Creating College Football Recruiting Database on AWS Athena

· 6 min read
Scottie Enriquez
Senior Solutions Developer at Amazon Web Services

About College Football Recruiting

Despite being played by amateur student-athletes, college football has become a multi-billion dollar industry. Most likely due to the emotional connection to an academic institution and the incredibly entertaining and volatile lack of parity and consistency amongst teams, college football fans tend to be even more diehard than their NFL counterparts, particularly in the South. Though college football is played by undergraduate and graduate students, players are scouted as recruits as early as middle school. These recruits are evaluated based on several factors that indicate their success at both the collegiate and professional levels of football. Whether physical attributes like height and weight or skill sets like blocking and catching, all of these attributes plus countless others are synthesized into a rating. Recruits are then offered by universities culminating in commitments and signings. A good recruiting class can be an indication of future success for a college football team provided that the coaching staff develops talents as expected.

Source Code

This repository is a set of Python and shell scripts to fetch and process publicly available data from 247 for non-commercial, personal data analysis use to be done using AWS Athena. It's co-authored by Callen Trail. As is the nature of web scrapers, the HTML parsing code is brittle. If the page structure changes on the site, the scripts will need to be modified. The process is split into three stages.

Stage One: Fetching Recruit Lists by Year

Players are scraped from the recruiting index page in the following format:

{
"247_id": "46038819",
"247_url": "https://247sports.com/Player/Bryan-Bresee-46038819",
"full_name": "Bryan Bresee",
"year": 2020,
"position": "DT",
"high_school": "Damascus",
"city": "Damascus",
"state": "MD",
"score": "0.9995",
"stars": 5,
"height_feet": 6.0,
"height_inches": 5.0,
"weight": 290.0
}

All Python dependencies are located in requirements.txt. To run, simple execute the command python scrape_recruit_list.py <START_YEAR> <END_YEAR>. This range dictates the volume of data captured by core logic of the script like so:

recruits_per_page = 50
year_range = range(int(sys.argv[1]), int(sys.argv[2]))
recruit_list_path = './recruit-lists'
for year in year_range:
recruit_list = []
number_of_pages_for_year = get_number_of_pages_for_year(year, recruits_per_page)
for page_index in range(1, number_of_pages_for_year + 1):
url = f'https://247sports.com/Season/{year}-Football/CompositeRecruitRankings/?page={page_index}'
print(emoji.emojize(f':rocket: Fetching: {url}'))
parse_page_of_recruits(url, recruit_list, year)
file_name = f'{recruit_list_path}/recruit-list-{year}.json'
with open(file_name, 'w') as output_file:
json.dump(recruit_list, output_file)
print(emoji.emojize(f':file_folder: Wrote {year} recruits to {file_name}'))

The script will generate a file for each year (i.e. recruit-list-2020.json) in the /recruit-lists directory. The files in this directory are treated as build output and ignored via the .gitignore. There's also some basic exception handling to insert default values for inconsistent or missing data.

Stage Two: Obtaining Ranking History and Recruiting Timeline Events

With a set of lists generated by stage one, the process_recruits.py script fetches and parses the complete ranking history and timeline of events (i.e. official visits, offers, etc.). To run, pass a recruiting list from stage one and the corresponding year to produce the files: python process_recruits.py 2020 recruit-lists/recruit-list-2020.json.

Recruit ranking histories are stored in the following path: /recruit-ranking-histories/{year}/{247_id}.json. For example, Bryan Bresee's path would be /recruit-ranking-histories/2020/46038819.json in the following format:

{
"247_id": "46038819",
"rating": 0.9995,
"rank": 1,
"change_date": "2020-01-31",
"delta": -0.0002,
"delta_inception": 0.0295
}

Recruiting timeline events are stored in the following path: /recruit-timeline-histories/{year}/{247_id}.json. For example, Bryan Bresee's path would be /recruit-timeline-histories/2020/46038819.json in the following format:

{
"247_id": "46038819",
"event_date": "2020-01-08",
"event_type": "Enrollment",
"event_description": "Bryan Bresee enrolls at Clemson Tigers",
"school": "Clemson"
}

Given the large amount of data to process during stage two, this repository also includes a bootstrapping shell script for EC2 instances to install the Python tooling, configure the virtual environment, and pull the data from stage one via S3. Pass the following to the user data field when provisioning a new EC2 instance:

#!/bin/bash
sudo yum install git -y
sudo yum install python3 -y
git clone https://github.com/scottenriquez/247-recruiting-ranking-history-scraper.git
cd 247-recruiting-ranking-history-scraper
mkdir recruit-lists
mkdir recruit-ranking-histories
mkdir recruit-timeline-histories
aws s3 cp s3://247-recruit-rankings-2010-2020/recruit-list/ recruit-lists --recursive
python3 -m venv env
source env/bin/activate
sudo pip3 install -r requirements.txt

Note that since S3 bucket names are globally unique, this will need to be changed for any other bucket. An IAM role with access to the target bucket must be attached to the EC2 instances as well.

Stage Three: Cleanup, Normalization, and Optimization

After the first two stages, there are three output directories containing data:

/recruit-lists now contains one file per year containing all recruits from that year.

/recruit-ranking-histories now contains subdirectories for each year storing an individual JSON file per recruit capturing ranking changes.

/recruit-timeline-histories now contains subdirectories for each year storing an individual JSON file per recruit capturing events like official visits.

There are also several utility scripts to apply additional transformations. The first of these is merge_utility.py which merges all recruit files in each of the top-level year directories into a single file. This can be easier to manage than handling the thousands of files generated by stages one and two depending on the use case. Specifically, it is more performant for Athena which prefers larger files (~100MBs is the sweet spot according to the AWS documentation) as opposed to a higher volume of files. To run, use the command python merge_utility.py <PATH_TO_DIRECTORY_WITH_FILES_TO_MERGE> <PATH_TO_OUTPUT_FILE>.

Both the recruiting history and event timeline scraping produced numerous duplicates. These data structure don't have a unique identifier (i.e. 247_id). duplicate_composite_utility.py creates a composite key by concatenating all fields together to detect duplicates and deletes accordingly:

def build_composite_key(data):
composite_key = ''
for key in data.keys():
composite_key += str(data[key])
return composite_key

To run, use the command python duplicate_composite_utility.py <PATH_TO_FILE_WITH_COMPOSITE_KEY>.

Numerous duplicate recruits exist after producing the recruit lists in stage one, so duplicate_utility.py can be run to clean a stage one output file in place: python duplicate_utility.py <PATH_TO_RECRUIT_LIST_FILE>.

Configuring AWS Athena

For this project, Athena is cheaper and simpler to stand up than a dedicated, relational database that would require additional ETL jobs or scripts to migrate from the JSON source files to tables. Athena uses serverless compute to query these raw files directly from S3 with ANSI SQL. After Athena and the Glue Data Catalog have been configured, SQL queries can be run against the datasets in-place. For example, this query computes when commits from the 2020 class were extended offers by the University of Texas at Austin:

select recruit.full_name, timeline.event_type, timeline.event_date, timeline.event_description
from timeline_events timeline
join recruit_list recruit on recruit."247_id" = timeline."247_id"
where timeline.event_type = 'Offer' and timeline.event_description like '%Texas Longhorns%' and recruit.year = 2020
order by event_date desc

Azure DevOps CI/CD Pipeline for an AWS Lambda Node.js Function

· 9 min read

Overview

This project serves as an end-to-end working example for testing, building, linting, and deploying an AWS Lambda Node.js function to multiple environments using AWS CloudFormation, Azure Pipelines, and Azure DevOps. The complete source code is located in this GitHub repository, and the build output is publicly available via Azure DevOps.

Setting Up a Git Repository

Even though I'm using Azure Pipelines for CI/CD instead of Travis CI, you can easily host the code in a Git repository on Azure DevOps or GitHub. Microsoft's GitHub integration is seamless, so there's no reason not to use it should you choose to host your source code there. All features like pull request integration and showing build status alongside each commit on GitHub behave exactly like Travis CI. To enable GitHub integration, simply navigate to the Azure DevOps project settings tab, select 'GitHub connections', then follow the wizard to link the repository of your choice.

Creating an NPM Project for the Lambda Function

A simple npm init command will create the package.json file and populate relevant metadata for the Lambda function. All dependencies and development dependencies are documented there.

Implementing a Sample Lambda Function

In the root of the project, there's a file called index.js with the Lambda function logic. For this example, the handler function simply returns a 200 status code with a serialized JSON body.

index.js
exports.handler = async event => ({
statusCode: 200,
body: JSON.stringify("Hello from Lambda!"),
})

Adding Unit Tests and Code Coverage

First, install a few development dependencies using the command npm install --save-dev mocha chai nyc. I've added a unit test in the file test/handler.test.js:

test/handler.test.js
const mocha = require("mocha")
const chai = require("chai")
const index = require("../index")

const { expect } = chai
const { describe } = mocha
const { it } = mocha

describe("Handler", async () => {
describe("#handler()", async () => {
it("should return a 200 response with a body greeting the user from Lambda ", async () => {
const expectedResponse = {
statusCode: 200,
body: JSON.stringify("Hello from Lambda!"),
}
const actualResponse = await index.handler(null)
expect(actualResponse).to.deep.equal(expectedResponse)
})
})
})

To configure code coverage rules for the CI/CD pipeline, add a .nycrc (Istanbul configuration) file to the root of the project. For this example, I've specified 80% across branches (i.e. if statement paths), lines, functions, and statements. You can also whitelist files to apply code coverage rules with the include attribute.

.nycrc
{
"branches": 80,
"lines": 80,
"functions": 80,
"statements": 80,
"check-coverage": true,
"all": true,
"include": ["**.js"]
}

With this in place, wire up everything in the package.json with the proper test command:

package.json
...
"scripts": {
"test": "nyc --reporter=text mocha"
},
...

You can verify that everything is configured correctly by running npm test to view unit testing results and code coverage reports.

Configuring Code Linting and Styling

It's important to think of linting and styling as two separate entities. Linting is part of the CI/CD pipeline and serves as static code analysis. This provides feedback on the code that could potentially cause bugs and should cause a failure in the pipeline if issues are found. Styling, on the other hand, is opinionated and provides readability and consistency across the codebase. However, it may not be part of build pipeline itself (i.e. causing the build to fail if a style rule is violated) and should be run locally prior to a commit.

For configuring ESLint, I used @wesbos' configuration as a base using the command npx install-peerdeps --dev eslint-config-wesbos. Detailed instructions can be found in his README. This makes the .eslintrc config in the root quite clean:

.eslintrc
{
"extends": ["wesbos"]
}

Given that code styling is quite opinionated, I won't inject any biases here. To install Prettier, use the command npm install prettier and add .prettierrc and .prettierignore files to the root.

With this in place, you can add linting and Prettier commands to the package.json:

package.json
...
"scripts": {
"lint": "eslint .",
"lint:fix": "eslint . --fix",
"format": "prettier --write \"**/*.{js,jsx,json,md}\""
},
...

Though there is no configuration managed in this repository for code styling, note that you can enable an IDE like Visual Studio Code or JetBrains' WebStorm to apply styling rules upon saving a file.

Enabling Continuous Integration Using Azure Pipelines

Via the Azure DevOps web UI, you can directly commit an initial azure-pipelines.yml file to the root of the repository and configure the trigger (i.e. commits). Once the NPM scripts are properly set up like above, the build stage can be configured to install dependencies, run unit tests, and handle linting in a few lines of code. Note that I've added an archive step because Lambda functions are deployed as ZIP files later in the pipeline.

azure-pipelines.yml
stages:
- stage: Build
jobs:
- job: BuildLambdaFunction
pool:
vmImage: "ubuntu-latest"
continueOnError: false
steps:
- task: NodeTool@0
inputs:
versionSpec: "12.x"
displayName: "Install Node.js"
- script: |
npm install
npm run lint
npm test
displayName: "NPM install, lint, and test"
- task: ArchiveFiles@2
inputs:
rootFolderOrFile: "$(Build.SourcesDirectory)"
includeRootFolder: true
archiveType: "zip"
archiveFile: "$(Build.ArtifactStagingDirectory)/LambdaBuild.zip"
replaceExistingArchive: true
verbose: true

For now, there is only one stage in the pipeline, but additional stages will be managed in the same YAML file later. The code above spins up a Linux virtual machine, installs Node.js version 12.x, installs the dependencies specified in the package.json file, runs ESLint, and finally runs the unit tests. The logs are made available via Azure DevOps, and the virtual machine is destroyed after the build is complete. If an error occurs at any point (i.e lint issue, failed unit test, etc.), the build does not continue.

Configuring Local Azure Pipeline Builds

As indicated by the nomenclature, Azure Pipelines run in the cloud. It's worth noting that it is possible to host your own build agents if you so choose. Setting it up does take quite a bit of configuration, so for this project, I opted to use the cloud-hosted agent instead. Microsoft has extensive documentation for setting this up, and I've included the Dockerfile in the dockeragent/ directory.

Enabling Infrastructure as Code Using AWS CloudFormation

One of the core goals of this project is to create a complete solution with everything from the source code to the build pipeline and cloud infrastructure managed under source control. CloudFormation is a technology from AWS that allows engineers to specify solution infrastructure as JSON or YAML. For this solution, I specified a Lambda function and an IAM role. Note that the build artifact will be sourced from an additional S3 staging bucket not detailed in the CloudFormation template.

cloudformation-stack.json
{
"AWSTemplateFormatVersion": "2010-09-09",
"Resources": {
"IAMLambdaRole": {
"Type": "AWS::IAM::Role",
"Properties": {
"AssumeRolePolicyDocument": {
"Version": "2012-10-17",
"Statement": [
{
"Effect": "Allow",
"Principal": {
"Service": ["lambda.amazonaws.com"]
},
"Action": ["sts:AssumeRole"]
}
]
}
}
},
"LambdaFunction": {
"Type": "AWS::Lambda::Function",
"Properties": {
"Code": {
"S3Bucket": "azdo-staging-s3-bucket",
"S3Key": "build.zip"
},
"Handler": "index.handler",
"Runtime": "nodejs12.x",
"Role": {
"Fn::GetAtt": ["IAMLambdaRole", "Arn"]
}
},
"DependsOn": ["IAMLambdaRole"]
}
}
}

With this file in hand, creating and/or updating the infrastructure can be done via the command line using the AWS CLI. After generating an access key and secret key, the CLI can be installed and configured with a few commands. Note that I have specified the commands for Ubuntu (apt-get package manager) since that's the virtual machine image that was specified in the Azure Pipelines YAML.

sudo apt-get install awscli
aws configure set aws_access_key_id $(AWS_ACCESS_KEY_ID)
aws configure set aws_secret_access_key $(AWS_SECRET_KEY_ID)
aws configure set aws_default_region $(AWS_DEFAULT_REGION)

These keys should be treated as a username/password combination. Do not expose them in any public source code repositories or build logs. They should always be stored as secure environment variables in the build pipeline. Azure DevOps will always hide secure environment variables even in public project logs.

After the CLI has been configured, the aws cloudformation deploy command will create or update the infrastructure specified in the template. I recommend testing this command locally before including it in the build pipeline.

Enabling Multi-Stage and Multi-Environment Continuous Deployments

With the ability to deploy cloud infrastructure, the build pipeline can now be a full CI/CD one. In the Azure DevOps UI, environments can be created via the project settings. For this project, I created development, test, and production. These will be referenced in the Azure Pipelines YAML script and capture a history of which build deployed which artifact to the corresponding environment.

Another stage can be added to the YAML script that depends on a successful build:

azure-pipelines.yml
- stage: DevelopmentDeployment
dependsOn: Build
jobs:
- deployment: LambdaDevelopment
pool:
vmImage: "ubuntu-latest"
environment: "Development"
strategy:
runOnce:
deploy:
steps:
- script: |
sudo apt-get install awscli
aws configure set aws_access_key_id $(AWS_ACCESS_KEY_ID)
aws configure set aws_secret_access_key $(AWS_SECRET_KEY_ID)
aws configure set aws_default_region $(AWS_DEFAULT_REGION)
displayName: "install and configure AWS CLI"
- script: |
aws s3 cp $(Pipeline.Workspace)/LambdaBuild/s/$(AWS_CLOUDFORMATION_TEMPLATE_FILE_NAME) s3://$(AWS_S3_STAGING_BUCKET_NAME)
aws s3 cp $(Pipeline.Workspace)/LambdaBuild/a/LambdaBuild.zip s3://$(AWS_S3_STAGING_BUCKET_NAME)
displayName: "upload CloudFormation template and Lambda function ZIP build to staging bucket"
- script: |
aws cloudformation deploy --stack-name $(AWS_STACK_NAME_DEVELOPMENT) --template-file $(Pipeline.Workspace)/LambdaBuild/s/$(AWS_CLOUDFORMATION_TEMPLATE_FILE_NAME) --tags Environment=Development --capabilities CAPABILITY_NAMED_IAM --no-fail-on-empty-changeset
displayName: "updating CloudFormation stack"

Note that I have parameterized certain inputs (i.e. $(AWS_ACCESS_KEY_ID)) as build environment variables to be reusable and secure. Again, these are managed via settings in Azure DevOps and not committed to source control.

A Note on Sharing Files Among Pipeline Stages

Because each stage in the Azure Pipeline spins up a separate virtual machine, files such as the build artifact are not immediately accessible between build stages. In the build stage, a task can be added to publish a pipeline artifact (accessible via the path $(Pipeline.Workspace) path) that can be shared between stages.

azure-pipelines.yml
- task: PublishPipelineArtifact@1
inputs:
targetPath: "$(Pipeline.Workspace)"
artifact: "LambdaBuild"
publishLocation: "pipeline"

Security Checks

Most organizations will require some sort of human approval before migrating to production. This can be configured via Azure DevOps at an environment level. From the web UI, each environment can be configured with separate approvers. For this project, I have configured it so that only production requires approval.

Limiting Production Deployments to the Master Branch Only

As part of a continuous deployment implementation, production migrations should happen every time that the master branch is updated via a pull request. However, all branches should still be privy to the CI/CD benefits. In the Azure Pipelines YAML script, the production stage can be configured to be skipped if the source branch is not master:

azure-pipelines.yml
- stage: ProductionDeployment
condition: and(succeeded(), eq(variables['build.sourceBranch'], 'refs/heads/master'))
dependsOn: TestDeployment

This prevents developers from having to manually reject or skip releases from non-master branches that should never go to production.

Building a React Widget for Mendix 8

· 4 min read
Scottie Enriquez
Senior Solutions Developer at Amazon Web Services

Use Case, Source Code, and Demo Site

For a weekend project, I wanted to build a nontrivial Mendix widget that required additional NPM packages, interacted with entity attributes, and had internal React state not managed by Mendix entities. Having just used the Ace editor to build a querying environment for my fantasy football league's databases and views, I thought building similar functionality in a Mendix application would be an excellent fit.

The source code is hosted on GitHub. I've also included the final .mpk file (version 1.0.2) as well. The demo site can be found here.

Prerequisites

Before getting started, you'll need the following installed on your development machine:

  • Node.js and NPM
  • Yeoman
  • Visual Studio Code, WebStorm, or a JavaScript/TypeScript IDE
  • Mendix Studio Pro

Since Mendix Studio Pro can only be run on Windows, it's easiest to install the tools above there as well.

Preparing Your Development Environment

While you can write unit tests for your React components and run via the command line, it's very helpful to test your widget in a real Mendix project as well. Start by creating a blank app, stripping out all existing plugins, and create a folder called /CustomWidgets in the /widgets folder of your newly created Mendix project. Note that you can create a Git repository in this nested directory for versioning your widget code independently of your Mendix project.

You can generate the skeleton for a Mendix widget using a single command npm install @mendix/generator-widget -g. The Yeoman template walks through numerous options including:

  • TypeScript or JavaScript
  • Web and hybrid or native phone
  • Unit tests, end-to-end tests, or none

To build your widget, simply use the command npm run dev or npm run build. Note that you have to sync the local project directory in Mendix Studio Pro manually by pressing F4 as well.

Managing Dependent Attributes and Generating TypeScript Definitions

To create any sort of stateful widget, we need to be able to interact with attributes from our entities. When the widget is scaffolded, an XML file is created in /src that allows us to do this. In the root, numerous attributes allow us to express our intentions such as needsEntityContent and offlineCapable. You can also add property tags to designated specific entity attributes required for the widget to function. For example, in the editor widget, the code itself is a required attribute. If you chose TypeScript, the definition file will be generated for you and stored in /typings when you run the build command.

Managing Widget NPM Dependencies

The Yeoman scaffolding creates all widget builds as well. Because of this, adding new dependencies (i.e. the Ace editor) is as simple as another NPM install command: npm i --save react-ace. Just like any other Node project, all required packages are documented in the package.json.

Accessing Common Widget Properties

When editing a widget in Mendix Studio Pro, there are a set of common properties that can be passed to widget such as an HTML class, CSS style, and tab index. These are passed to your root component and are accessible out-of-the-box as React props (i.e. this.props.class). This allows your widget to utilize the properties in the underlying JSX or TSX in whatever way makes the most sense. Mendix common properties

If you elected to use TypeScript, an interface is generated for you as well.

interface CommonProps {
name: string
class: string
style?: CSSProperties
tabIndex: number
}

Building the Editor Component

The code for the Editor component is standard React. Ultimately, this component could be easily used in a totally different application on a totally different platform. Mendix AceEditor component screenshot

Deploying the Widget

Running the npm run release produces an MPK file in the /dist folder that can be uploaded easily to the App Store.

Microsoft Ignite 2019

· 5 min read
Scottie Enriquez
Senior Solutions Developer at Amazon Web Services

Contents

  • .NET 5: The Future
  • Unique Azure Functions Features
  • Microsoft Edge Chromium
  • .NET Support for Jupyter Notebooks

.NET 5: The Future

.NET Core 3.1 will be released in December 2019 as a minor release focusing on enhancements to Blazor and desktop development. As for a .NET roadmap, Scott Hanselman and Scott Hunter also mentioned that there will not be a .NET Core 4.x release. The underlying idea is that it would collide with the well-known 4.x .NET Framework versions that still have widespread production use to this day. Starting in November 2020, there will no longer be .NET Core or Framework, but instead, they will merge into a unified platform simply known as .NET 5. Each November a new major version of .NET will be released (i.e. .NET 6 in 2021, .NET 7 in 2022, etc.).

The message around .NET Framework versus .NET Core remains the same: there's not an imperative need to migrate all .NET Framework projects to .NET Core, however, .NET Framework should not be used for any new projects going forward. Windows will continue to ship with .NET Framework, and .NET Core continues to expand its self-contained offerings (i.e. .NET Core 3.0 adding the ability to build an executable with the runtime included).

Unique Azure Function Features

My expertise is in AWS, so I figured that I'd note a couple of key features that Azure Functions offer in the serverless space not available in Lambda. The first is the ability to deploy containers as serverless functions. While you can create similar functionality using Fargate, it's awesome to see this function built into Microsoft's serverless offering.

It's easy to stand up a new Azure Function with full Docker support in just a few minutes. Start by installing the Azure Functions CLI tools via NPM with the command npm install -g azure-functions-core-tools and creating a function with Docker support using func init --docker --force. The latter command will create a new .NET project as well as a Dockerfile. Run func new to select from a list of starter templates for your new Azure Function. You now have a scaffolded function for a number of use cases such as an HTTP trigger, CosmosDB trigger, or Event Grid trigger.

We're now ready to build and run using the CLI by using: func start --build. Note that you can also use typical Docker commands: docker build -t azure-func-demo . and docker run -p 8080:80 -it ignite-azure-func. You can verify that the function is running by navigating to the homepage at http://localhost:7071 (or whichever port you've specified).

Once you've implemented your logic and pushed the image to DockerHub (i.e. docker push) or any other container registry, you can then deploy the container using the Azure CLI: az functionapp create --name APP_NAME … --deployment-container-image-name DOCKER_ID/DOCKER_IMAGE.

The other feature that sets Azure Functions apart from AWS Lambda is the new Premium plan that's currently in preview. This allows you to have a specified number of pre-warmed instances for your serverless function. One of the key drawbacks of using serverless functions in any architecture is the performance hit from cold starts. Cold starts occur when the serverless function hasn't been run in some time and thus there is the additional latency of loading your function onto the underlying infrastructure. With pre-warmed instances, you can reap the performance of PaaS solutions with a serverless architecture.

Microsoft Edge Chromium

I downloaded the new Microsoft Edge on my MacBook Pro and have been using it as my default browser for the past week during the conference. I never thought I'd say those words in a million years.

As Satya Nadella mentioned in his keynote, Microsoft Edge Beta 79 was released on November 4th, 2019. This is the release candidate before it comes to the general public in January 2020. There are currently three channels that you can subscribe to: canary (daily builds), development (weekly builds), or beta (builds every six weeks). What makes this so significant to the web development community is that its build on the Chromium engine. After millions and millions of lines of code have collectively been written to handle Internet Explorer's quirks and create consistent, cross-browser builds, we're finally here.

From an enterprise perspective, this is game-changing for developers. Internet Explorer has persisted due to it being the de facto Windows standard browser. Many large companies like mine require that our websites be compatible with a version of Internet Explorer as the lowest common denominator. In addition to a Chromium-based browser now taking its place, Edge also provides a compatibility mode that allows legacy sites to seamlessly work alongside all of the latest advancements of the web. No additional code changes are required for now.

I have to confess that I'm extremely impressed with it. The user experience is quite smooth. I'm a huge fan of the privacy features that allow for strict tracking prevention out of the box. In terms of addons and extensions, the list is small but growing. There's support for some of the biggest names like uBlock Origin, but more importantly, you can add extensions from the Google Chrome store as well. I added the React extension with no issues. As for the developer tools, they're just like Google Chrome's. No longer do I have to fumble through the clunky performance and UI of Internet Explorer's developer console whenever some obscure issue pops up.

Last but not least, the Touch Bar support for MacBook is quite solid as well. I'm a huge fan of the way that they've utilized the real estate by having each tab's favicon be a button that switches to it.

.NET Support for Jupyter Notebooks

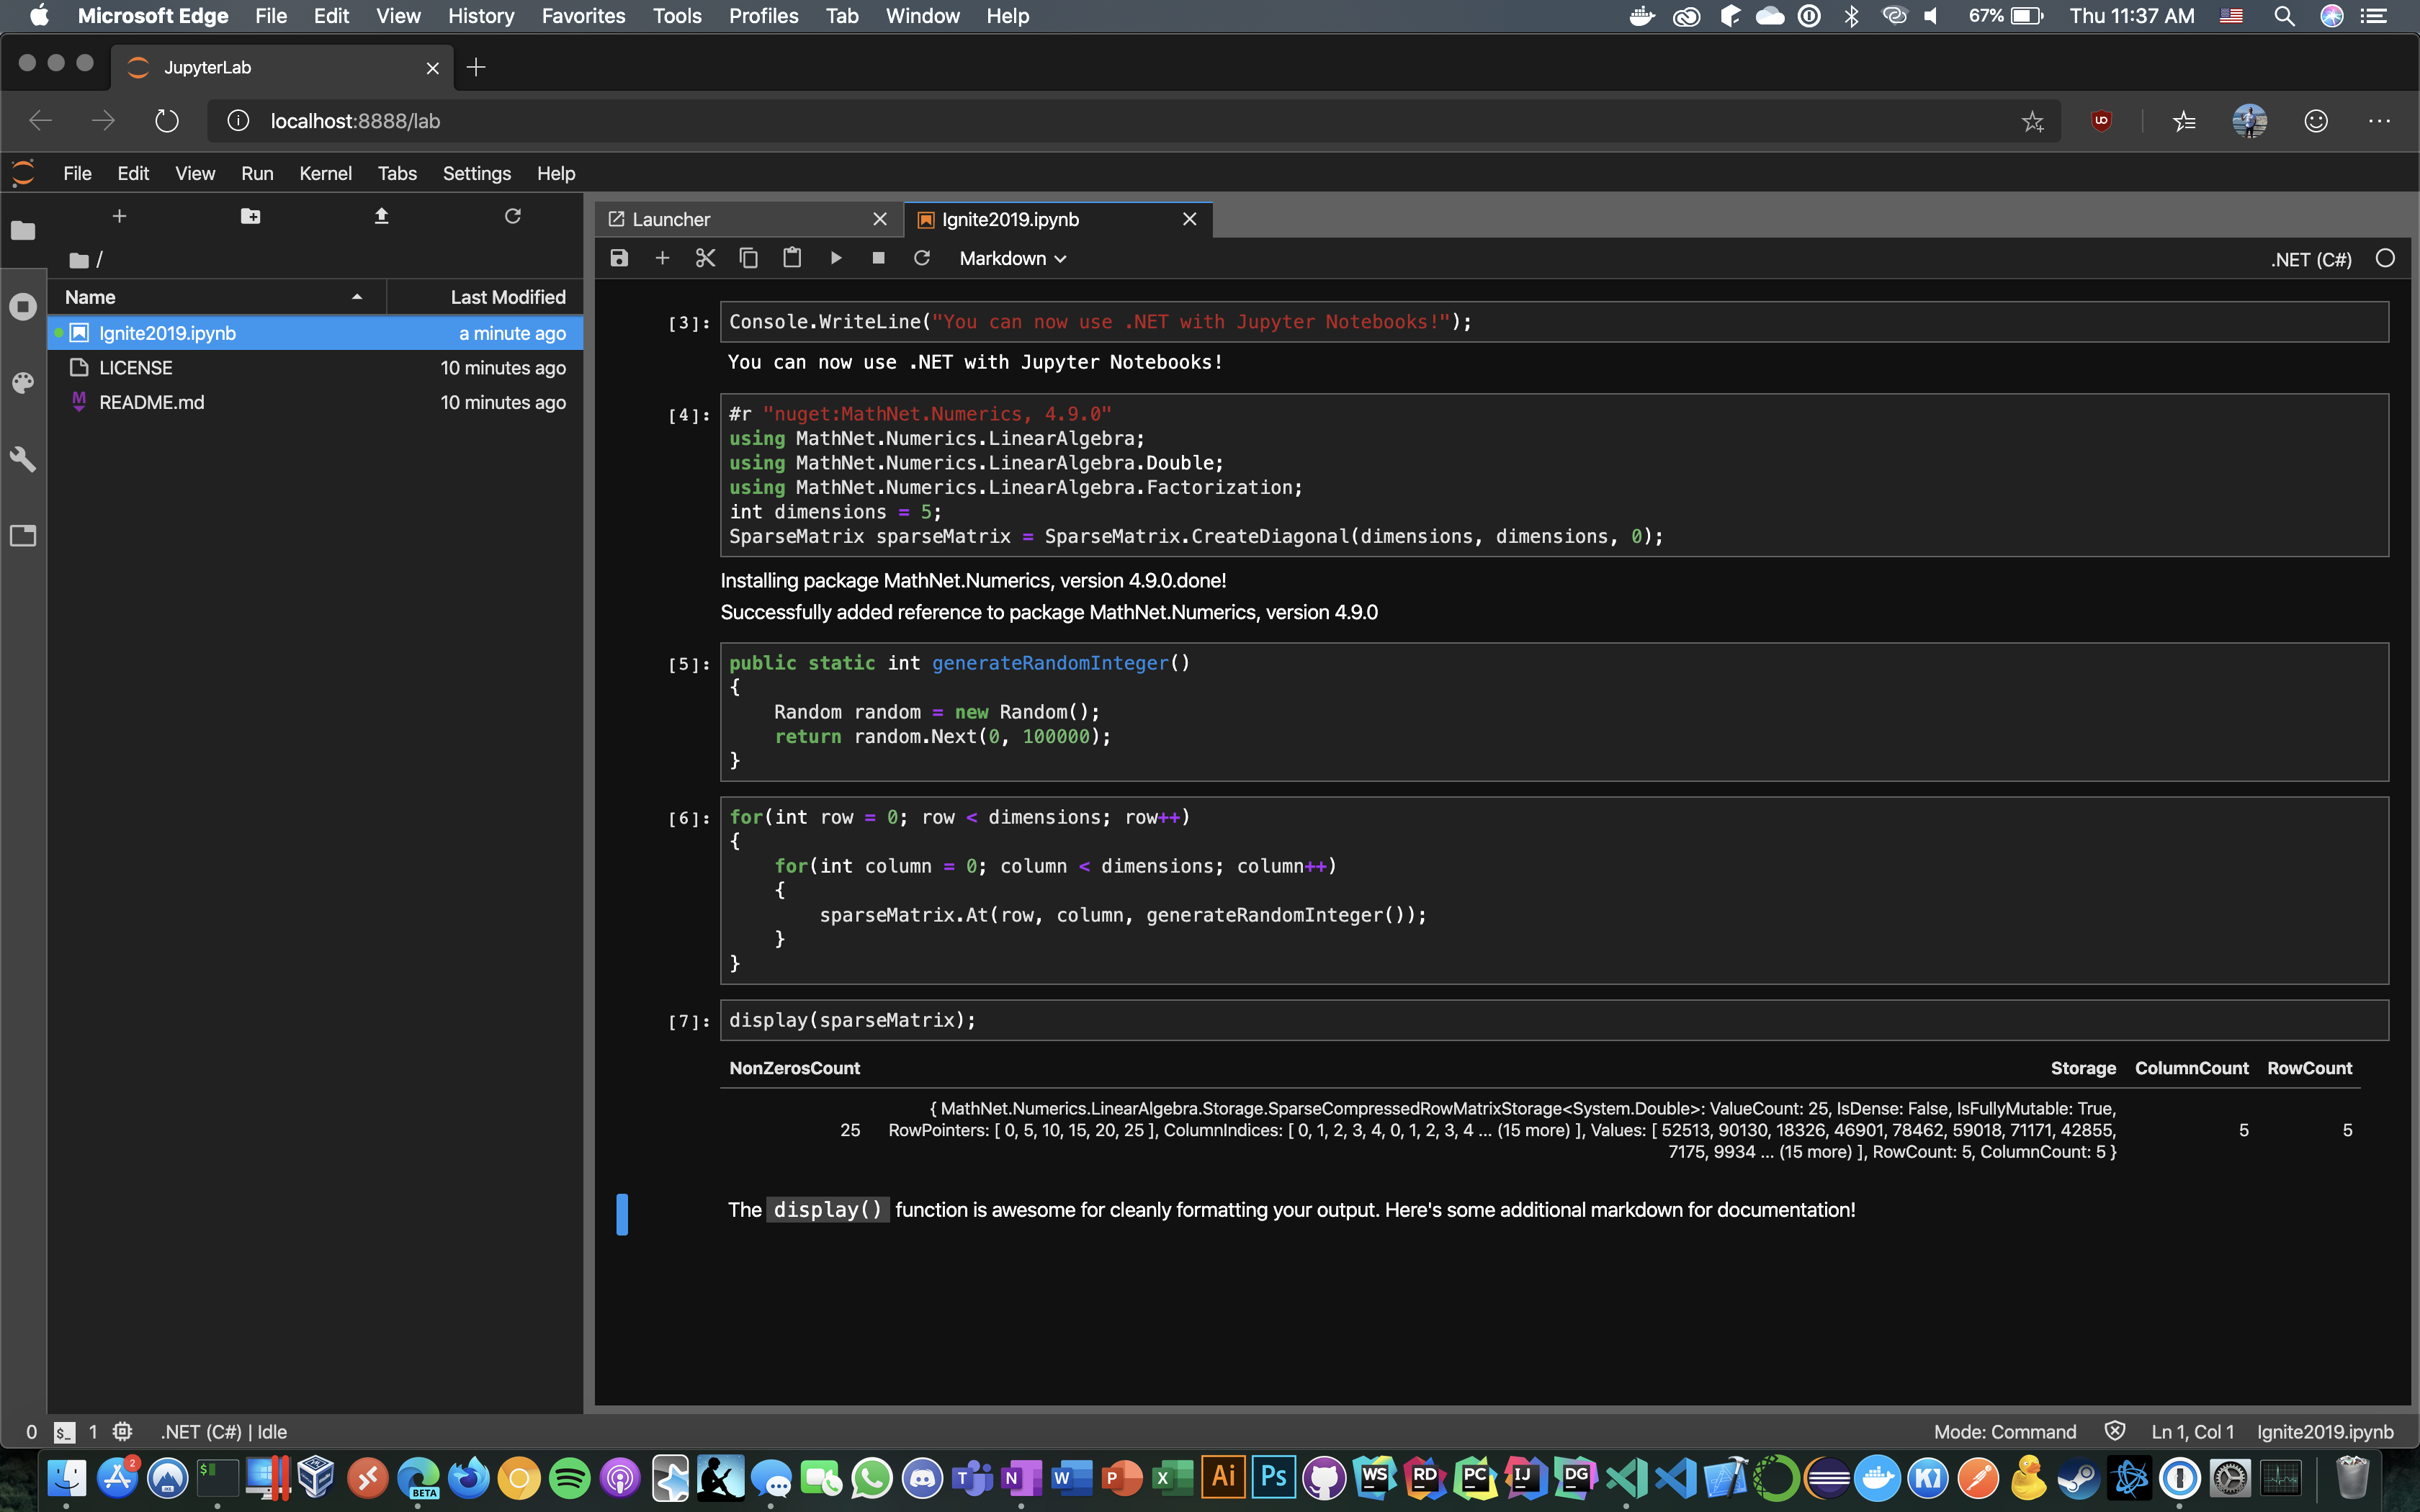
Jupyter for .NET

.NET now supports Jupyter which allows for code sharing, documentation, and reporting opportunities. In addition to running .NET code, it even supports fetching external dependencies via NuGet on the fly.

Visual Studio Live 2019: San Diego

· 13 min read
Scottie Enriquez
Senior Solutions Developer at Amazon Web Services

Contents

Visual Studio Live in San Diego was an amazing opportunity to learn about new Microsoft technology like Azure's artificial intelligence offerings and .NET Core 3.0. I attended some talks about leadership and Agile as well. I've put together several proofs of concept and documented what I learned about:

  • Azure Cognitive Services
  • ASP.NET Core Health Checks and Startup.cs Inline Endpoints
  • .NET Core CLI Tooling for AWS Lambda
  • .NET Core 3.0 Linux Worker with systemd Integration
  • Windows Subsystem for Linux 2 and Windows Terminal
  • The Dynamics of a Healthy Team
  • Goodhart's Law and the Hawthorne Effect

Azure Cognitive Services

The keynote this year was AI for the Rest of Us and was delivered by Damian Brady. One of the core themes of the talk is that artificial intelligence and machine learning has become infinitely more accessible to programmers. Cloud providers have made their algorithms and statistical models available via easily consumable RESTful services. Much of the talk centered around a sample web application that consumed Azure's out-of-the-box computer vision and translation services to manage a company's inventory. One feature was identifying an item in a picture returned to a warehouse. Another was translating foreign customer reviews to English and analyzing their sentiment.

I decided to put together a couple of quick demos and was truly amazed with the results. In about 20 lines of Python 3 code and 10 minutes, I was able to read text from an image on a whiteboard. You can find a pipenv-enabled demo here.

main.py
subscription_key = os.environ['COMPUTER_VISION_SUBSCRIPTION_KEY']
endpoint = os.environ['COMPUTER_VISION_ENDPOINT']
computervision_client = ComputerVisionClient(endpoint, CognitiveServicesCredentials(subscription_key))
remote_image_printed_text_url = 'https://scottie-io.s3.amazonaws.com/vslive-whiteboard.jpg'
recognize_printed_results = computervision_client.batch_read_file(remote_image_printed_text_url, raw=True)
operation_location_remote = recognize_printed_results.headers["Operation-Location"]
operation_id = operation_location_remote.split("/")[-1]
while True:
get_printed_text_results = computervision_client.get_read_operation_result(operation_id)
if get_printed_text_results.status not in ['NotStarted', 'Running']:
break
time.sleep(1)
if get_printed_text_results.status == TextOperationStatusCodes.succeeded:
for text_result in get_printed_text_results.recognition_results:
for line in text_result.lines:
print(line.text)
print(line.bounding_box)

In about 10 lines of C# using .NET Core 3.0, I was able to detect the language and sentiment of generic text. You can find the full code here.

text-analytics/Program.cs
string textToAnalyze = "今年最強クラスの台風が週末3連休を直撃か...影響とその対策は?";
ApiKeyServiceClientCredentials credentials = new ApiKeyServiceClientCredentials(subscriptionKey);
TextAnalyticsClient client = new TextAnalyticsClient(credentials)
{
Endpoint = endpoint
};
OutputEncoding = System.Text.Encoding.UTF8;
LanguageResult languageResult = client.DetectLanguage(textToAnalyze);
Console.WriteLine($"Language: {languageResult.DetectedLanguages[0].Name}");
SentimentResult sentimentResult = client.Sentiment(textToAnalyze, languageResult.DetectedLanguages[0].Iso6391Name);
Console.WriteLine($"Sentiment Score: {sentimentResult.Score:0.00}");

These are features that I would have previously told clients were completely out of the question given the complex mathematics and large data set required to train the models. Developers can now reap the benefits of machine learning with virtually no knowledge of statistics.

ASP.NET Core Health Checks and Inline Endpoints

.NET Core now supports built-in service health checks that can be easily configured in Startup.cs with a couple of lines of code.

public class Startup
{
public void ConfigureServices(IServiceCollection services)
{
services.AddHealthChecks();
}

public void Configure(IApplicationBuilder app)
{
app.UseRouting();
app.UseEndpoints(endpoints =>
{
endpoints.MapHealthChecks("/health");
});
}
}

This creates a /health endpoint that returns an HTTP status code and brief message indicating whether or not the API is available and can process requests. This is ideal for integrating with load balancers, container orchestrators, and reports. If the default checks don't suffice for your needs, you can also create custom health check by implementing the IHealthCheck interface and registering it. Be aware that health checks are intended to be able to run quickly, so if the custom health check has to open connections with other systems or perform lengthy I/O, the polling cycle needs to account for that.

public class MyHealthCheck : IHealthCheck
{
public Task CheckHealthAsync(
HealthCheckContext context,
CancellationToken cancellationToken = default(CancellationToken))
{
return Task.FromResult(HealthCheckResult.Healthy("A healthy result."));
}
}

You can also create simple HTTP endpoints inline in Startup.cs without creating an API controller class in addition to registering API controllers normally.

app.UseEndpoints(endpoints =>
{
endpoints.MapControllers();
endpoints.Map("/startup", context =>
{
return context.Response.WriteAsync("This is from Startup.cs");
});
endpoints.MapHealthChecks("/health");
});

Find the complete source code here.

.NET Core CLI Tooling for AWS Lambda

AWS has built extensive CLI tooling and templating for building .NET Core serverless functions on Lambda. Assuming you have .NET Core installed and added to your PATH, you can run dotnet new -i Amazon.Lambda.Templates to install the Lambda templates and dotnet tool install -g Amazon.Lambda.Tools to install the Lambda tools. With a few commands, you can have a brand new .NET Core serverless function created, deployed to AWS, and invoke the function from the command line.

#!/usr/env/bin bash
# create a new serverless function from the Lambda template
dotnet new lambda.EmptyFunction --name MyFunction
# validate that the skeleton builds and initial unit tests pass
dotnet test MyFunction/test/MyFunction.Tests/MyFunction.Tests.csproj
# navigate to the project directory
cd MyFunction/src/MyFunction
# deploy function to AWS
dotnet lambda deploy-function MyFunction --function-role role
# validate that the Lambda function was properly created
dotnet lambda invoke-function MyFunction --payload "Hello, world!"

.NET Core 3.0 Linux Worker with systemd Integration

When I first wrote my first line of C# code back in 2012 as a young intern, .NET Core didn’t exist yet. At the time, .NET hadn't been open-sourced yet either. While powerful, .NET Framework was monolithic and only ran on Windows natively. Throughout college, I used Ubuntu and macOS and hadn't touched a Windows machine in years except for gaming. As a student, I fell in love with shells and preferred CLIs over cumbersome IDEs. While I remained a Unix enthusiast at home (macOS, Debian, and Manjaro), I felt that there was such a clear divide between this enterprise tool and the up-and-coming juggernaut in Node.js that was beginning to eat the server-side market share in an explosion of microscopic NPM packages.

Though I grew to love the crisp C# syntax and bundles of functionality in .NET Framework, .NET Core made me fall in love again. The first time that I wrote dotnet build and dotnet run on macOS was such a strange feeling. Even though Mono brought the CLR to Linux many years ago, being able to compile and run C# code on the .NET runtime out of the box was so satisfying. Sometimes, it still blows me away that I have a fully fledged .NET IDE in JetBrains' Rider running on my Debian box. All this to say, Microsoft's commitment to Linux makes me excited for the future.

At Visual Studio Live this year, one of the new features discussed is systemd integration on Linux, which is analogous to writing Windows Services. The thought of writing a systemd service using .NET Core 3.0 (which was just released a few days ago) was pretty exciting, so I put together a fully functional example project to capture and log internet download speeds every minute.

I started by using the worker service template included in both Visual Studio and Rider. Configuring for systemd only requires one chained call: .UseSystemd(). It's worth noting that this still allows you to build and run using the CLI (i.e. dotnet run) without being integrated with systemd.

src/SpeedTestWorkerService/SpeedTestWorkerService/Program.cs
public static IHostBuilder CreateHostBuilder(string[] args) =>
Host.CreateDefaultBuilder(args)
.UseSystemd()
.ConfigureServices((hostContext, services) => { services.AddHostedService(); });

The Worker executes the given task until a cancellation token is received. I made a few modifications to the starter template such as changing the Task.Delay() millisecond parameter and implementing the speed test logic. Note that _logger is the dependency injected logging service.

src/SpeedTestWorkerService/SpeedTestWorkerService/Worker.cs
protected override async Task ExecuteAsync(CancellationToken stoppingToken)
{
while (!stoppingToken.IsCancellationRequested)
{
SpeedTestClient speedTestClient = new SpeedTestClient();
Settings settings = speedTestClient.GetSettings();
Server bestServer = settings.Servers[0];
_logger.LogInformation("Server name: " + bestServer.Name);
double downloadSpeed = speedTestClient.TestDownloadSpeed(bestServer);
_logger.LogInformation("Download speed (kbps): " + downloadSpeed);
await Task.Delay(60000, stoppingToken);
}
}

I also implemented a simple deployment script to migrate the .service file to the correct folder for systemd, map the executable, and start the service. The rest is handled by .NET Core.

#!/usr/env/bin bash
dotnet build
dotnet publish -c Release -r linux-x64 --self-contained true
sudo cp speedtest.service /etc/systemd/system/speedtest.service
sudo systemctl daemon-reload
sudo systemctl start speedtest.service

Windows Subsystem for Linux 2 and Windows Terminal

Though many of the talks at Visual Studio Live utilized Linux environments in Azure and AWS, none of the presenters developed in Linux during their demos. Instead they used WSL2 with Windows Terminal. In the latest Insiders build of Windows 10 (build 18917 or higher), Microsoft has shipped a Linux kernel too. This kernel has been specifically tuned for WSL2 and the performance is extremely solid. You can now also install various distros (i.e. Debian, Ubuntu) from the Microsoft Store and interact with them via a CLI.

You can also combine this with a preview of the new Windows Terminal. Which allows you to have multiple tabs running command lines for various environments simultaneously (i.e. PowerShell, Linux, etc.). You can even modify files on your Linux file system with Visual Studio code via a nifty plugin.
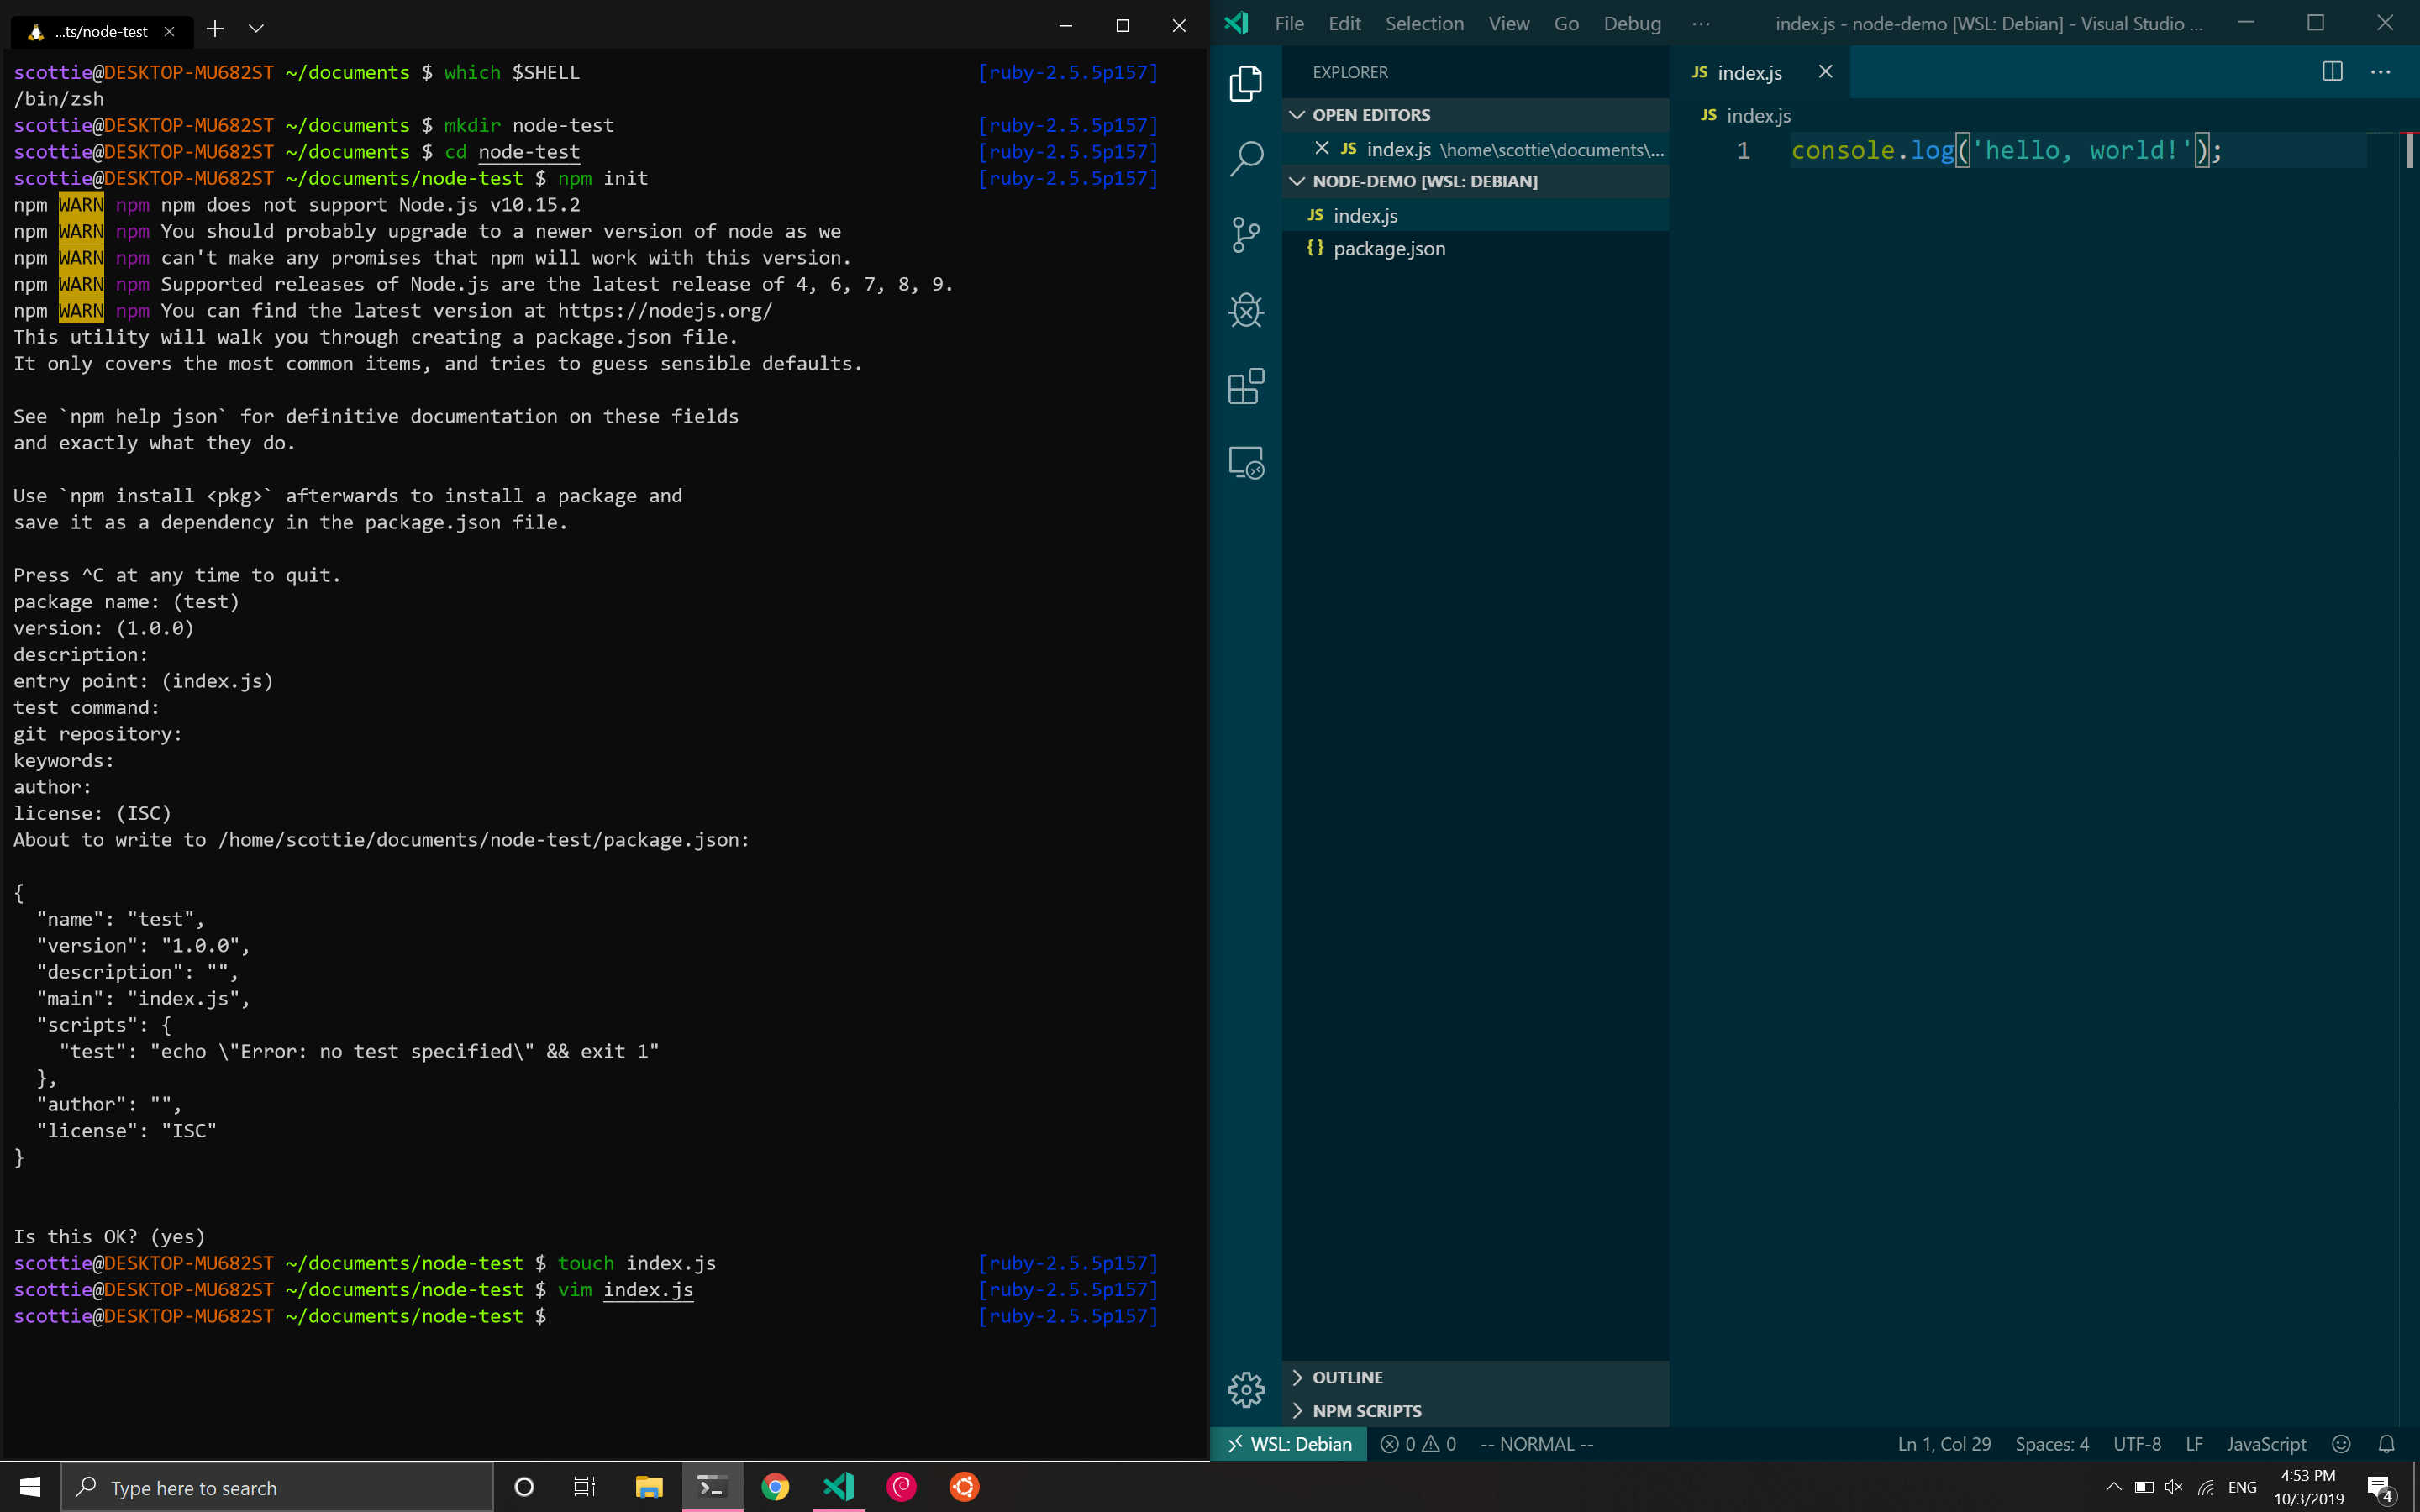
WSL

I installed Debian 10 plus my usual Linux tools like Vim and Zsh and found that the performance and usability were solid. I even went as far as to install and use some tools that aren't easy to use on Windows like Docker. I was able to run containers without any performance issues. Though all of these features and tools are still in preview, it shows Microsoft's commitment to Linux going forward. It also makes software development on Windows a lot more appealing in my opinion given that the majority of cloud infrastructure runs Linux.

The Dynamics of a Healthy Team

Though there were numerous exciting technical sessions throughout the week, some of my most valuable takeaways from the conference came from Angela Dugan's talks about leadership and metrics. Many of her points echoed much of the reading that I've done since transitioning to leadership about a year ago.

The first takeaway is that as leaders we need to find ways to create more continuous collaboration. According to quantitative surveys and informal discussion, one common complaint is that my team's developers often work alone on projects. While they often collaborate with business analysts and solution integrators outside of our team, it's quite common for us to only have the bandwidth to assign one software developer given their supply and demand. A recurring theme from the conference talks and Certified Scrum Master training is that cohesion and chemistry comes from the same team working on different projects.

One way to help achieve this goal is to decrease the number of simultaneous projects (i.e. works-in-progress) assigned to a developer. Admittedly, this is an area that I've fallen short in as a leader. In terms of resource planning, trying to make ends meet feels like a game of Tetris. It's difficult to prevent and manage an extensive buildup of backlog items, but managing client relations and expectations is even harder. For the sake of business satisfaction, we'll often compromise by dividing a developer's time between multiple efforts so that the clients feel that they're getting a timely response time. However, the taxes of context switching negate the benefits of being able to focus on one project at a time. Fundamentally, this is analogous to the divide and conquer principle in computer science. Even the smartest humans are bad at multitasking.

The final takeaway I had was that it's not enough to merely identify cultural and personality differences. My team has taken multiple personality tests to understand how we all view the world differently. As a company, we've hosted numerous multicultural events to understand how culture impacts our work (see Outliers by Malcolm Gladwell). However, I feel that my team doesn't necessarily work any differently despite these efforts yet.

Goodhart's Law and the Hawthorne Effect

During a fantastic talk on the dangers and benefits of collecting metrics, Angela introduced these two concepts that eloquently summed up some of the challenges my team has with identifying and reporting on quality metrics: Goodhart's Law and the Hawthorne Effect.

Goodhart's Law states that "when a measure becomes a target, it ceases to be a good measure." During the presentation, my mind immediately wandered to the arbitrary metric of time. Like many other giant corporations, my company has countless avenues of tracking time. I had a simple hypothesis that I was able to quickly validate by pulling up my timesheets: my hours always add up to 40 hours per week. If I have a doctor's appointment in the morning, I don't always stay late to offset it. On days that I have an 8pm CST call with Australia, I don't always get to leave the office early to get that time back. My boss certainly doesn't care, and I certainly wouldn't sweat a developer on my team for not working exactly 40 hours per week.

So why has time become the key target? Hypothetically, if I only worked 20 hours in a given week, nothing is stopping me from marking 40 hours. No one in their right mind is going to enter less than that. I'd also argue that some people wouldn't feel empowered to enter more than that. In reality, numerous other metrics would reflect my poor performance. All this makes me realize that any metric that's self-reported with arbitrary targets and a negative perception of its intentions is going to lead to false information and highly defensive data entry.

The next logical progression is considering a burndown chart. The x-axis represents time, and the y-axis often represents remaining effort in a two-week sprint. In a utopian world, the line of best fit would be a linear function with a negative slope. The reality is that project or portfolio managers call me when the burndown rate isn't fast enough for their liking. But again, why is the focus here time? Why aren't the most important metrics features delivered and customer satisfaction? Why not a burnup chart?

The Hawthorne Effect refers to the performance improvement that occurs when increased attention is paid to an employee's work. For a simple thought experiment, imagine that your job is to manually copy data from one system to another. Naturally, your throughput would be substantially improved if you got frequent feedback on how much data you were copying. It would probably also increase if your boss sat right behind you all day.

In leadership, we constantly observe our employees' work though I would argue it's rarely in the most productive contexts. Instead of measuring developers purely based on how many features they deliver, we almost always relate them to the estimates they're forced to give based on minimal and sometimes incorrect requirements as well as arbitrary and often unrealistic dates set by both ourselves and our customers. I can think of several metrics I track to report on project and operation health, but none that reflect a developer's happiness or psychological safety.

As a leader, I've fallen short in shielding developers from this. Consider the difference between "can you have this feature done by the end of the year?" and "how long will it take to deliver this feature?" The answer should ultimately be static between the two scenarios, but in the former question, I'm shifting the responsibility to deliver onto the developer. The developer feels immense pressure to conform their estimate to the context they've been placed in. As a leader, the responsibility should fall solely on me though. If the developer can't deliver the feature by the end of the year, it's up to me to acquire another resource or set more realistic expectations with the client.

SonarCloud for C# Projects with Travis CI

· 3 min read
Scottie Enriquez
Senior Solutions Developer at Amazon Web Services

Example SonarCloud/SonarScanner C# Integration for Travis CI

SonarQube is a very powerful source code continuous inspection tool. It's incredibly valuable to have integrated into a project's CI/CD pipeline to help maintain code quality and prevent issues. In the process of adding this to some existing open-source C# projects, I discovered that there's not quality, up-to-date documentation on integrating C# inspection with Travis CI. This GitHub project serves as a functioning example.

Getting Started

Note that you'll need a SonarCloud account created, a project set up, and a token for the project.

Travis CI Setup

You can either use an existing GitHub repository or create a new one. You'll need to enable Travis CI for the repository and create a secure environment variable named SONAR_TOKEN initialized as your SonarCloud token. Make sure that you don't commit the token in your source code or expose it via logs.

Which Release of This Project to Use

You'll notice that there are three releases of this example project. The first two require Mono as a dependency because they utilize .NET Framework builds of the SonarScanner for MSBuild tool. The third option only uses .NET Core. It's worth noting that the Travis CI builds with Mono and .NET Core take on average ten minutes to complete whereas the .NET Core only builds take roughly two minutes.

0.0.1: SonarScanner for MSBuild 4.0.2.892

  • .NET Core: 2.1.502
  • Mono: latest
  • Notes: This version uses an old version of SonarScanner. This release is not recommended for any use.

0.0.2: SonarScanner for MSBuild version 4.6.1.2049 (.NET Framework 4.6)

  • .NET Core: 2.1.502
  • Mono: latest
  • Notes: This version only uses .NET Core because my unit tests in the sample class library target it. If your project only uses .NET Framework, you can drop the .NET Core dependency from the Travis CI YAML file. This release is recommended for C# projects targeting .NET Framework.

1.0.0: SonarScanner for MSBuild version 4.6.1.2049 (.NET Core)

  • .NET Core: 2.1.502
  • Mono: none
  • Notes: This version assumes no targets of .NET Framework and does not install Mono. This version is recommended for pure .NET Core projects. It's also the most performant.

Updating Your Project

Updating the Travis CI YAML File

Start by including the SonarCloud addon and pasting in your SonarCloud organization name.

.travis.yml
addons:
sonarcloud:
organization: "YOUR_ORG_NAME_HERE"

You'll also need to run the /tools/travis-ci-install-sonar.sh script as part of before-install section and /tools/travis-ci-build.sh as part of the script section.

Modifying Build Script

You'll need to make a few replacements in this file. Add your organization name and project key to the SonarScanner.MSBuild.dll (or SonarScanner.MSBuild.exe for the .NET Framework version) arguments. Note that you can also expose these as environment variables like SONAR_TOKEN. You'll also want to add any project-specific build and test commands to this script.

tools/travis-ci-build.sh
dotnet ../tools/sonar/SonarScanner.MSBuild.dll begin /o:"YOUR_ORG_NAME_HERE" /k:"YOUR_PROJECT_KEY_HERE" /d:sonar.host.url="https://sonarcloud.io" /d:sonar.verbose=true /d:sonar.login=${SONAR_TOKEN}
# Add additional build and test commands here
dotnet build
dotnet test
dotnet ../tools/sonar/SonarScanner.MSBuild.dll end /d:sonar.login=${SONAR_TOKEN}

Testing

Your Travis CI build will fail if there are any issues with the SonarScanner command. If the build passes, you can view the feedback via the SonarCloud dashboard.

References

I was able to find a project called NGenerics that utilizes an older version of SonarScanner with some syntax differences. There was also a short blog post by Riaan Hanekom that expands on it. These were extremely helpful starting points.

Travis CI Build Status

Build Status

Gaming on EC2

· 5 min read
Scottie Enriquez
Senior Solutions Developer at Amazon Web Services

The Idea

For a quick weekend project, I wanted to see how feasible setting up a cloud gaming rig would be. Using EC2 from AWS and about 10 USD, I was able to get a proof of concept set up and several games installed and running. I did run into a few issues that this post should address how to get around.

Choosing an AMI

An Amazon Machine Image is a virtual appliance used to create a virtual machine in EC2. These AMIs span a variety of purposes and use a *NIX or Windows operating system. You can create your own AMIs, use community-provided AMIs, or subscribe to one from the AWS Marketplace. It’s worth noting that the last option tacks on an additional hourly cost in addition to the base EC2 computing costs. In the interest of time, I opted to start with a marketplace AMI specifically purposed for gaming with the requisite graphics drivers preinstalled.

Launching an Instance

Per the AMI’s recommendation, I provisioned a g3.4xlarge EC2 instance. As you might expect from an instance that carries a nearly 2 USD/hour price tag, the resources are quite powerful: 16 vCPUs, 122 GiB RAM, and an NVIDIA Tesla GPU. Most of the default settings should work, but be sure to provision an SSD larger than the default 30 GB given that most AAA games now are nearly twice that in size.

Always remember to shut the server down when you’re not using it and verify that it’s instance state is listed as stopped in your EC2 console. I would highly recommend configuring a billing alarm to avoid surprising charges, as well as configuring your EC2 instance to stop when you shut down.

Connecting to the EC2 Instance

Once the instance has been provisioned, you can connect to it via RDP. For macOS users, you can download Microsoft Remote Desktop 10 via the App Store. If you configured a key pair when launching your VM, download and locate the .pem file. In order to log into your new server, you’ll need the password for Administrator as well as the public hostname. To obtain the password, simply right-click on the instance and choose Get Windows Password and provide the private key if need be. To obtain the public hostname, simply refer to the description tab beneath the running instance. You can also download a Remote Desktop (.rdp) file via the right-click menu.

EC2 instance

Initial Configuration and Installing Software

Windows Server 2016 is a highly stripped-down version of Windows 10. You’ll notice that the only browser installed is Internet Explorer running in Enhanced Security mode. I’d highly recommend starting by disabling this mode or installing Google Chrome. You’ll also need to enable some services that aren’t turned on by default. Via the Server Manager, start by enabling the WLAN service and .NET Frameworks. You’ll also need to enable sound as well.

I wanted to see how well such a powerful VM could run a graphically intensive game, so I chose The Witcher 3. In addition to downloading the game and Steam, I also installed the GeForce Experience app from NVIDIA to ensure that my graphics drivers were the latest available. Assuming that you chose the same AMI that I did, the latest drivers should already be pre-installed.

Running Games

After doing all of the setup above, I received D3D errors from every game that I tried to run. I was able to get past this error by running the game in windowed mode or specifying a resolution via the launch options: -windowed or -h 1920 -w 1080.

Tweaking Your Settings

I was able to get solid performance on both my MacBook’s Retina Display as well as a standard 1080p monitor. Never having done anything graphically intensive on a Windows VM, I wasn’t aware that you can’t change your resolution from the VM itself. Rather, configuration needs to be done via your RDP client. As you probably expect, these settings are heavily dependent on the display that you’re playing on.

It’s also worth noting that unless you provision an Elastic IP Address, your public hostname and IP will change every time you start and stop the EC2 instance. This means that if you don’t have a static IP address in place, you’ll need to either download a fresh .rdp file or update your hostname in the RDP client constantly.

Latency and Limitations

I was able to play The Witcher 3 with bearable latency though I don’t know that this setup would be feasible for multiplayer or competitive gaming. Per the AMI’s documentation, the streaming limit is 1080p with 30 frames per second. This means that while the VM is powerful enough to achieve higher FPS at a higher resolution, the bottleneck will ultimately be its streaming bandwidth.

Laptop

Things I Learned From Teaching a High School Class for a Semester

· 11 min read
Scottie Enriquez
Senior Solutions Developer at Amazon Web Services

A Semester in the Classroom

I volunteer co-teaching an advanced computer science class at a Houston high school. This involves me being in the classroom for up to three days per week. In addition to lecturing, lesson planning, and grading, I'm simultaneously mentoring and being mentored by an experienced science teacher who has never taught programming before. One of my majors was computer science, and I have years of real-world software engineering experience supplementing my formal education. In turn, the teacher provides excellent guidance on education methodologies and best practices, as well as moral support.

In order to make this schedule work with my full-time job, I make up my classroom time and additional commute by working from home early in the morning before school starts on days that I teach. This generally requires about two additional hours. These days can be brutally long, especially if the teacher and I meet after work too. I feel that I've learned even more than I've taught this semester, and I wanted to share some of my experiences and lessons.

Be Motivated by Both Failure and Success

After class one morning, a student bluntly told me, “That was the most boring lecture that I've ever seen in my entire life.” The overall classroom energy and participation was the lowest I'd ever experienced, so this statement wasn't exactly a shock to me. I maintained composure, but I remember fuming in my car for a couple of minutes before I left the campus. I had to remind myself that the student was being simply being honest and not trying to belittle my hard work and preparation. The student didn't understand the time and effort that I put into the slides, material, and dry runs for practice. Naturally, I was disheartened by the situation, and the next lecture I was extremely nervous. I felt like I was stammering and fumbling even though I rehearsed the material even more this time to compensate. The next several classes went the same way, and I began to let fear of failure creep in. What if the students never picked up the material? What if I was turning them away from computer science? What if I was just a bad teacher?

The thought of giving up on my volunteering never crossed my mind, but I realized that I needed to fundamentally rethink my approach. I kept trying new formats, activities, and techniques. I reminded myself of how difficult the material is and how it would take numerous attempts before students began to master the curriculum. It took some time before we had another successful class with lots of progress, participation, and positive feedback. I left that particular class feeling motivated and driven. The high of success wasn't the catalyst though. It was the realization of my efforts and my personal pride in dealing with the earlier setbacks in a positive way. If you're only motivated by success, your growth as an individual will be severely stunted.

It also made me realize that while lecture is a useful teaching technique, it's important to delegate some struggle and challenges back onto the students. It can feel like a lot of formal education devolves into spoon-feeding, rote memorization, and regurgitation, but computer science requires thinking analytically and synthesizing complex concepts. Even though my students would often much rather just have the answer or explanation given to them, they develop so much more when they're pushed to derive it for themselves. I can also tell that they're much more satisfied whether they realize it or not.

Students Aren't Any Different Today

I'll be honest that I expected my students to be completely foreign compared to me as a high school student. It had been ten years since I set foot in a live high school classroom. Plus, there seems to be a negative stereotype of decay in each generation that follows. The so-called greatest generation versus entitled millennials versus a new generation that will never know an existence without smartphones and the internet. Time and technology have shaped some undeniable social and behavioral differences, but these kids are just as motivated as I was. In fact, they're probably smarter and cover much more course material than my parents' generation or even I did. Shouldn't this absolutely be the case though?

My class will cover about twice as much material as I did in my high school computer science class. While I had to deal with the sluggish, groaning desktop behemoths running Windows 95 (already antiquated in the year 2007), every student in my class is assigned a laptop that's more than capable of running a Java IDE. We now have education web applications that we can assign homework through which provides much more targeted practice and instantaneous feedback on their work. People record and share high-quality lectures on all sorts of subject matter. Technology and learning techniques are constantly improving, so it only makes sense that the curriculum expands as well.

Even as someone who creates new software on a daily basis, I can't accurately tell you what the technology universe or computer science careers will look like in the next ten or fifteen years, but I do know that the barrier of entry for work is getting higher. More and more roles are getting automated, but there is still a near infinite number of problems for the next generation to solve. These students will have to rise up to previously unattained educational heights in order to be able to find lucrative careers and contribute to society. It's up to us to prepare them for the journey. Each generation must continually improve and adapt its education in order to adequately prepare its youths for the next iteration of society that they'll be soon enough shaping themselves.

It can be annoying that kids get distracted on social media during class. Sometimes it can even feel like I'm vying with that computer in their pocket for their attention. However, these are the tools that students will have going forward to solve the challenges they face, and there's no question in my mind that being exposed to technology from a young age does far more good than harm. I have the pleasure of working with some incredibly bright and promising students, and I refuse to subscribe to the idea that the greatest generation has already passed us by.

If Something Feels Thankless, Reconsider Your Motivations

I met up with my teacher at the high school a few days before school started in August to see the classroom and get acquainted with the administration. He invited me to join him for a teacher assembly in the gym. On the walk over, the entire marching band was lined up in a long hallway blaring the ESPN theme song to pump up the teachers returning to school. Little did I know that before the school year had even started, I was receiving the most external gratitude that I'd probably ever get as a volunteer.

Programming can be frustrating and stressful. I work diligently to build rapport with my students every time that I'm in classroom, but understandably they would much rather talk about why their code isn't working as opposed to how their day is going. They understand that having me around to answer technical questions is incredibly valuable, so they keep the personal talk to a minimum. It can feel like thankless and impersonal work sometimes. I give a lot of my precious spare time, and at first, I struggled with the lack of feeling appreciated. I'm not always able to see the impact that I'm making on my students. I won't see how it affects their academic and professional careers for some time either. I probably never will. I had to learn very quickly to derive personal satisfaction from within.

No one sees the odd schedule I work to be in the classroom, the hours I spend preparing, or the time I spend in the evening helping out with homework over email. Very few people have thanked me directly, but I've come to realize that I don't need it and wouldn't get far if I did. Everyone wants to be recognized for their dedication, but I've grown to love my role in the background because I truly believe in my motivations for teaching. I don't need a marching band, but it's nice when it happens that way.

I Didn't Realize How Much Time I Wasted Until I Didn't Have It

I'm reminded of an old adage about a family living in a one-bedroom house. The parents complain that it's too loud and there's no space. They ask someone for help who suggests that they bring in several animals into their already cramped, rambunctious home. The parents then complain that it's even louder and more crowded than ever before. Then, they are instructed to remove all the animals from their home. The family ultimately realizes that their house originally wasn't that bad in comparison.

I work full-time and try to have a social life, so one concern about accepting a commitment like teaching was how it would affect my work-life balance. For the first few weeks, I was constantly exhausted and felt like I didn't have enough time to do chores, go to work, exercise, teach, lesson plan, and so on. I began to examine my routine and realized how much time I was allocating for things that I didn't care about. Instead of de-stressing after work by consuming mindless social media, I should have been exercising to unwind. Instead of shirking chore duties until late Sunday night, I should have spread my duties across the week. Adding in more responsibility to my seemingly overbooked schedule made me realize that I needed to prioritize and organize my time better.

Stay in the Moment, But Always Have a Goal in Mind

When designing every single lecture or lesson plan or assignment, I'm constantly faced with a simple question: why? The specifics are often determined by the preferred learning styles of my students and culturally responsive teaching practices, but with each topic or skill that we introduce, I always focus on why they need to know it. How does this fit into the bigger picture? How can it be synthesized with other concepts? How can it be used in the real world?

Not everyone in the class wants to grow up to be a programmer like me, but I constantly ask myself what computer science can offer every single student regardless of interest or desired career path. Critical thinking and creating abstract algorithms are high-level concepts that can be applied to absolutely anything. Technology now affects nearly every facet of human life, so I bring in guest speakers to class to illustrate how what they're learning could be utilized in a wide array of careers.

But my 'why' isn't just limited to the curriculum or even computer science. Most importantly, I try to show my students passion. A decade ago, I was on the other side of the desk and at the start of a long and winding journey through college towards my current career. I mean no insult towards my parents and family, but I simply wasn't surrounded by very many university graduates growing up. I never thought of higher education as opening countless doors to the future. I couldn't even begin to fathom the implications of the major or school that I chose. For better or worse, our education system requires that young high school graduates make these life-altering decisions despite massive socioeconomic inequities and educational gaps.

I want every single student in my class to consider furthering their education after high school. I openly share my pitfalls and accomplishments with them in hopes that one day they'll be even more successful than me. I aim to be a voice of genuine encouragement that reminds them of what they're capable of and that where they come from doesn't have to dictate where they end up.

Everyone Can Give Back

If you're a technology professional, I'd encourage you to consider volunteering for a program like TEALS. Even if you're not, there are countless programs that offer opportunities to make a huge impact in shaping the lives and futures of students everywhere.

TEALS Week One Postmortem

· 4 min read
Scottie Enriquez
Senior Solutions Developer at Amazon Web Services

My first week of teaching is in the books, and there’s already a ton to reflect on. Overall, I think that class so far has been a success, but I’ve already identified several opportunities for improvement.

What Went Well

I graduated from high school over a decade ago, and the world and technology have changed a great deal since then. I pounded out Java programs on crawling, clunky Windows 95 desktop machines without the interruptions of smartphones. Now every student has their own laptop. I assumed that my lectures and exercises would have to rival the distractions of the digital age. Overall, I found that it was easy to get the students engaged with the material especially when I made a conscious effort to explain its application in the real world. The students in my class seem much more focused on their careers after high school than I was at 16 or 17.

I thought it would be difficult to switch contexts from my work persona to my classroom persona while maintaining genuineness with the students. Thus far, it’s been a very natural progression for me even though I work in the morning prior to teaching class.

Where to Improve

Time management continues to be a difficult challenge. As a high school student, an hour felt like an eternity to be in the classroom. From the other side of the desk, an hour feels like not enough time to even begin to teach computer science and programming. Individual time with students is equally scarce and valuable. I want to support everyone in every way that I can, but only getting a minute or two of interaction at a time makes building rapport with my students seem insurmountable. On top of this, when a student asks for help, it’s usually at a point of challenge and frustration.

In week one, I fell short in regard to learning names. I’m only in the classroom for three days per week. This time has to be split between lectures and individual attention. One technique I’m going to try next week is using a Java program that I wrote to randomly select a student’s name when I ask a question. This should give me both the opportunity to finally put names to faces on a regular basis as well as make our formative assessments more uniform and accurate. If this doesn’t pan out, my contingency is to simply make flashcards.

public class TEALSRandomNameSelector {
public static void main(String[] args) {
try {
ArrayList studentNames = new ArrayList();
Scanner scanner = new Scanner(new FileReader("students.txt"));
while(scanner.hasNextLine()) {
studentNames.add(scanner.nextLine());
}
scanner.close();
Random random = new Random();
int randomIndex = random.nextInt(studentNames.size());
System.out.println(studentNames.get(randomIndex));
}
catch(FileNotFoundException exception) {
System.out.println("File not found. Check the path in the FileReader constructor method.");
}
}
}

Lesson planning is extremely time-consuming, but it is paramount to the success of the students. It involves more than just making notes, exercises, demos, and presentations. This week, I intend to focus more on dry runs of my lectures and activities so that they’re more polished and nuanced.

What Was Unexpected

I underestimated both how intensive and rewarding teaching in the classroom is. On any given day, I’m most likely working on something related to teaching after a day at my full-time job. While I’m often exhausted, I’ve managed to find reserves of energy when working on anything related to school. It’s a responsibility that I take very seriously because of the unique position I’m in to truly make a difference in the lives of my students. Bringing my industry experience to the classroom is a rare opportunity that I’m determined to make the most of.

Configuring Multiple SSL Certs for a Single Elastic Beanstalk Instance

· 2 min read
Scottie Enriquez
Senior Solutions Developer at Amazon Web Services

The Use Case

I own two domains for my personal site. I have a primary domain that I use for most occasions, but I also recently acquired another. Rather than having the second domain remain unused, my goal was simply to have both configured simultaneously without configuring multiple environments.

The Architecture

My website has used HTTPS for some time, but this initially complicated the plan of using two domains in parallel. I’ve been hosting this website on Amazon Web Services via Elastic Beanstalk for about three years now. The process of managing SSL certificates has been quite easy using a combination of Elastic Load Balancing and AWS Certificate Manager. However, what’s now known as a Classic Load Balancer only supports one certificate per port and protocol (i.e. HTTPS, 443). Given that SSL certificates are tied to one domain, the lone certificate on the load balancer would not be valid for my second domain and a security warning would be thrown in the browser.

Migrating to an Application Load Balancer

Since my Elastic Beanstalk environment was configured before the new Application Load Balancer was released, I laid it to rest and provisioned a fresh application with one. There may be a way via the settings to convert an existing Classic Load Balancer to Application Load Balancer, but I was unable to find a quick solution. You can find the differences between load balancer offerings in Amazon’s documentation.

Configuring the Listener

Unless specified otherwise during the provisioning process, no HTTPS listener will be configured. Just like my Classic Load Balancer, I created an HTTPS listener on port 443 and chose my primary domain’s SSL certificate from ACM as the default. Application Load Balancers also only allow one listener per protocol, so one more step must be taken.

Listener

Adding Certificates

Via the EC2 interface you can edit your load balancer’s listeners settings and add more SSL certificates. That’s all you need to configure.

SSL

The rest is handled by the magic of Server Name Indication (SNI) which Application Load Balancers use as of October 2017. The load balancer will use the correct SSL certificate based on the domain specified in the request.