Preparing for the Certified Kubernetes Application Developer (CKAD) Exam Using Amazon EKS

· 32 min read
Scottie Enriquez
Senior Solutions Developer at Amazon Web Services

Motivation and Background

While I've used Kubernetes professionally in a few capacities (particularly in customer engagements while working at AWS), I wanted to cement my knowledge and increase my mastery with a systematic approach. I decided to prepare for the Certified Kubernetes Application Developer (CKAD) exam. I've taken and passed more than a dozen technology certification exams spanning AWS, Azure, HashiCorp, and more. This exam is unique in several ways. Namely, it's all hands-on in a lab environment. Azure exams often have a coding, configuration, or CLI command component, but even these are typically multiple-choice questions. The CKAD presents you with a virtual desktop and several Kubernetes clusters, making you tackle 15-20 tasks with a strict two-hour time limit. I put together this repository and post for a few reasons:

  • I wanted to document all of my hands-on preparation for when I have to recertify in two years
  • I wanted to share my knowledge with others and offer a supplemental guide to a CKAD course
  • Since the CKAD exam focuses on Kubernetes from a cloud-agnostic perspective, I wanted to fill in the gaps in my own knowledge of running Kubernetes in the AWS ecosystem (e.g., Karpenter, Container Insights, etc.)
  • Many courses and guides leverage Microk8s or minikube to run Kubernetes locally, but I wanted to focus on cloud-based infrastructure, especially for things like EBS volumes created via PVCs, ELBs created via a Service, etc.

In summary, this material focuses on hands-on exercises for preparing for the exam and other tools in the cloud-agnostic and AWS ecosystems.

Preparing for the Exam

While two hours may sound like plenty of time, you'll need to work quickly to complete the exam. With an average of six to eight minutes per exercise (each is not timed individually), ensuring you can work efficiently and ergonomically is paramount. The following items were incredibly useful for me:

  • Running through a practice exam to get a feel for the CKAD structure
  • Proficiency with Vim motions (since most of the exam takes place in a terminal) to efficiently edit code
  • Generating YAML manifests via the command line for new resources instead of copying and pasting from documentation (e.g., kubectl create namespace namespace-one -o yaml --dry-run=client)
  • Generating YAML manifests for existing resources that do not have one (e.g., kubectl get namespace namespace-one -o yaml > namespace.yaml)
  • Leveraging the explain command instead of looking up resource properties in the web documentation (e.g., kubectl explain pod.spec)
  • Memorizing the syntax for running commands in a container (e.g., kubectl exec -it pod-one -- /bin/sh) and for quickly creating a new Pod to run commands from (e.g., kubectl run busybox-shell --image=busybox --rm -it --restart=Never -- sh)
  • Refreshing knowledge of Docker commands like exporting an image (i.e., docker save image:tag --output image.tar)

Materials and Getting Started

All code shown here resides in this GitHub repository. In addition to this content, I highly recommend the following:

My preferred approach was to work through the Pluralsight course first. After reviewing the classroom material, I designed and implemented the examples below. If you have foundational Kubernetes knowledge, skip to the most useful exercises. Each one is designed to be a standalone experience.

00: eksctl Configuration

eksctl is a powerful CLI tool that quickly spins up and tears down Kubernetes clusters via Amazon EKS. Nearly all of the exercises below start by leveraging the tool to create a cluster:

00-eksctl-configuration/create-cluster.sh
# before running these commands, first authenticate with AWS (e.g., aws configure sso)
eksctl create cluster -f cluster.yaml
# if connecting to an existing cluster
eksctl utils write-kubeconfig --cluster=learning-kubernetes

The default cluster configuration uses a two-node cluster of t3.medium instances to keep hourly costs as low as possible. At the time of writing this blog post, the exam tests on Kubernetes version 1.30.

00-eksctl-configuration/culster.yaml
apiVersion: eksctl.io/v1alpha5
kind: ClusterConfig

metadata:
name: learning-kubernetes
region: us-west-2
version: "1.30"

nodeGroups:
- name: node-group-1
instanceType: t3.medium
desiredCapacity: 2
minSize: 2
maxSize: 2

This cluster can be transient for learning purposes. To keep costs low, be sure to run the destroy-cluster.sh script to delete the cluster when not in use. I also recommend configuring an AWS Budget as an extra measure of cost governance.

00-eksctl-configuration/destroy-cluster.sh
eksctl delete cluster --config-file=cluster.yaml --disable-nodegroup-eviction

01: First Deployment with Nginx (CKAD Topic)

With the cluster created, we can now make our first Deployment. We'll start by creating a web server with three replicas using the latest Nginx image:

01-first-deployment-with-nginx/deployment.yaml
apiVersion: apps/v1
kind: Deployment
metadata:
name: nginx-deployment
spec:
replicas: 3
selector:
matchLabels:
app: nginx
template:
metadata:
labels:
app: nginx
spec:
containers:
- name: nginx-container
image: nginx:latest
ports:
- containerPort: 80

The following commands leverage the manifest to create three Pods and inspect them:

01-first-deployment-with-nginx/commands.sh
# assumes cluster created from 00-eksctl-configuration first
kubectl apply -f ./
# returns three pods (e.g., nginx-deployment-5449cb55b-jfgnc)
kubectl get pods -o wide
# clean up
kubectl delete -f ./

02: Pod Communication over IP (CKAD Topic)

The Deployment in this example is identical to the previous: a web server with three replicas. Use the following commands to explore how IP addressing works for Pods:

02-pod-communication-over-ip/commands.sh
# assumes cluster created from 00-eksctl-configuration first
kubectl apply -f ./
# 192.168.51.32 is one of my pod's IP address, but yours will be different
# when the pod is replaced, this IP address changes
kubectl get pods -o wide
# creates a pod with the BusyBox image
# entering BusyBox container shell to communicate with pods in the cluster
kubectl run -it --rm --restart=Never busybox --image=busybox sh
# replace the IP address as needed
wget 192.168.51.32
# displys the nginx homepage code
cat index.html
# returning to default shell and deletes the BusyBox pod
exit
# clean up
kubectl delete -f ./

03: First Service (CKAD Topic)

Since each Pod has a separate IP address that can change, we can use a Service to keep track of the Pod's IP addresses on our behalf. This abstraction allows us to group Pods via a selector and reference them via a single Service. In the Service manifest and leveraging the same Deployment as before, we specify how to select which Pods to target, what port to expose, and the type of Service:

03-first-service/service.yaml
apiVersion: v1
kind: Service
metadata:
name: nginx-service
spec:
selector:
name: nginx
ports:
- protocol: TCP
port: 80
targetPort: 80
# nodePort is used for external access
# ClusterIP services are only accessible within the cluster
# NodePort services are a way to expose ClusterIP services externally without using a cloud provider's load balancer
# LoadBalancer is covered in the next section
type: ClusterIP

Using the Service, we have a single interface to the three nginx replicas. We can also use the Service name instead of its IP address.

03-first-service/commands.sh
# assumes cluster created from 00-eksctl-configuration first
kubectl apply -f ./
# 10.100.120.203 is the service IP address
kubectl describe service nginx-service
# entering BusyBox container shell
kubectl run -it --rm --restart=Never busybox --image=busybox sh
# can also use the IP address instead
wget nginx-service
cat index.html
# returning to default shell
exit
# clean up
kubectl delete -f ./

04: Elastic Load Balancers for Kubernetes Service (CKAD Topic)

A significant benefit of Kubernetes is that it can create and manage resources in AWS on our behalf. Using the AWS Load Balancer Controller, we can specify annotations to create a Service of type LoadBalancer that leverages an Elastic Load Balancer. Using the same Deployment from the past two sections, this manifest illustrates how to leverage a Network Load Balancer for the Service:

04-load-balancer/load-balancer.yaml
apiVersion: v1
kind: Service
metadata:
name: nginx-load-balancer
annotations:
service.beta.kubernetes.io/aws-load-balancer-internal: "true"
# by default, a Classic Load Balancer is created
# https://docs.aws.amazon.com/elasticloadbalancing/latest/classic/introduction.html
# this annotation creates a Network Load Balancer
service.beta.kubernetes.io/aws-load-balancer-type: "nlb"
spec:
selector:
name: nginx
ports:
- protocol: TCP
port: 80
targetPort: 80
type: LoadBalancer
status:
loadBalancer:
ingress:
- ip: "192.0.2.127"

The following commands deploy the LoadBalancer Service:

04-load-balancer/commands.sh
# assumes cluster created from 00-eksctl-configuration first
kubectl apply -f ./
# entering BusyBox container shell
kubectl run -it --rm --restart=Never busybox --image=busybox sh
wget nginx-load-balancer
cat index.html
# returning to default shell
exit
# clean up
# this command ensures that the load balancer is deleted
# be sure to run before destroying the cluster
kubectl delete -f ./

05: Ingress (CKAD Topic)

Services of type ClusterIP only support internal cluster networking. The NodePort configuration allows for external communication by exposing the same port on every node (i.e., EC2 instances in our case). However, this introduces a different challenge because the consumer must know the nodes' IP addresses (and nodes are often transient). The LoadBalancer configuration has a 1:1 relationship with the Service. If you have numerous Services, the cost of load balancers may not be feasible. Ingress alleviates some of these challenges by providing a single external interface over HTTP or HTTPS with support for path-based routing. Leveraging the Nginx example one last time, we can create an Ingress that exposes a Service with the NodePort configuration via an Application Load Balancer.

05-ingress/ingress.yaml
apiVersion: networking.k8s.io/v1
kind: Ingress
metadata:
name: ingress
annotations:
kubernetes.io/ingress.class: alb
alb.ingress.kubernetes.io/scheme: internet-facing
spec:
rules:
- http:
paths:
- path: /
pathType: Prefix
backend:
service:
name: nginx-service
port:
number: 80

The following commands install the AWS Load Balancer Controller, configure required IAM permissions, and deploy the Ingress. Be sure to set the $AWS_ACCOUNT_ID environment variable first.

05-ingress/commands.sh
# assumes cluster created from 00-eksctl-configuration first
# install AWS Load Balancer Controller
# https://docs.aws.amazon.com/eks/latest/userguide/lbc-manifest.html
curl -O https://raw.githubusercontent.com/kubernetes-sigs/aws-load-balancer-controller/v2.7.2/docs/install/iam_policy.json
aws iam create-policy \
--policy-name AWSLoadBalancerControllerIAMPolicy \
--policy-document file://iam_policy.json
rm iam_policy.json
eksctl utils associate-iam-oidc-provider --region=us-west-2 --cluster=learning-kubernetes --approve
eksctl create iamserviceaccount \
--cluster=learning-kubernetes \
--namespace=kube-system \
--name=aws-load-balancer-controller \
--role-name AmazonEKSLoadBalancerControllerRole \
--attach-policy-arn=arn:aws:iam::$AWS_ACCOUNT_ID:policy/AWSLoadBalancerControllerIAMPolicy \
--approve
kubectl apply \
--validate=false \
-f https://github.com/jetstack/cert-manager/releases/download/v1.13.5/cert-manager.yaml
curl -Lo v2_7_2_full.yaml https://github.com/kubernetes-sigs/aws-load-balancer-controller/releases/download/v2.7.2/v2_7_2_full.yaml
sed -i.bak -e '596,604d' ./v2_7_2_full.yaml
sed -i.bak -e 's|your-cluster-name|learning-kubernetes|' ./v2_7_2_full.yaml
kubectl apply -f v2_7_2_full.yaml
rm v2_7_2_full.yaml*
kubectl get deployment -n kube-system aws-load-balancer-controller
# apply maniftests
kubectl apply -f ./
# gets address (e.g, http://k8s-default-ingress-08daebdfec-204015293.us-west-2.elb.amazonaws.com/) that can be opened in a web browser
kubectl describe ingress
# clean up
kubectl delete -f ./

06: Jobs and CronJobs (CKAD Topic)

Jobs are a powerful mechanism that reliably ensures that Pods are completed successfully. CronJobs extend this functionality by supporting a recurring schedule.

06-jobs-and-cronjobs/job.yaml
apiVersion: batch/v1
kind: Job
metadata:
name: pi
spec:
template:
spec:
containers:
- name: pi
image: perl:5.34.0
command: ["perl", "-Mbignum=bpi", "-wle", "print bpi(2000)"]
restartPolicy: Never
backoffLimit: 4
06-jobs-and-cronjobs/cronjob.yaml
apiVersion: batch/v1
kind: CronJob
metadata:
name: hello
spec:
# runs every minute
schedule: "* * * * *"
jobTemplate:
spec:
template:
spec:
containers:
- name: hello
image: busybox:1.28
imagePullPolicy: IfNotPresent
command:
- /bin/sh
- -c
- date; echo Hello from the Kubernetes cluster
restartPolicy: OnFailure

07: Metrics Server and Pod Autoscaling (CKAD Topic)

Metrics Server provides container-level resource metrics for autoscaling within Kubernetes. It is not installed by default and is meant only for autoscaling purposes. There are other options, such as Container Insights, Prometheus, and Grafana, for more accurate resource usage metrics (all covered later in this post). With Metrics Server installed, a HorizontalPodAutoscaler resource can be configured with values such as target metric, minimum replicas, maximum replicas, etc.

07-metrics-server-and-pod-autoscaling/horizontal-pod-autoscaler.yaml
apiVersion: autoscaling/v2
kind: HorizontalPodAutoscaler
metadata:
name: php-apache
spec:
scaleTargetRef:
apiVersion: apps/v1
kind: Deployment
name: php-apache
minReplicas: 1
maxReplicas: 10
metrics:
- type: Resource
resource:
name: cpu
target:
type: Utilization
averageUtilization: 50
status:
observedGeneration: 1
currentReplicas: 1
desiredReplicas: 1
currentMetrics:
- type: Resource
resource:
name: cpu
current:
averageUtilization: 0
averageValue: 0

HorizontalPodAutoscalers create and destroy Pods based on metric usage. On the other hand, vertical autoscaling rightsizes the resource limits (covered in the next section) for Pods.

08: Resource Management (CKAD Topic)

When creating a Pod, you can optionally specify an estimate for the number of resources a container needs (e.g., CPU and RAM). This baseline estimate should be specified in the requests parameter. The limits parameter specifies the threshold for which a container should be terminated to prevent starvation of other processes. Limits also help with cluster capacity planning (e.g., EKS node groups). Below is the Nginx Deployment from earlier with resource management applied:

08-resource-management/deployment.yaml
apiVersion: apps/v1
kind: Deployment
metadata:
name: nginx-deployment
spec:
replicas: 3
selector:
matchLabels:
name: nginx
template:
metadata:
labels:
name: nginx
spec:
containers:
- name: nginx-container
image: nginx:latest
ports:
- containerPort: 80
resources:
# estimated resources for container to run optimally
requests:
cpu: 100m
memory: 128Mi
# kills the container if threshold is crossed
limits:
cpu: 200m
memory: 256Mi

09: Karpenter

In the previous two sections, we covered how additional Pods are created (i.e., horizontal scaling) and how resources (e.g., CPU and RAM) are requested and limited in Kubernetes. The next topic is managing the underlying compute when additional infrastructure is required. There are two primary options for scaling compute using EKS on EC2: Cluster Autoscaler and Karpenter. On AWS, Cluster Autoscaler leverages EC2 Auto Scaling Groups (ASGs) to manage node groups. Cluster Autoscaler typically runs as a Deployment in the cluster. Karpenter does not leverage ASGs, allowing for the ability to select from a wide array of instance types that match the exact requirements of the additional containers. Karpenter also allows for easy adoption of Spot for further cost savings on top of better matching the workload to compute resources. The cluster defined in 00-eksctl-configuration uses an unmanaged node group and does not leverage Cluster Autoscaler or Karpenter. To demonstrate how to leverage Karpenter, we'll need a different cluster configuration file. We can dynamically generate it like so:

09-karpenter/commands.sh
# set environment variables
export KARPENTER_NAMESPACE=karpenter
export KARPENTER_VERSION=v0.32.10
export K8S_VERSION=1.28
export AWS_PARTITION="aws"
export CLUSTER_NAME="${USER}-karpenter-demo"
export AWS_DEFAULT_REGION="us-west-2"
export AWS_ACCOUNT_ID="$(aws sts get-caller-identity --query Account --output text)"
export ARM_AMI_ID="$(aws ssm get-parameter --name /aws/service/eks/optimized-ami/${K8S_VERSION}/amazon-linux-2-arm64/recommended/image_id --query Parameter.Value --output text)"
export AMD_AMI_ID="$(aws ssm get-parameter --name /aws/service/eks/optimized-ami/${K8S_VERSION}/amazon-linux-2/recommended/image_id --query Parameter.Value --output text)"
export GPU_AMI_ID="$(aws ssm get-parameter --name /aws/service/eks/optimized-ami/${K8S_VERSION}/amazon-linux-2-gpu/recommended/image_id --query Parameter.Value --output text)"
# deploy resources to support Karpenter
aws cloudformation deploy \
--stack-name "Karpenter-${CLUSTER_NAME}" \
--template-file karpenter-support-resources-cfn.yaml \
--capabilities CAPABILITY_NAMED_IAM \
--parameter-overrides "ClusterName=${CLUSTER_NAME}"
# generate cluster file and deploy
<<EOF > cluster.yaml
---
apiVersion: eksctl.io/v1alpha5
kind: ClusterConfig
metadata:
name: ${CLUSTER_NAME}
region: ${AWS_DEFAULT_REGION}
version: "${K8S_VERSION}"
tags:
karpenter.sh/discovery: ${CLUSTER_NAME}

iam:
withOIDC: true
serviceAccounts:
- metadata:
name: karpenter
namespace: "${KARPENTER_NAMESPACE}"
roleName: ${CLUSTER_NAME}-karpenter
attachPolicyARNs:
- arn:${AWS_PARTITION}:iam::${AWS_ACCOUNT_ID}:policy/KarpenterControllerPolicy-${CLUSTER_NAME}
roleOnly: true

iamIdentityMappings:
- arn: "arn:${AWS_PARTITION}:iam::${AWS_ACCOUNT_ID}:role/KarpenterNodeRole-${CLUSTER_NAME}"
username: system:node:{{EC2PrivateDNSName}}
groups:
- system:bootstrappers
- system:nodes

managedNodeGroups:
- instanceType: t3.medium
amiFamily: AmazonLinux2
name: ${CLUSTER_NAME}-ng
desiredCapacity: 2
minSize: 2
maxSize: 5
EOF
eksctl create cluster -f cluster.yaml

Next, we install Karpenter on the EKS cluster:

09-karpenter/commands.sh
# set additional environment variables
export CLUSTER_ENDPOINT="$(aws eks describe-cluster --name ${CLUSTER_NAME} --query "cluster.endpoint" --output text)"
export KARPENTER_IAM_ROLE_ARN="arn:${AWS_PARTITION}:iam::${AWS_ACCOUNT_ID}:role/${CLUSTER_NAME}-karpenter"
# install Karpenter
helm registry logout public.ecr.aws
helm upgrade --install karpenter oci://public.ecr.aws/karpenter/karpenter --version "${KARPENTER_VERSION}" --namespace "${KARPENTER_NAMESPACE}" --create-namespace \
--set "serviceAccount.annotations.eks\.amazonaws\.com/role-arn=${KARPENTER_IAM_ROLE_ARN}" \
--set "settings.clusterName=${CLUSTER_NAME}" \
--set "settings.interruptionQueue=${CLUSTER_NAME}" \
--set controller.resources.requests.cpu=1 \
--set controller.resources.requests.memory=1Gi \
--set controller.resources.limits.cpu=1 \
--set controller.resources.limits.memory=1Gi \
--wait

Finally, we create a node pool that specifies what compute our workload can support. In this case, Karpenter can provision EC2 Spot instances from the c, m, or r families from any generation greater than two running Linux on AMD64 architecture.

09-karpenter/commands.sh
# create NodePool
<<EOF > node-pool.yaml
apiVersion: karpenter.sh/v1beta1
kind: NodePool
metadata:
name: default
spec:
template:
spec:
requirements:
- key: kubernetes.io/arch
operator: In
values: ["amd64"]
- key: kubernetes.io/os
operator: In
values: ["linux"]
- key: karpenter.sh/capacity-type
operator: In
values: ["spot"]
- key: karpenter.k8s.aws/instance-category
operator: In
values: ["c", "m", "r"]
- key: karpenter.k8s.aws/instance-generation
operator: Gt
values: ["2"]
nodeClassRef:
apiVersion: karpenter.k8s.aws/v1beta1
kind: EC2NodeClass
name: default
limits:
cpu: 1000
disruption:
consolidationPolicy: WhenUnderutilized
expireAfter: 720h
---
apiVersion: karpenter.k8s.aws/v1beta1
kind: EC2NodeClass
metadata:
name: default
spec:
amiFamily: AL2
role: "KarpenterNodeRole-${CLUSTER_NAME}"
subnetSelectorTerms:
- tags:
karpenter.sh/discovery: "${CLUSTER_NAME}"
securityGroupSelectorTerms:
- tags:
karpenter.sh/discovery: "${CLUSTER_NAME}"
amiSelectorTerms:
- id: "${ARM_AMI_ID}"
- id: "${AMD_AMI_ID}"
EOF
kubectl apply -f node-pool.yaml

With the new EKS cluster deployed and Karpenter installed, we can add new Pods and see new EC2 instances created on our behalf.

09-karpenter/commands.sh
# deploy pods and scale
kubectl apply -f deployment.yaml
kubectl scale deployment inflate --replicas 5

In less than a minute after the inflate command, a new EC2 instance is created that matches the node pool specifications. In my case, a c5n.2xlarge server was deployed.

Karpenter instances

As expected, the node pool leverages Spot instances.

Karpenter instances

You can monitor the Karpenter logs via the command below. Less than a minute after deleting the Deployment, the c5n.2xlarge instance was terminated. Be sure to follow the cleanup steps when done to ensure no resources become orphaned.

09-karpenter/commands.sh
# monitor Karpenter events
kubectl logs -f -n "${KARPENTER_NAMESPACE}" -l app.kubernetes.io/name=karpenter -c controller
# scale down
kubectl delete deployment inflate
# clean up
helm uninstall karpenter --namespace "${KARPENTER_NAMESPACE}"
aws cloudformation delete-stack --stack-name "Karpenter-${CLUSTER_NAME}"
aws ec2 describe-launch-templates --filters Name=tag:karpenter.k8s.aws/cluster,Values=${CLUSTER_NAME} |
jq -r ".LaunchTemplates[].LaunchTemplateName" |
xargs -I{} aws ec2 delete-launch-template --launch-template-name {}
eksctl delete cluster --name "${CLUSTER_NAME}"

10: Persistent Volumes Using EBS (CKAD Topic)

Storage in Kubernetes can be classified as either ephemeral or persistent. Without leveraging PersistentVolumes (PVs), containers read and write data to the volume attached to the node they run on. Ephemeral storage is temporary and tied to the Pod's lifecycle. If requirements dictate that the storage persists or be shared across Pods, there are some prerequisites before EBS can be leveraged for PVs.

The first step is installing the AWS EBS Container Storage Interface (CSI) driver. The next step is to define a StorageClass (SC) that includes configuration such as volume type (e.g., gp3), encryption, etc. The final step is to reference a PersistentVolumeClaim (PVC) when deploying a Pod in order to dynamically provision the EBS volume and attach to the containers.

In practice, this goes as follows:

10-persistent-volumes/commands.sh
# assumes cluster created from 00-eksctl-configuration first
# create an OIDC provider
eksctl utils associate-iam-oidc-provider --cluster learning-kubernetes --approve
# install aws-ebs-csi-driver
eksctl create iamserviceaccount \
--name ebs-csi-controller-sa \
--namespace kube-system \
--cluster learning-kubernetes \
--role-name AmazonEKS_EBS_CSI_DriverRole \
--role-only \
--attach-policy-arn arn:aws:iam::aws:policy/service-role/AmazonEBSCSIDriverPolicy \
--approve
eksctl create addon --name aws-ebs-csi-driver --cluster learning-kubernetes --service-account-role-arn arn:aws:iam::$AWS_ACCOUNT_ID:role/AmazonEKS_EBS_CSI_DriverRole --force

Once completed, the add-on will appear in the AWS Console.

EBS CSI

Next, define the StorageClass and PersistentVolumeClaim:

10-persistent-volumes/storage-class.yaml
apiVersion: storage.k8s.io/v1
kind: StorageClass
metadata:
name: ebs-sc
provisioner: ebs.csi.aws.com
volumeBindingMode: WaitForFirstConsumer
parameters:
csi.storage.k8s.io/fstype: xfs
type: gp3
encrypted: "true"
allowedTopologies:
- matchLabelExpressions:
- key: topology.ebs.csi.aws.com/zone
values:
- us-west-2a
- us-west-2b
- us-west-2c
10-persistent-volumes/persistent-volume-claim.yaml
apiVersion: v1
kind: PersistentVolumeClaim
metadata:
name: ebs-claim
spec:
accessModes:
- ReadWriteOnce
storageClassName: ebs-sc
resources:
requests:
storage: 4Gi

Finally, attach the PVC to the Pod and deploy:

10-persistent-volumes/persistent-volume-claim.yaml
apiVersion: v1
kind: Pod
metadata:
name: app
spec:
containers:
- name: app
image: centos
command: ["/bin/sh"]
args: ["-c", "while true; do echo $(date -u) >> /data/out.txt; sleep 5; done"]
volumeMounts:
- name: persistent-storage
mountPath: /data
volumes:
- name: persistent-storage
persistentVolumeClaim:
claimName: ebs-claim

As soon as the Pod is created, a gp3 volume is provisioned.

PVC

11: Prometheus and Grafana

The next several sections focus on observability. Prometheus is an open-source monitoring system commonly leveraged in Kubernetes clusters. As a de facto standard, it's widely used with Grafana to provide cluster monitoring. Using Helm we can quickly deploy both of these tools to our cluster.

11-prometheus-and-grafana/commands.sh
# assumes cluster created from 00-eksctl-configuration first
# install Helm on local machine
# https://helm.sh/docs/intro/install/
brew install helm
# install Helm charts
helm repo add prometheus-community https://prometheus-community.github.io/helm-charts
helm repo update
helm install v60-0-1 prometheus-community/kube-prometheus-stack --version 60.0.1
# use http://localhost:9090 to access Prometheus
kubectl port-forward svc/prometheus-operated 9090
# get Grafana password for admin
kubectl get secret v60-0-1-grafana -o jsonpath="{.data.admin-password}" | base64 --decode ; echo
# use http://localhost:3000 to access Grafana
kubectl port-forward svc/v60-0-1-grafana 3000:80

Using port forwarding, we can quickly access Prometheus:
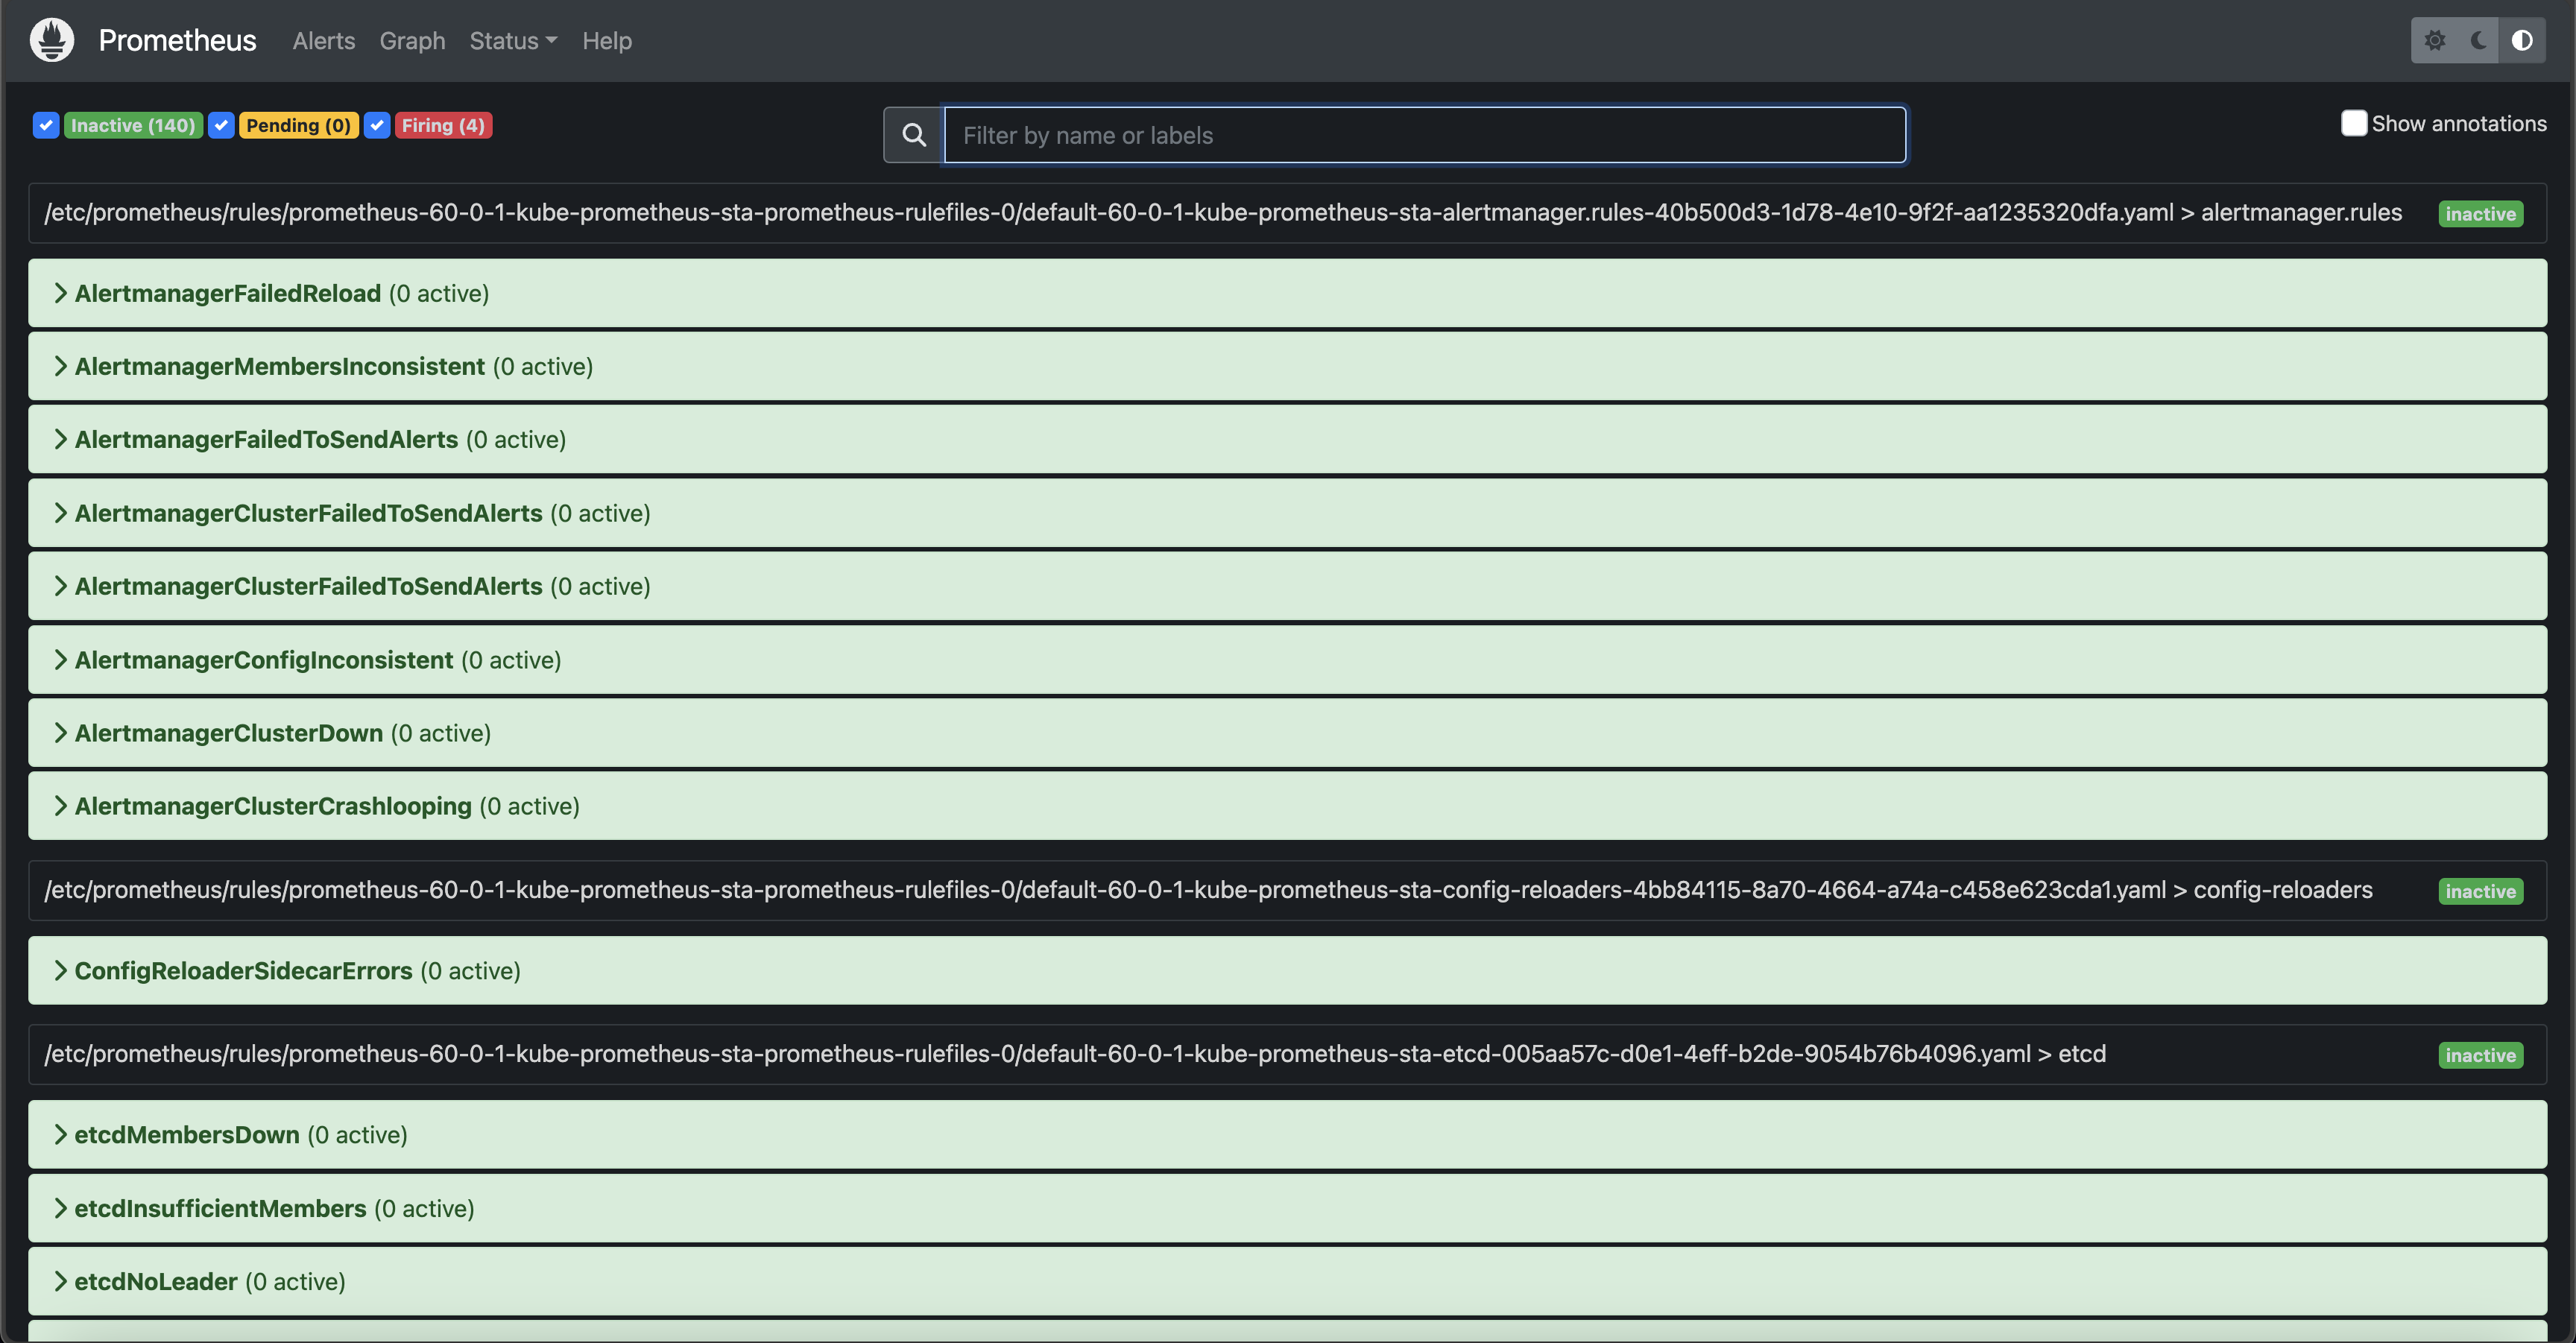
Prometheus

And Grafana:

Grafana

12: Container Insights

Prometheus and Grafana are both open-source and cloud-agnostic. AWS has a native infrastructure monitoring offering called Container Insights that integrates cluster data with the AWS Console via CloudWatch with two simple commands:

12-container-insights/commands.sh
# assumes cluster created from 00-eksctl-configuration first
# configure permissions
# change role to the one created by eksctl
aws iam attach-role-policy \
--role-name $EKSCTL_NODEGROUP_ROLE_NAME \
--policy-arn arn:aws:iam::aws:policy/CloudWatchAgentServerPolicy
# wait until add-on is installed and give time for data to propagate
aws eks create-addon --cluster-name learning-kubernetes --addon-name amazon-cloudwatch-observability
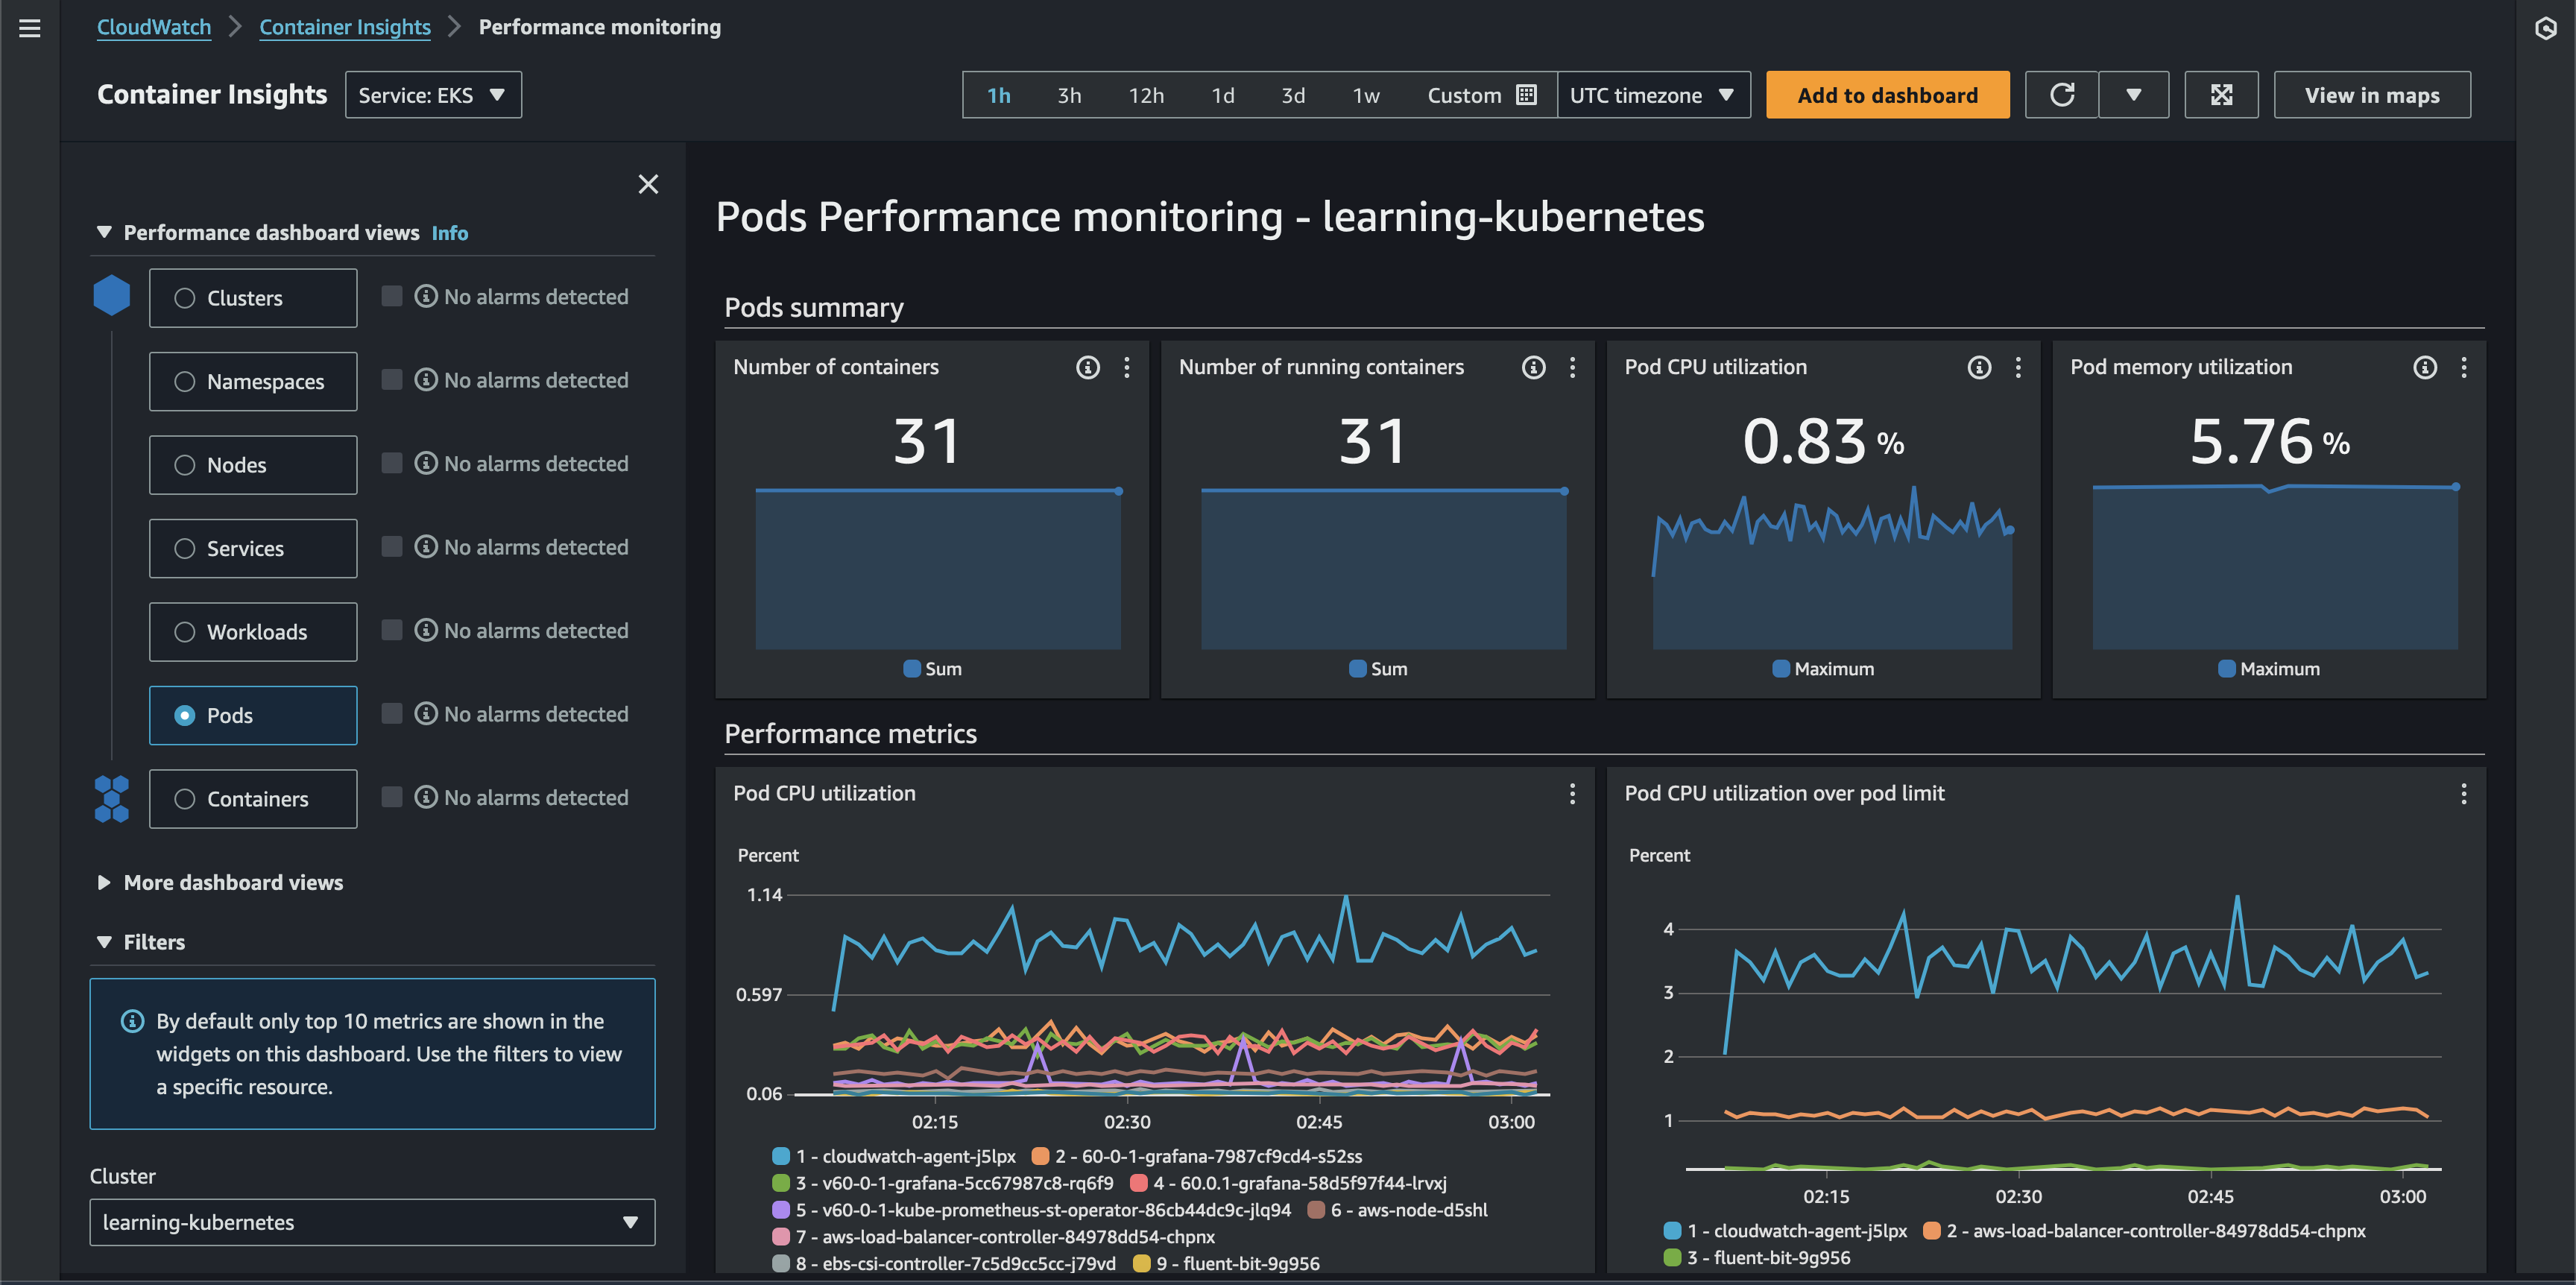
Container Insights

It's worth noting that Container Insights can also ingest Prometheus metrics.

13: EKS Split Cost Allocation Data in Cost and Usage Reports

The AWS Cost and Usage Reports (CUR) are the most comprehensive and detailed billing data available to customers. It offers a well-defined schema that we can use to write SQL queries against via Athena. CUR data offers resource-level time series data for in-depth AWS cost and usage analysis. In April 2024, AWS released EKS split cost allocation data for CUR. Previously, the lowest resource level available was an EC2 instance. This feature adds billing data container-level resources in EKS (e.g., Pods).

Create a new CUR via Data Exports in the Billing and Cost Management Console if required. If you have an existing CUR without split cost allocation data, you can modify the report content configuration to add this.
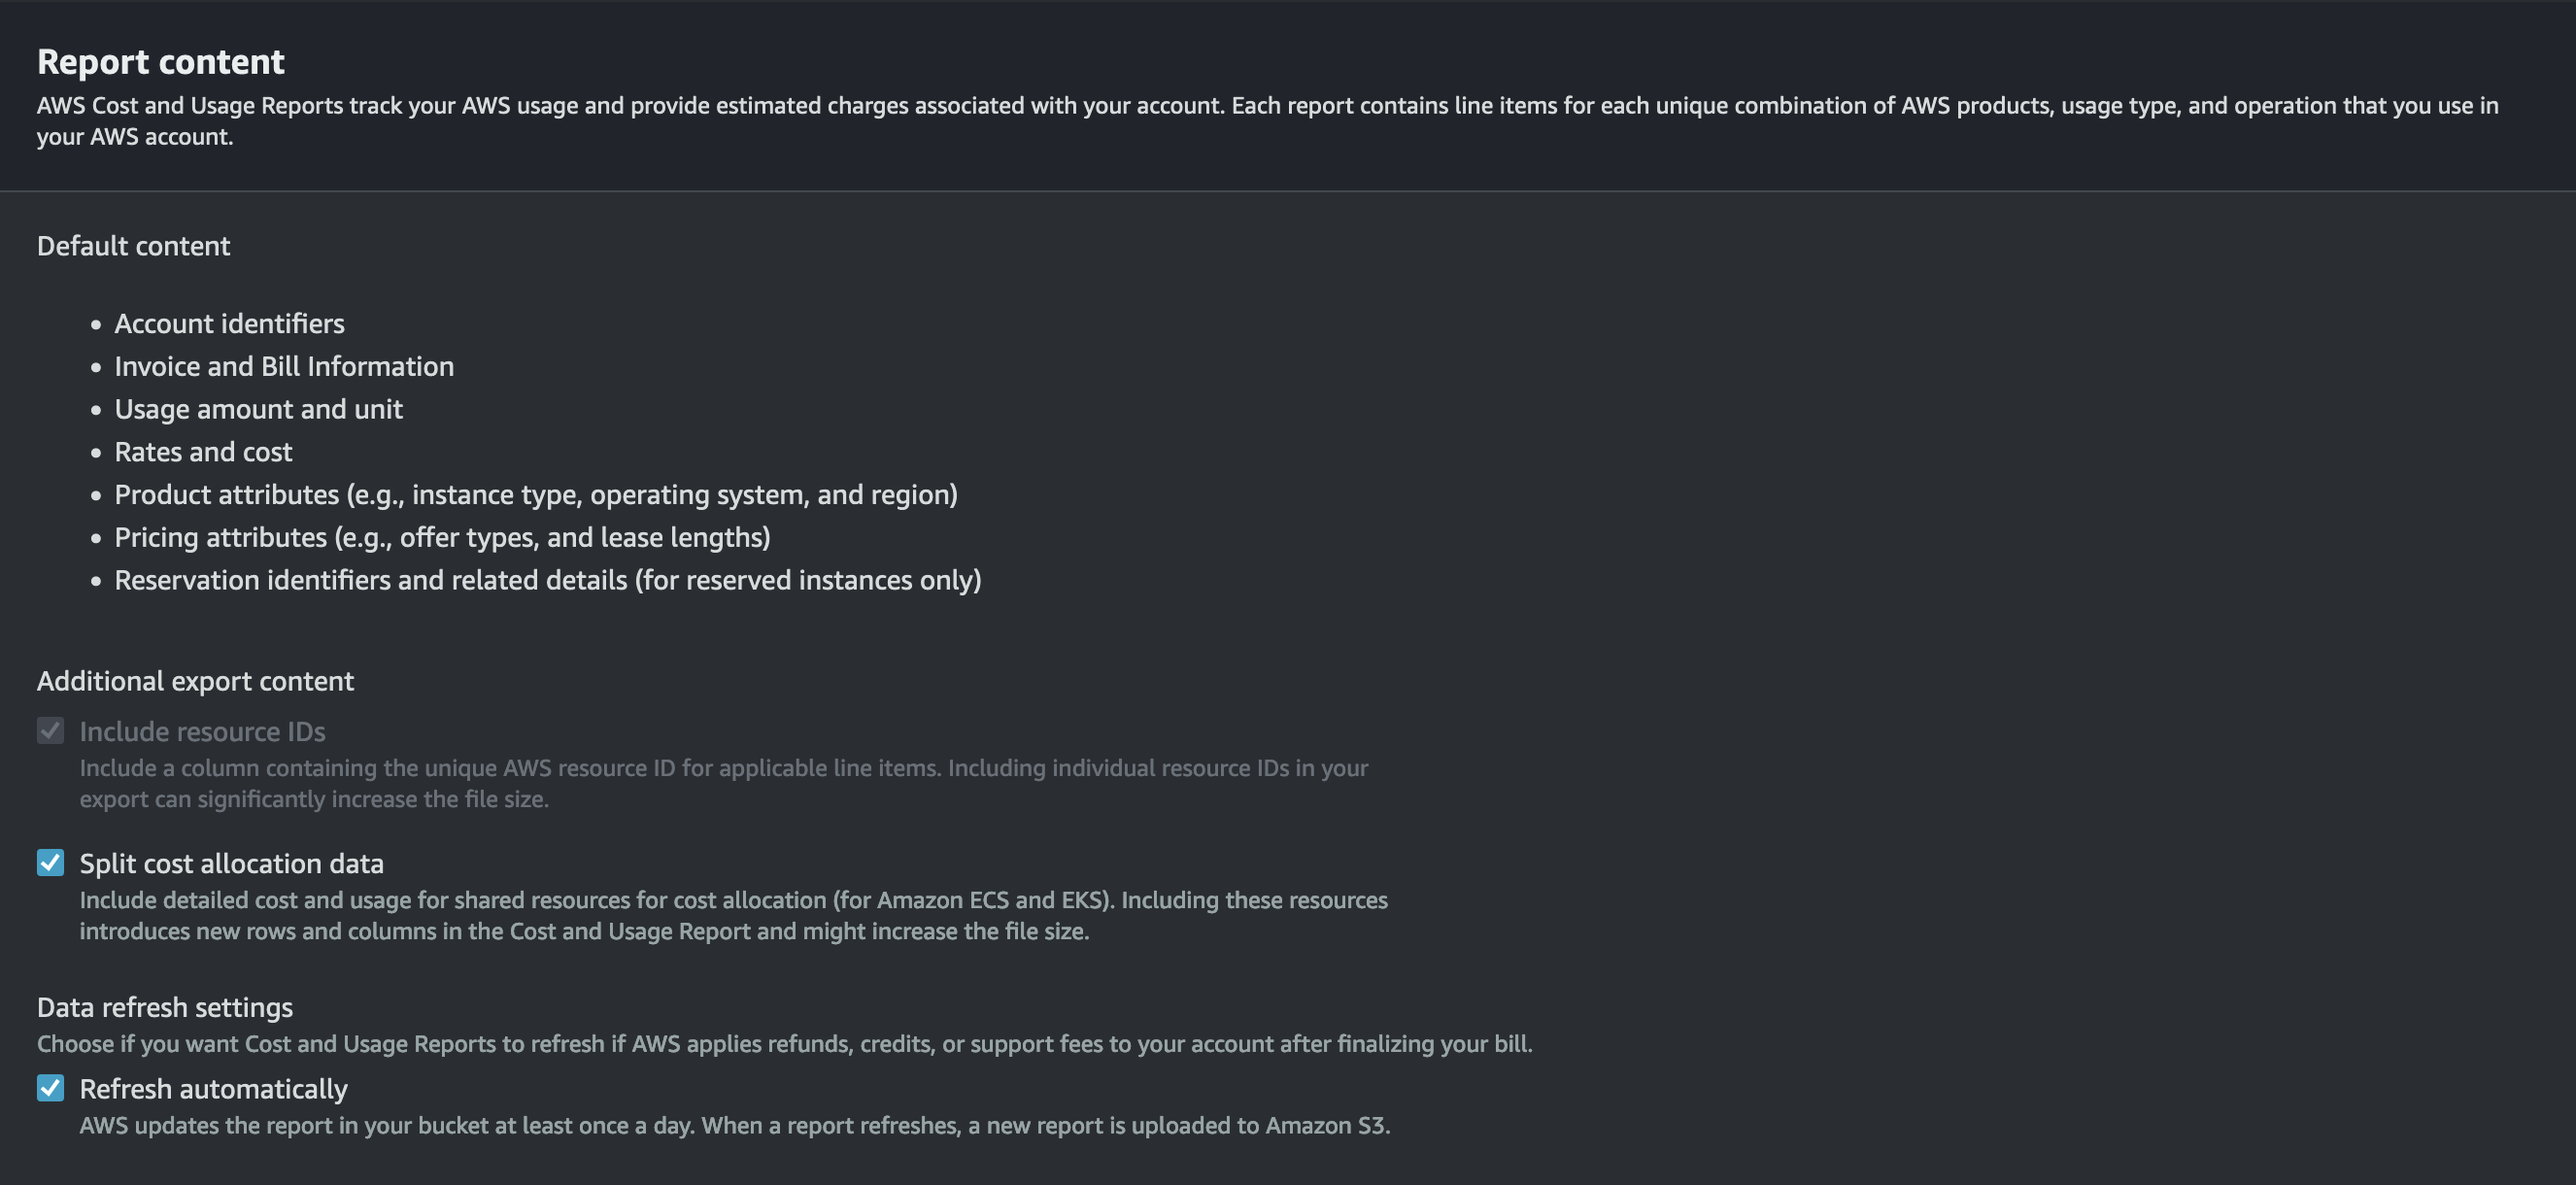
Data Exports

With this configured, we can use the following SQL query in Athena to gather cost and usage data for the EKS cluster resources:

13-cur-split-cost-allocation/query.sql
SELECT 
DATE_FORMAT(
DATE_TRUNC(
'day', "line_item_usage_start_date"
),
'%Y-%m-%d'
) AS "date",
"line_item_resource_id" AS "resource_id",
ARBITRARY(CONCAT(
REPLACE(
SPLIT_PART(
"line_item_resource_id",
'/', 1
),
'pod',
'cluster'
),
'/',
SPLIT_PART(
"line_item_resource_id",
'/', 2
)
)) AS "cluster_arn",
ARBITRARY(SPLIT_PART(
"line_item_resource_id",
'/', 2
)) AS "cluster_name",
ARBITRARY("split_line_item_parent_resource_id") AS "node_instance_id",
ARBITRARY("resource_tags_aws_eks_node") AS "node_name",
ARBITRARY(SPLIT_PART(
"line_item_resource_id",
'/', 3
)) AS "namespace",
ARBITRARY("resource_tags_aws_eks_workload_type") AS "controller_kind",
ARBITRARY("resource_tags_aws_eks_workload_name") AS "controller_name",
ARBITRARY("resource_tags_aws_eks_deployment") AS "deployment",
ARBITRARY(SPLIT_PART(
"line_item_resource_id",
'/', 4
)) AS "pod_name",
ARBITRARY(SPLIT_PART(
"line_item_resource_id",
'/', 5
)) AS "pod_uid",
SUM(
CASE WHEN "line_item_usage_type" LIKE '%EKS-EC2-vCPU-Hours' THEN "split_line_item_split_cost" + "split_line_item_unused_cost" ELSE 0.0 END
) AS "cpu_cost",
SUM(
CASE WHEN "line_item_usage_type" LIKE '%EKS-EC2-GB-Hours' THEN "split_line_item_split_cost" + "split_line_item_unused_cost" ELSE 0.0 END
) AS "ram_cost",
SUM(
"split_line_item_split_cost" + "split_line_item_unused_cost"
) AS "total_cost"
FROM
cur
WHERE
"line_item_operation" = 'EKSPod-EC2'
AND CURRENT_DATE - INTERVAL '7' DAY <= "line_item_usage_start_date"
GROUP BY
1,
2
ORDER BY
"cluster_arn",
"date" DESC
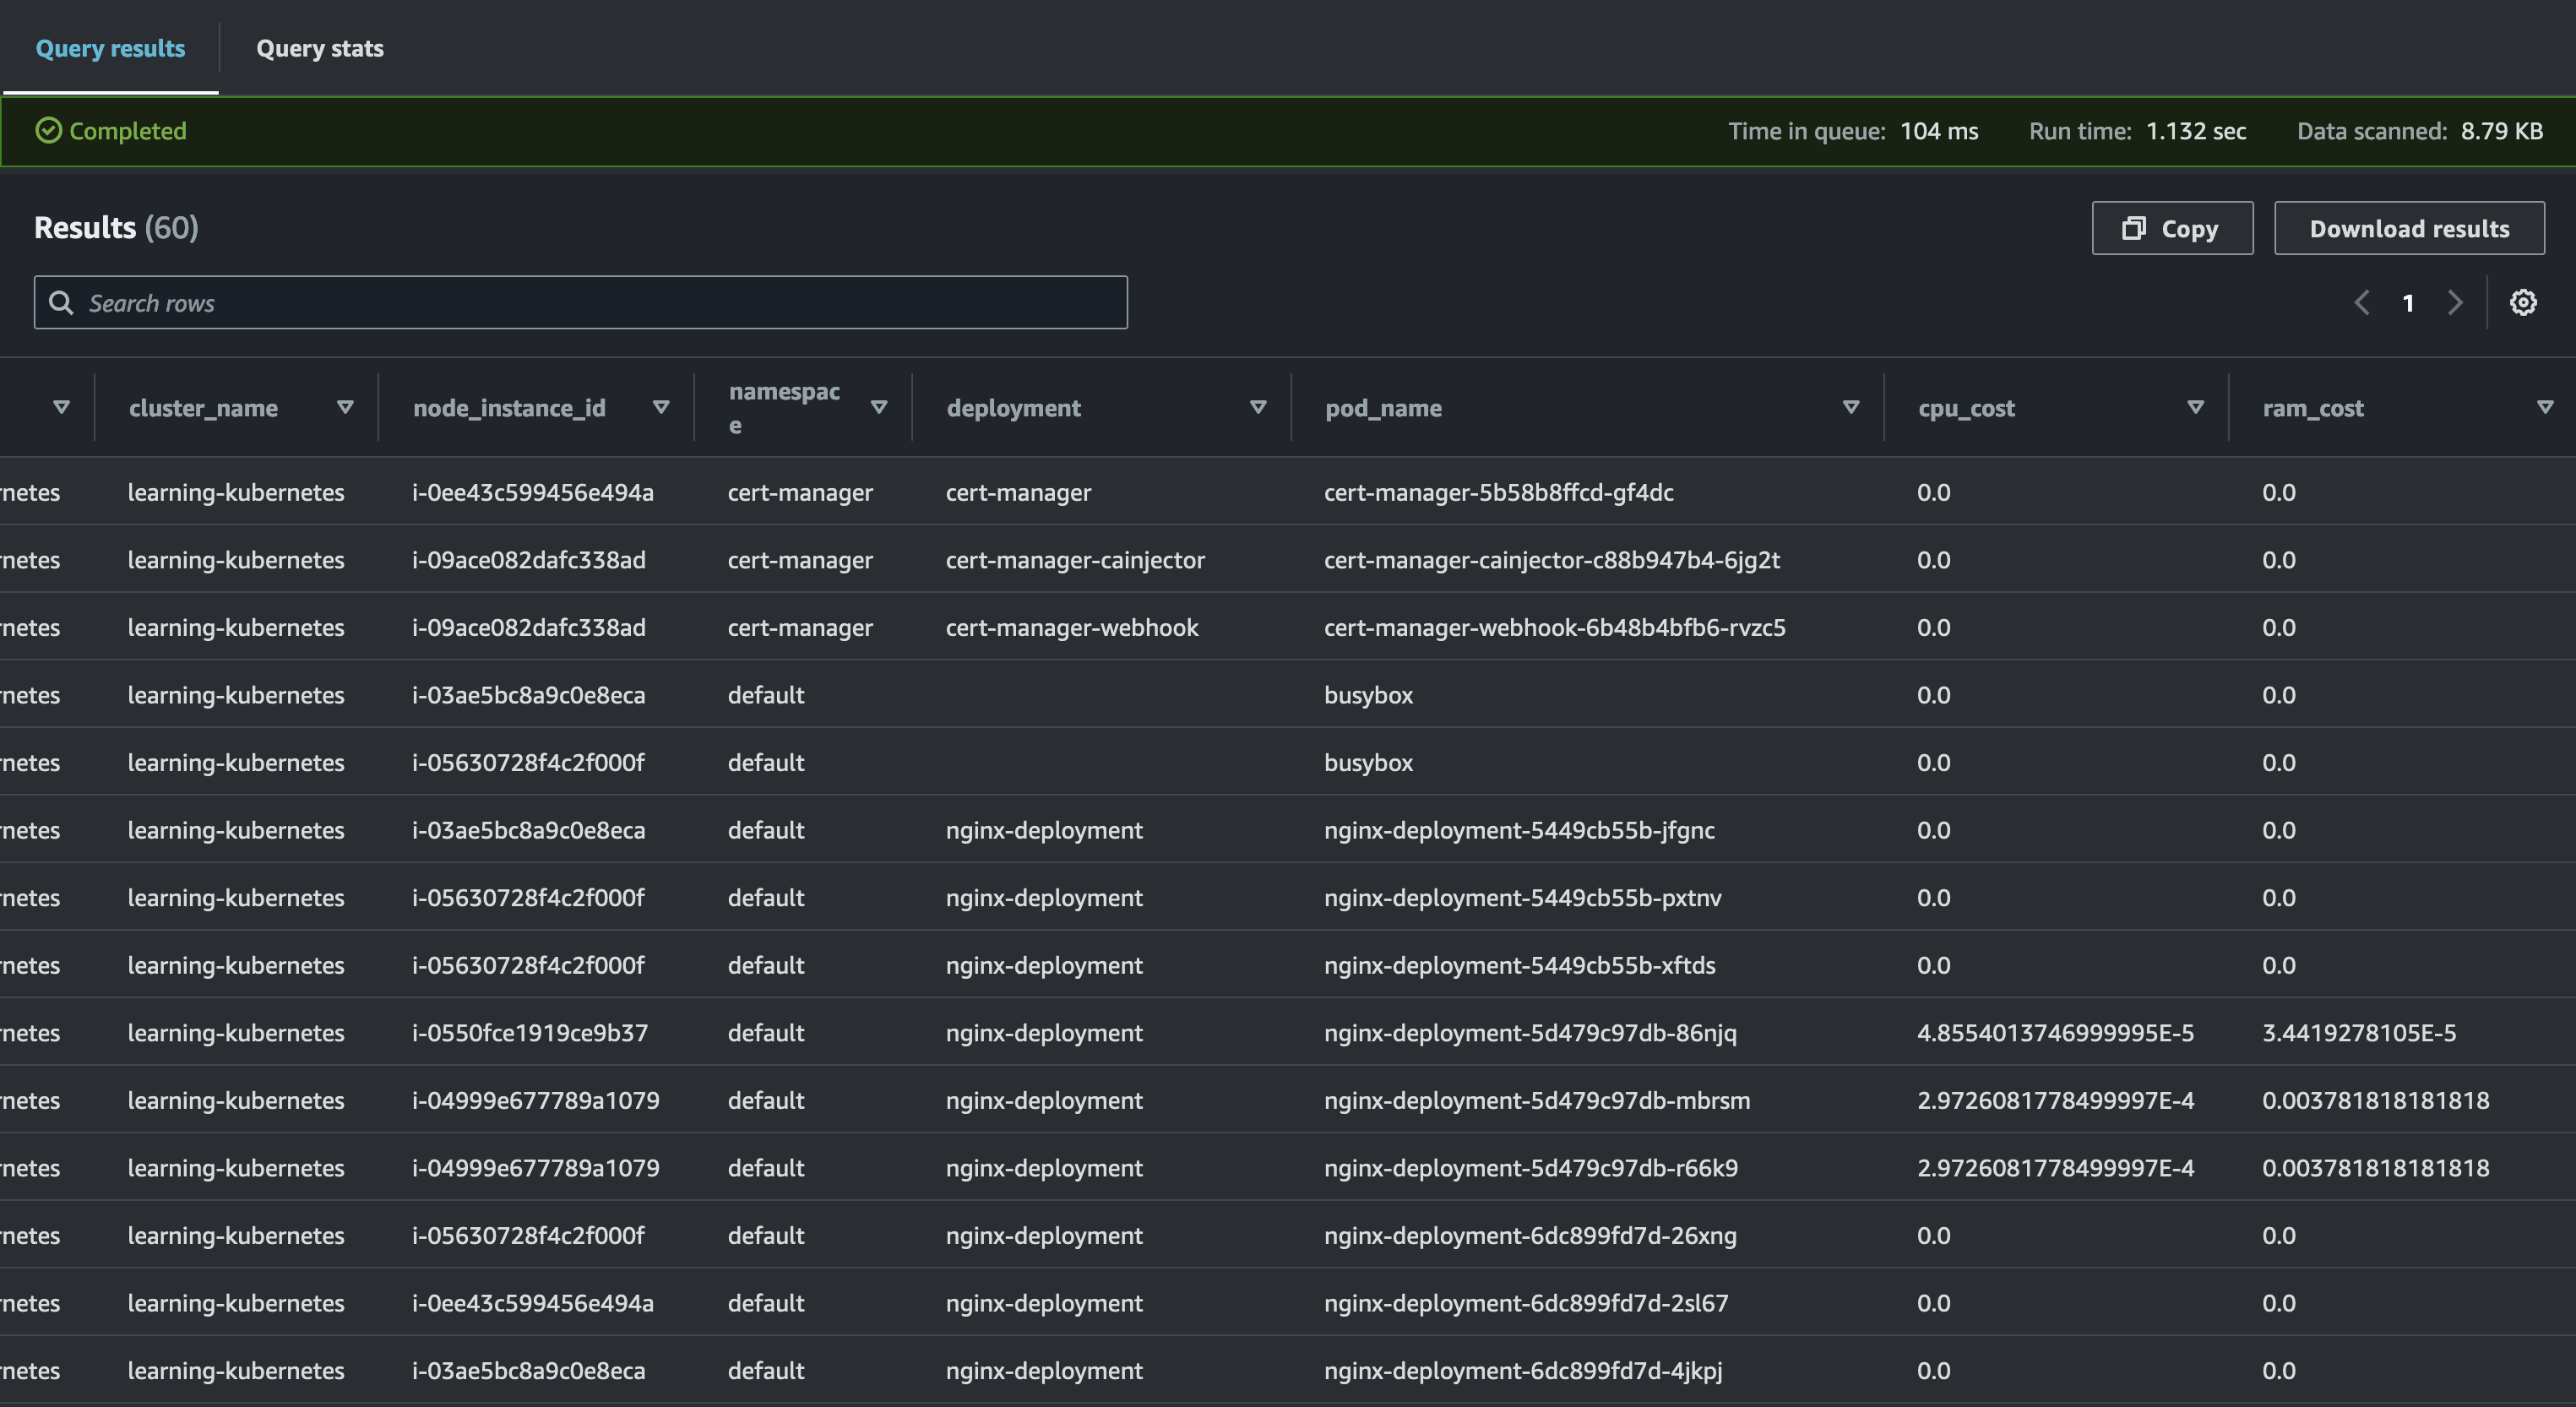
Athena

AWS also offers open-source QuickSight dashboards that provide a visualization of this data.

14: ConfigMap (CKAD Topic)

The following two sections focus on configuration management. A ConfigMap is a Kubernetes construct that stores non-sensitive key-value pairs (e.g., URLs, feature flags, etc.). There are several ways to consume ConfigMaps, but we'll set an environment variable for a container below. First, I created a TypeScript Cloud Development Kit (CDK) application to deploy a FastAPI container to Elastic Container Repository (ECR). The API is simple:

14-configmap/api-cdk/container/app/main.py
api = fastapi.FastAPI()
@api.get('/api/config')
def config():
return {
'message': os.getenv('CONFIG_MESSAGE', 'Message not set')
}

We publish the container to ECR via CDK:

14-configmap/api-cdk/lib/api-cdk-stack.ts
import * as cdk from 'aws-cdk-lib';
import { Construct } from 'constructs';
import { DockerImageAsset } from 'aws-cdk-lib/aws-ecr-assets';

export class ApiCdkStack extends cdk.Stack {
constructor(scope: Construct, id: string, props?: cdk.StackProps) {
super(scope, id, props);
const dockerImageAsset = new DockerImageAsset(this, 'MyDockerImage', {
directory: './container/'
});
}
}

Next, we define the ConfigMap:

14-configmap/configmap.yaml
apiVersion: v1
kind: ConfigMap
metadata:
name: api-configmap
data:
config-message: "Hello from ConfigMap!"

Finally, we reference the ConfigMap in the Deployment:

14-configmap/deployment.yaml
apiVersion: apps/v1
kind: Deployment
metadata:
name: config-api-deployment
spec:
replicas: 1
selector:
matchLabels:
name: config-api
template:
metadata:
labels:
name: config-api
spec:
containers:
- name: config-api-container
# deployed via CDK
# replace with your image
image: 196736724465.dkr.ecr.us-west-2.amazonaws.com/cdk-hnb659fds-container-assets-196736724465-us-west-2:afbbd8d7b43a7f833eb07c26a13d5344fa7656c136b1e27b545490fa58dad983
ports:
- containerPort: 8000
env:
- name: CONFIG_MESSAGE
valueFrom:
configMapKeyRef:
name: api-configmap
key: config-message

With the API deployed, we can verify that the configuration propagates correctly.

14-configmap/commands.sh
# entering BusyBox container shell
kubectl run -it --rm --restart=Never busybox --image=busybox sh
wget config-api-service:80/api/config
cat config

15: Secrets (CKAD Topic)

Secrets are very similar to ConfigMaps except that they are intended for sensitive information. Opaque is the default type of Secret for arbitrary user data unless you need to store SSH credentials, TLS certificates, ~/.dockercfg, etc. For a complete list of types, see the documentation. Kubernetes Secrets do not encrypt the data on your behalf. That responsibility is on the developer.

15-secrets/secret.yaml
apiVersion: v1
kind: Secret
metadata:
name: busybox-password
type: Opaque
data:
password: MWYyZDFlMmU2N2Rm

16: Multi-Container Pods (CKAD Topic)

In the examples so far, Pods and containers had a 1:1 relationship. Two common patterns for multi-container Pods in Kubernetes are init containers and sidecars. To illustrate these patterns, we'll use a PostgreSQL database with a backend that relies on it. Given that the backend container depends on the database, we must ensure that PostgreSQL is available before starting it. To do so, we can use an init container that verifies the ability to connect to the database. All init containers run before the Pod starts. If any init container fails, the Pod fails.

16-multi-container-pods/backend.deployment.yaml
apiVersion: apps/v1
kind: Deployment
metadata:
name: backend-with-database
namespace: default
spec:
selector:
matchLabels:
app: backend
replicas: 1
template:
metadata:
labels:
app: backend
spec:
initContainers:
- name: verify-database-online
image: postgres
command: [ 'sh', '-c',
'until pg_isready -h database-service -p 5432;
do echo waiting for database; sleep 2; done;' ]
containers:
- name: backend
image: nginx

An example of a sidecar container is a GUI called Adminer for the database. The GUI has a lifecycle tightly coupled to the Postgres container (i.e., if we don't need the database anymore, we don't need the GUI). To configure a sidecar, append another container to the Deployment's spec:

16-multi-container-pods/database.deployment.yaml
apiVersion: apps/v1
kind: Deployment
metadata:
name: postgres-database
namespace: default
spec:
selector:
matchLabels:
app: database
replicas: 1
template:
metadata:
labels:
app: database
spec:
containers:
- name: database
image: postgres
envFrom:
- configMapRef:
name: database-access
ports:
- containerPort: 5432
- name: database-admin
image: adminer
ports:
- containerPort: 8080

With the sidecar in place, we can deploy and leverage the GUI to log into our database.

16-multi-container-pods/commands.sh
# assumes cluster created from 00-eksctl-configuration first
kubectl apply -f database.configmap.yaml
kubectl apply -f backend.deployment.yaml
# check that the primary container is not yet running because the init container has not completed
# STATUS shows as Init:0/1
kubectl get pods
# deploy database and service
kubectl apply -f database.deployment.yaml
kubectl apply -f database.service.yaml
# verify that init container has completed
# get database pod
kubectl get pods
# forward ports
kubectl port-forward pod/postgres-database-697695b774-xcp9p 9000:8080
# open Adminer in browser
# see screenshot for logging in
wget http://localhost:9000
# clean up
kubectl delete -f ./

17: Deployment Strategies (CKAD Topic)

The four most common deployment strategies are rolling, blue/green, canary, and recreate. Rolling updates involve deploying new Pods in a batch while decreasing old Pods at the same rate. This is the default behavior in Kubernetes. Blue/green deployments provision an entirely new environment (green) parallel to the existing one (blue), then perform a Service selector cutover when approved for production release. Canary deployments allow developers to test a new deployment with a subset of users in parallel with the current production release. Recreating an environment involves destroying the old environment and then provisioning a new one, which may result in downtime.

For a blue/green release, let's start by creating the blue and green deployments. The following YAML for the blue deployment is nearly identical to the green. The only difference is the Docker image used.

17-deployment-strategies/blue-green-deployment/blue.deployment.yaml
apiVersion: apps/v1
kind: Deployment
metadata:
name: blue-deployment
spec:
replicas: 2
selector:
matchLabels:
app: nginx
role: blue
template:
metadata:
labels:
app: nginx
role: blue
spec:
# the green deployment uses the green Docker image
containers:
- name: blue
image: scottenriquez/blue-nginx-app
imagePullPolicy: Always
ports:
- containerPort: 80
resources:
limits:
memory: "128Mi"
cpu: "200m"

By default, the production Service should point to the blue environment.

17-deployment-strategies/blue-green-deployment/production.service.yaml
kind: Service
apiVersion: v1
metadata:
name: production-service
labels:
env: production
spec:
type: ClusterIP
selector:
app: nginx
ports:
- port: 9000
targetPort: 80

To perform the release, change the selector on the Production service. Then verify that the web application contains the green release instead of the blue.

17-deployment-strategies/blue-green-deployment/commands.sh
# perform cutover
# can also be done via manifest
kubectl set selector service production-service 'role=green'
# entering BusyBox container shell
kubectl run -it --rm --restart=Never busybox --image=busybox sh
# verify green in HTML
wget production-service:9000
cat index.html

Switching gears to a canary release, we start by creating stable and canary Deployments. In this code example, the two web applications are nearly identical, except that the canary has a yellow message in a <h1> tag. We control the percentage of canary Pods by splitting the number of canary and stable replicas. For this example, there is a 20% chance of using a canary Pod because there is one canary replica and four stable replicas.

17-deployment-strategies/canary-deployment/canary.deployment.yaml
apiVersion: apps/v1
kind: Deployment
metadata:
name: canary-deployment
spec:
# the stable Deployment has four replicas
replicas: 1
selector:
matchLabels:
track: canary
template:
metadata:
labels:
app: nginx
track: canary
spec:
# the stable deployment uses the stable Docker image
containers:
- name: canary-deployment
image: scottenriquez/canary-nginx-app
imagePullPolicy: Always
ports:
- containerPort: 80
resources:
limits:
memory: "128Mi"
cpu: "200m"

With this approach, traffic will be directed to the canary pod on average 20% of the time. It may take several requests to the Service, but a canary webpage will eventually be returned.

Canary

18: Probes (CKAD Topic)

There are two primary types of probes: readiness and liveness. Kubernetes uses liveness probes to determine when to restart a container (i.e., a health check). It uses readiness probes to determine when a container is ready to accept traffic. These two probes are independent and unaware of each other. Probes of type HTTP, TCP, gRPC, and shell commands are supported. For this example, we'll use HTTP for both and add them as endpoints to an API:

18-probes-and-health-checks/api-cdk/container/app/main.py
@api.get('/api/healthy')
def config():
return {
'healthy': True
}

@api.get('/api/ready')
def config():
return {
'ready': True
}

In the Deployment manifest, we simply map the probes to the endpoints:

18-probes-and-health-checks/deployment.yaml
apiVersion: apps/v1
kind: Deployment
metadata:
name: probe-api-deployment
spec:
replicas: 1
selector:
matchLabels:
name: probe-api
template:
metadata:
labels:
name: probe-api
spec:
containers:
- name: probe-api-container
# deployed via CDK
# replace with your image
image: 196736724465.dkr.ecr.us-west-2.amazonaws.com/cdk-hnb659fds-container-assets-196736724465-us-west-2:86b591781a296c7b2980608eeb67e30aaf316c732c92b6a47e536555bce0dc93
ports:
- containerPort: 8000
resources:
limits:
cpu: 250m
memory: 256Mi
livenessProbe:
httpGet:
path: /api/healthy
port: 8000
readinessProbe:
httpGet:
path: /api/ready
port: 8000

19: SecurityContext (CKAD Topic)

A SecurityContext resource configures a Pod's privilege and access control settings, such as enabling or disabling Linux capabilities and running as a specific user ID. This topic is straightforward but critical for the exam.

19-security-context/pod.yaml
apiVersion: v1
kind: Pod
metadata:
name: security-context-pod
spec:
securityContext:
runAsUser: 1000
runAsGroup: 3000
fsGroup: 2000
volumes:
- name: security-context-pod-volume
emptyDir: {}
containers:
- name: security-context-container
image: busybox:1.28
command: [ "sh", "-c", "id" ]
volumeMounts:
- name: security-context-pod-volume
mountPath: /data/security-context-volume
securityContext:
allowPrivilegeEscalation: false

20: ServiceAccounts and Role-Based Access Control (CKAD Topic)

Like how Identity and Access Management (IAM) in AWS grants principals permissions to specific actions for specific resources, Kubernetes Roles and ServiceAccounts allow resources within the cluster to leverage the control plane to perform operations on the cluster. For this example, let's grant a Pod access to get other Pods. We start by creating a Role:

20-service-accounts-and-rbac/role.yaml
apiVersion: rbac.authorization.k8s.io/v1
kind: Role
metadata:
namespace: default
name: pod-reader
rules:
# "" indicates the core API group
- apiGroups: [""]
resources: ["pods"]
verbs: ["get", "watch", "list"]

A ServiceAccount provides an identity for processes that run inside Pods. We generate one next:

20-service-accounts-and-rbac/service-account.yaml
apiVersion: v1
kind: ServiceAccount
metadata:
annotations:
kubernetes.io/enforce-mountable-secrets: "true"
name: sa-pod-reader

Next, we bind the Role to the ServiceAccount:

20-service-accounts-and-rbac/role-binding.yaml
apiVersion: rbac.authorization.k8s.io/v1
kind: RoleBinding
metadata:
name: read-pods
namespace: default
subjects:
- kind: ServiceAccount
name: sa-pod-reader
apiGroup: ""
roleRef:
kind: Role
name: pod-reader
apiGroup: ""

Then, we create a Pod that leverages the ServiceAccount:

20-service-accounts-and-rbac/pod.yaml
apiVersion: v1
kind: Pod
metadata:
name: reader-pod
spec:
serviceAccountName: sa-pod-reader
containers:
- name: reader-container
image: alpine:3.12
resources:
limits:
memory: "128Mi"
cpu: "500m"
command: ["/bin/sh"]
args: ["-c", "sleep 3600"]

Finally, we can test specific operations against the API server to validate that certain actions are allowed and others are denied.

20-service-accounts-and-rbac/commands.sh
# entering Pod shell
kubectl exec -it reader-pod -- sh
# install curl
apk --update add curl
# get Pods
# allowed by Role
curl -s --header "Authorization: Bearer $(cat /var/run/secrets/kubernetes.io/serviceaccount/token)" --cacert /var/run/secrets/kubernetes.io/serviceaccount/ca.crt https://kubernetes/api/v1/namespaces/default/pods
# get Secrets
# denied by Role
curl -s --header "Authorization: Bearer $(cat /var/run/secrets/kubernetes.io/serviceaccount/token)" --cacert /var/run/secrets/kubernetes.io/serviceaccount/ca.crt https://kubernetes/api/v1/namespaces/default/secrets

21: NetworkPolicy (CKAD Topic)

By default, network traffic between Pods is unrestricted. In other words, any Pod can communicate with any other Pod. A NetworkPolicy is a Kubernetes resource that uses selectors to implement granular ingress and egress rules. However, a network plugin must first be installed in the cluster to leverage NetworkPolicies. For this example, we will use Calico. For EKS, this only requires two commands:

21-network-policy/commands.sh
kubectl create -f https://raw.githubusercontent.com/projectcalico/calico/v3.28.1/manifests/tigera-operator.yaml
kubectl create -f - <<EOF
kind: Installation
apiVersion: operator.tigera.io/v1
metadata:
name: default
spec:
kubernetesProvider: EKS
cni:
type: AmazonVPC
calicoNetwork:
bgp: Disabled
EOF

With the network plugin installed, we can define a simple NetworkPolicy based on three example Pods:

21-network-policy/network-policy.yaml
apiVersion: networking.k8s.io/v1
kind: NetworkPolicy
metadata:
name: pod-one-and-two-network-policy
spec:
podSelector:
matchLabels:
# this label is also attached to the first two Pods but not the third
network: allow-pod-one-and-two
policyTypes:
- Ingress
- Egress
ingress:
- from:
- podSelector:
matchLabels:
network: allow-pod-one-and-two
egress:
- to:
- podSelector:
matchLabels:
network: allow-pod-one-and-two

After applying the manifest above, we can validate that the network traffic now behaves as expected (i.e., the first two Pods can communicate with each other without allowing traffic from the third).

21-network-policy/commands.sh
# get Pod IP addresses
kubectl get pods -o wide
# enter pod-three shell
kubectl exec -it pod-three -- sh
# ping pod-one and pod-two IP address (replace with yours)
# these commands should hang
ping 192.168.2.246
ping 192.168.21.2
# returning to default shell
exit
# enter pod-one shell
kubectl exec -it pod-one -- sh
# ping pod-two IP address (replace with yours)
# this command should be successful
ping 192.168.21.2
# ping pod-three IP address (replace with yours)
# this command should hang
ping 192.168.71.123

22: ArgoCD

ArgoCD is a declarative continuous delivery tool for Kubernetes that leverages the GitOps pattern (i.e., storing configuration files in a Git repository to serve as the single source of truth). Instead of developers constantly typing kubectl apply -f manifest.yaml, ArgoCD monitors a specified Git repository for changes to manifests. ArgoCD applications can be configured to automatically update when deltas are detected or require manual intervention. Applications can be created using a GUI or through a YAML file. To get started, we install ArgoCD on the cluster and configure port forwarding to access the UI locally.

22-argocd/commands.sh
# install CLI
brew install argocd
# install ArgoCD on the cluster
kubectl create namespace argocd
kubectl apply -n argocd -f https://raw.githubusercontent.com/argoproj/argo-cd/stable/manifests/install.yaml
# get initial password
argocd admin initial-password -n argocd
# forward ports to access the ArgoCD UI locally
kubectl port-forward svc/argocd-server -n argocd 8080:443

Once we've navigated to the UI in the browser, we create an ArgoCD application using the following YAML:

22-argocd/argocd-application.yaml
apiVersion: argoproj.io/v1alpha1
kind: Application
metadata:
name: helm-webapp-dev
spec:
destination:
name: ''
namespace: default
server: https://kubernetes.default.svc
source:
path: helm-webapp
# all credit to devopsjourney1 for the repository
# https://github.com/devopsjourney1
# https://www.youtube.com/@DevOpsJourney
repoURL: https://github.com/scottenriquez/argocd-examples
targetRevision: HEAD
helm:
valueFiles:
- values-dev.yaml
sources: []
project: default
syncPolicy:
automated:
prune: false
selfHeal: false

Based on the configuration, the ArgoCD application will automatically be updated when we commit to the specified GitHub repository. Via the UI, we can monitor the resources that have been created, sync status, commit information, etc.
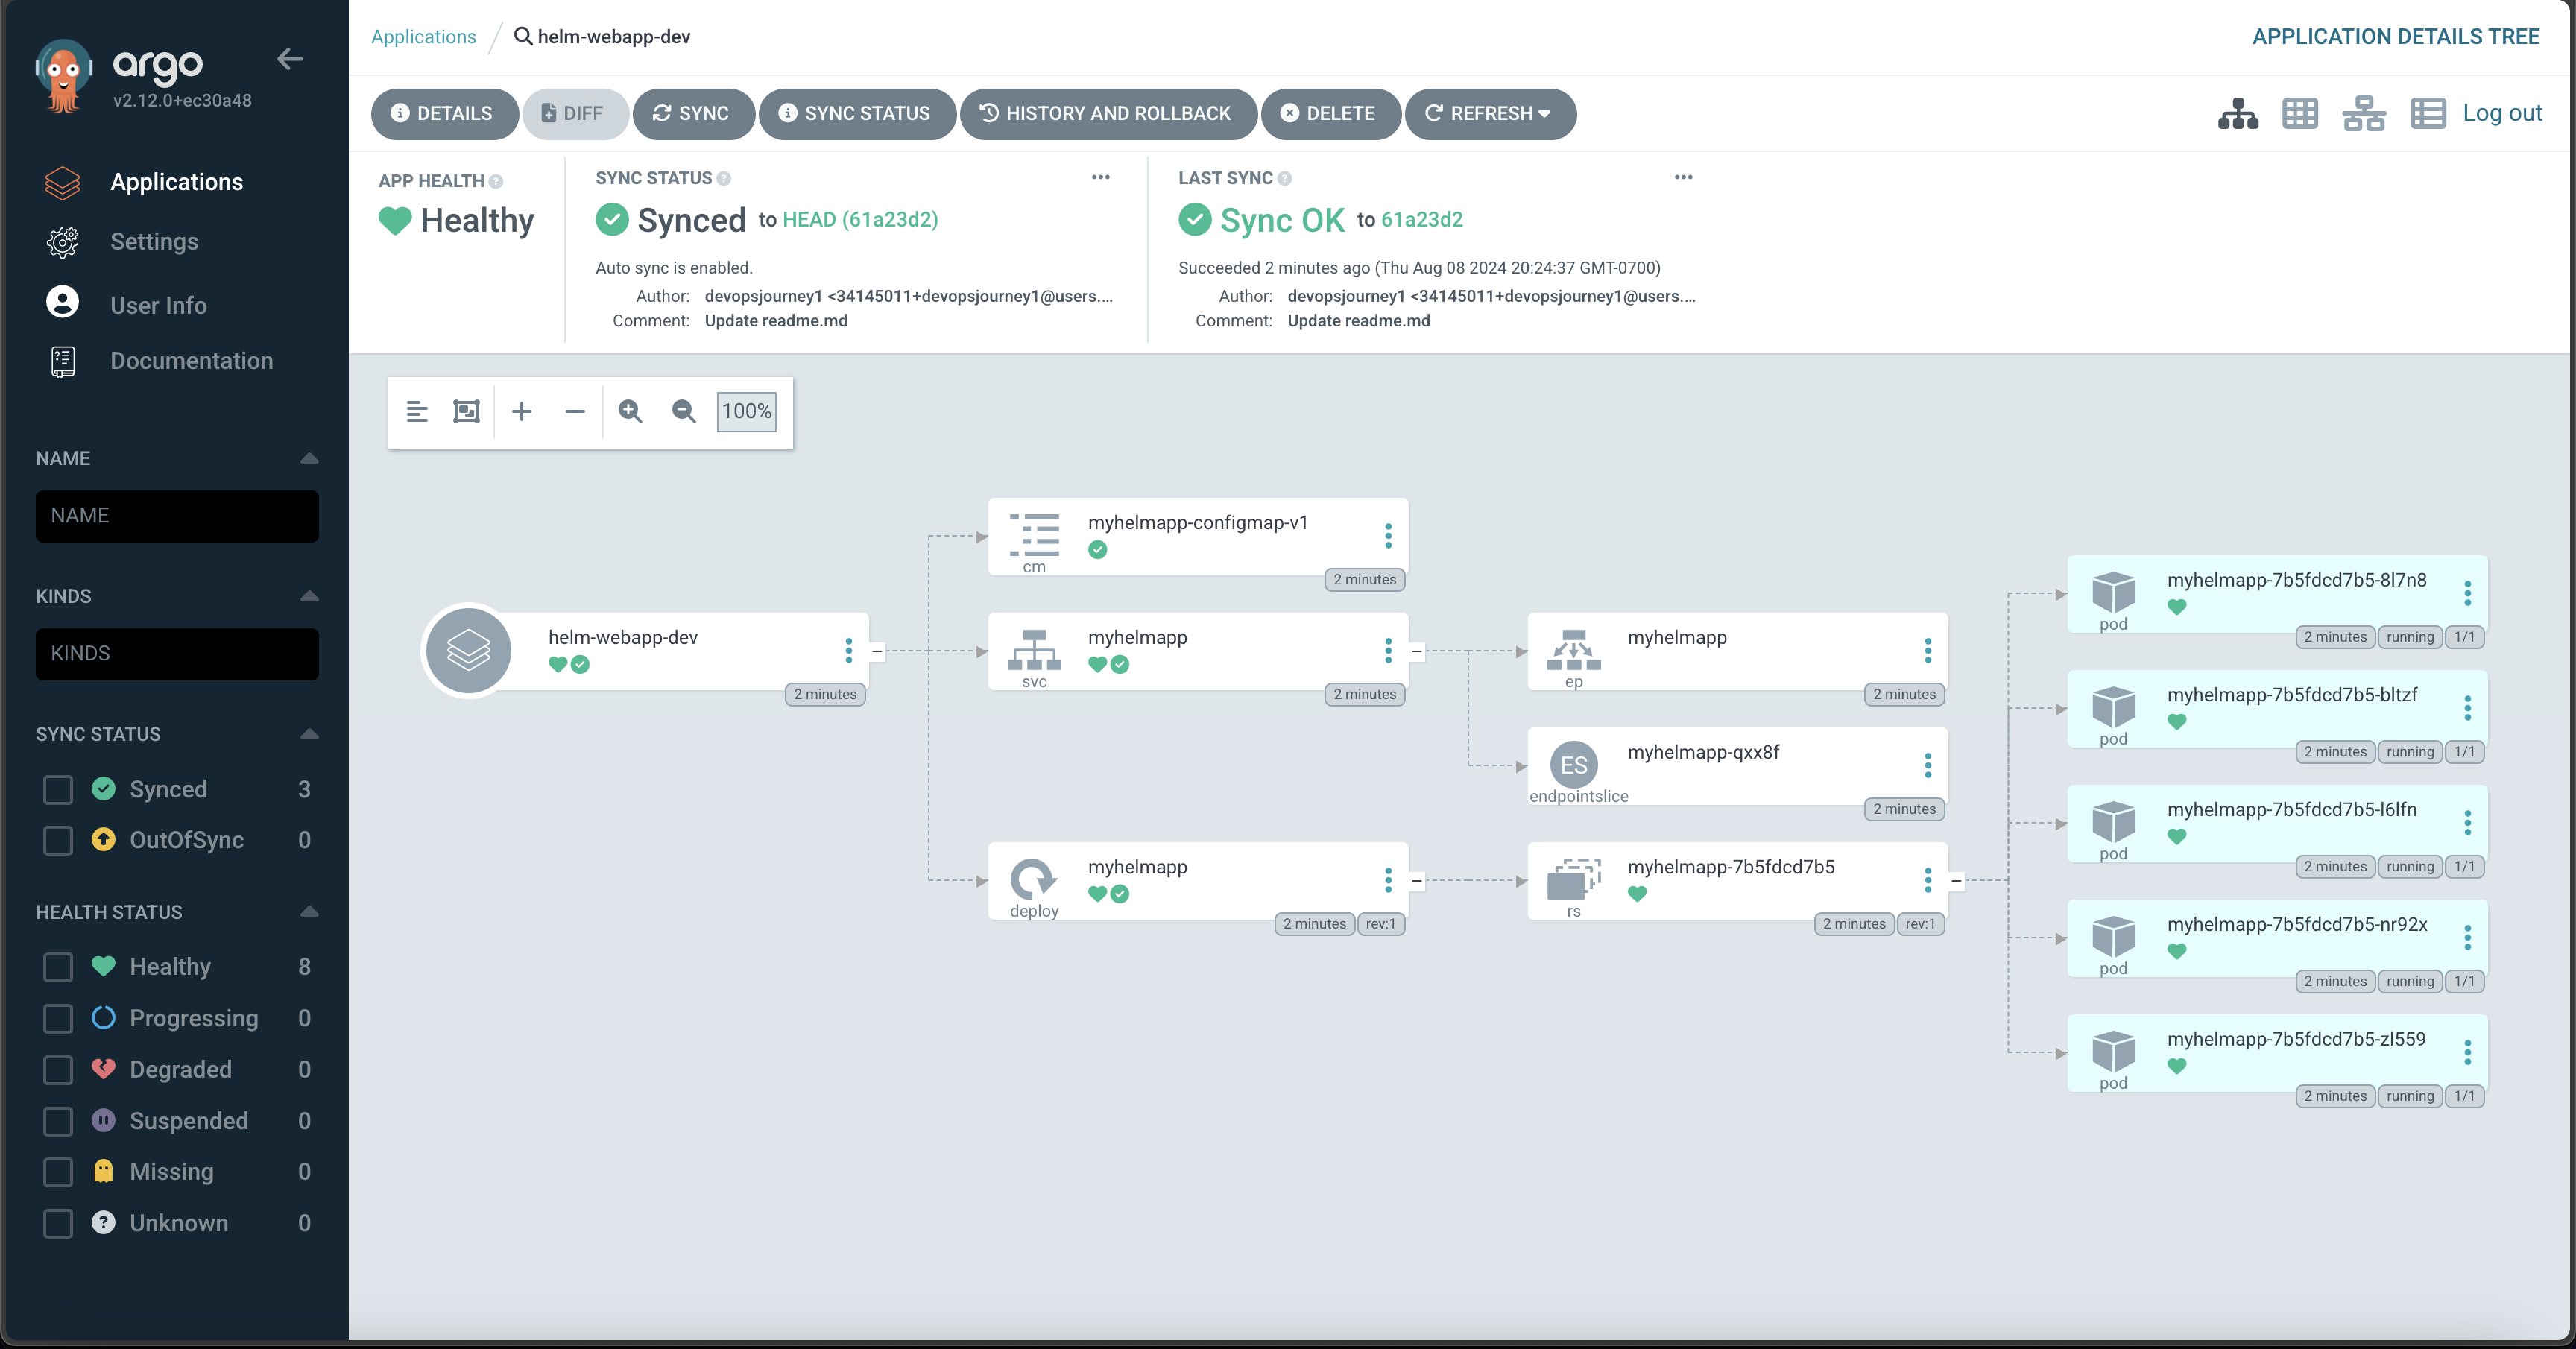
ArgoCD

23: cdk8s

The AWS Cloud Development Kit (CDK) is an open-source software development framework that brings the capabilities of general-purpose programming languages (e.g., unit testing, adding robust logic, etc.) to infrastructure as code. In addition to being more ergonomic for those with a software engineering background, CDK also provides higher levels of abstraction through constructs and patterns. HashiCorp also created a spinoff called CDK for Terraform (CDKTF). Using a similar design, AWS created a project called Cloud Development Kit for Kubernetes (cdk8s). Rather than managing the cloud infrastructure, cdk8s only manages the resources within a Kubernetes cluster. The code compiles the TypeScript (or language of your choice) to a YAML manifest file. Below is an example:

23-cdk8s/cluster/main.ts
export class MyChart extends Chart {
constructor(scope: Construct, id: string, props: ChartProps = { }) {
super(scope, id, props);
new KubeDeployment(this, 'my-deployment', {
spec: {
replicas: 3,
selector: { matchLabels: { app: 'frontend' } },
template: {
metadata: { labels: { app: 'frontend'} },
spec: {
containers: [
{
name: 'app-container',
image: 'nginx:latest',
ports: [{ containerPort: 80 }]
}
]
}
}
}
});
}
}

Which produces:

apiVersion: apps/v1
kind: Deployment
metadata:
name: cluster-my-deployment-c8e7fb18
spec:
replicas: 3
selector:
matchLabels:
app: frontend
template:
metadata:
labels:
app: frontend
spec:
containers:
- image: nginx:latest
name: app-container
ports:
- containerPort: 80

24: OpenFaaS

OpenFaaS is a nifty project that allows you to run serverless functions on Kubernetes. We start by installing OpenFaaS to our cluster and as a CLI:

24-openfaas/commands.sh
# install CLI on local machine
# https://docs.openfaas.com/cli/install/
brew install faas-cli
# create namespace
kubectl apply -f namespace.yaml
# add Helm charts to cluster
helm repo add openfaas https://openfaas.github.io/faas-netes
helm install my-openfaas openfaas/openfaas --version 14.2.49 --namespace openfaas
# forward the API's port in a separate terminal tab
kubectl port-forward svc/gateway 8080 --namespace openfaas
# fetch password and log in
faas-cli login --password $(kubectl -n openfaas get secret basic-auth -o jsonpath="{.data.basic-auth-password}" | base64 --decode)

Next, we create a simple function that looks similar to AWS Lambda:

24-openfaas/commands.sh
# create a function
faas-cli new --lang python openfaas-python-function
# requires Docker running locally
faas-cli build -f openfaas-python-function.yml
# push to DockerHub
faas-cli publish -f openfaas-python-function.yml
# deploy to cluster
faas-cli deploy -f openfaas-python-function.yml
24-openfaas/openfaas-python-function/handler.py
def handle(request):
return "Hello from OpenFaaS!"

Finally, we can invoke the function through the web UI:
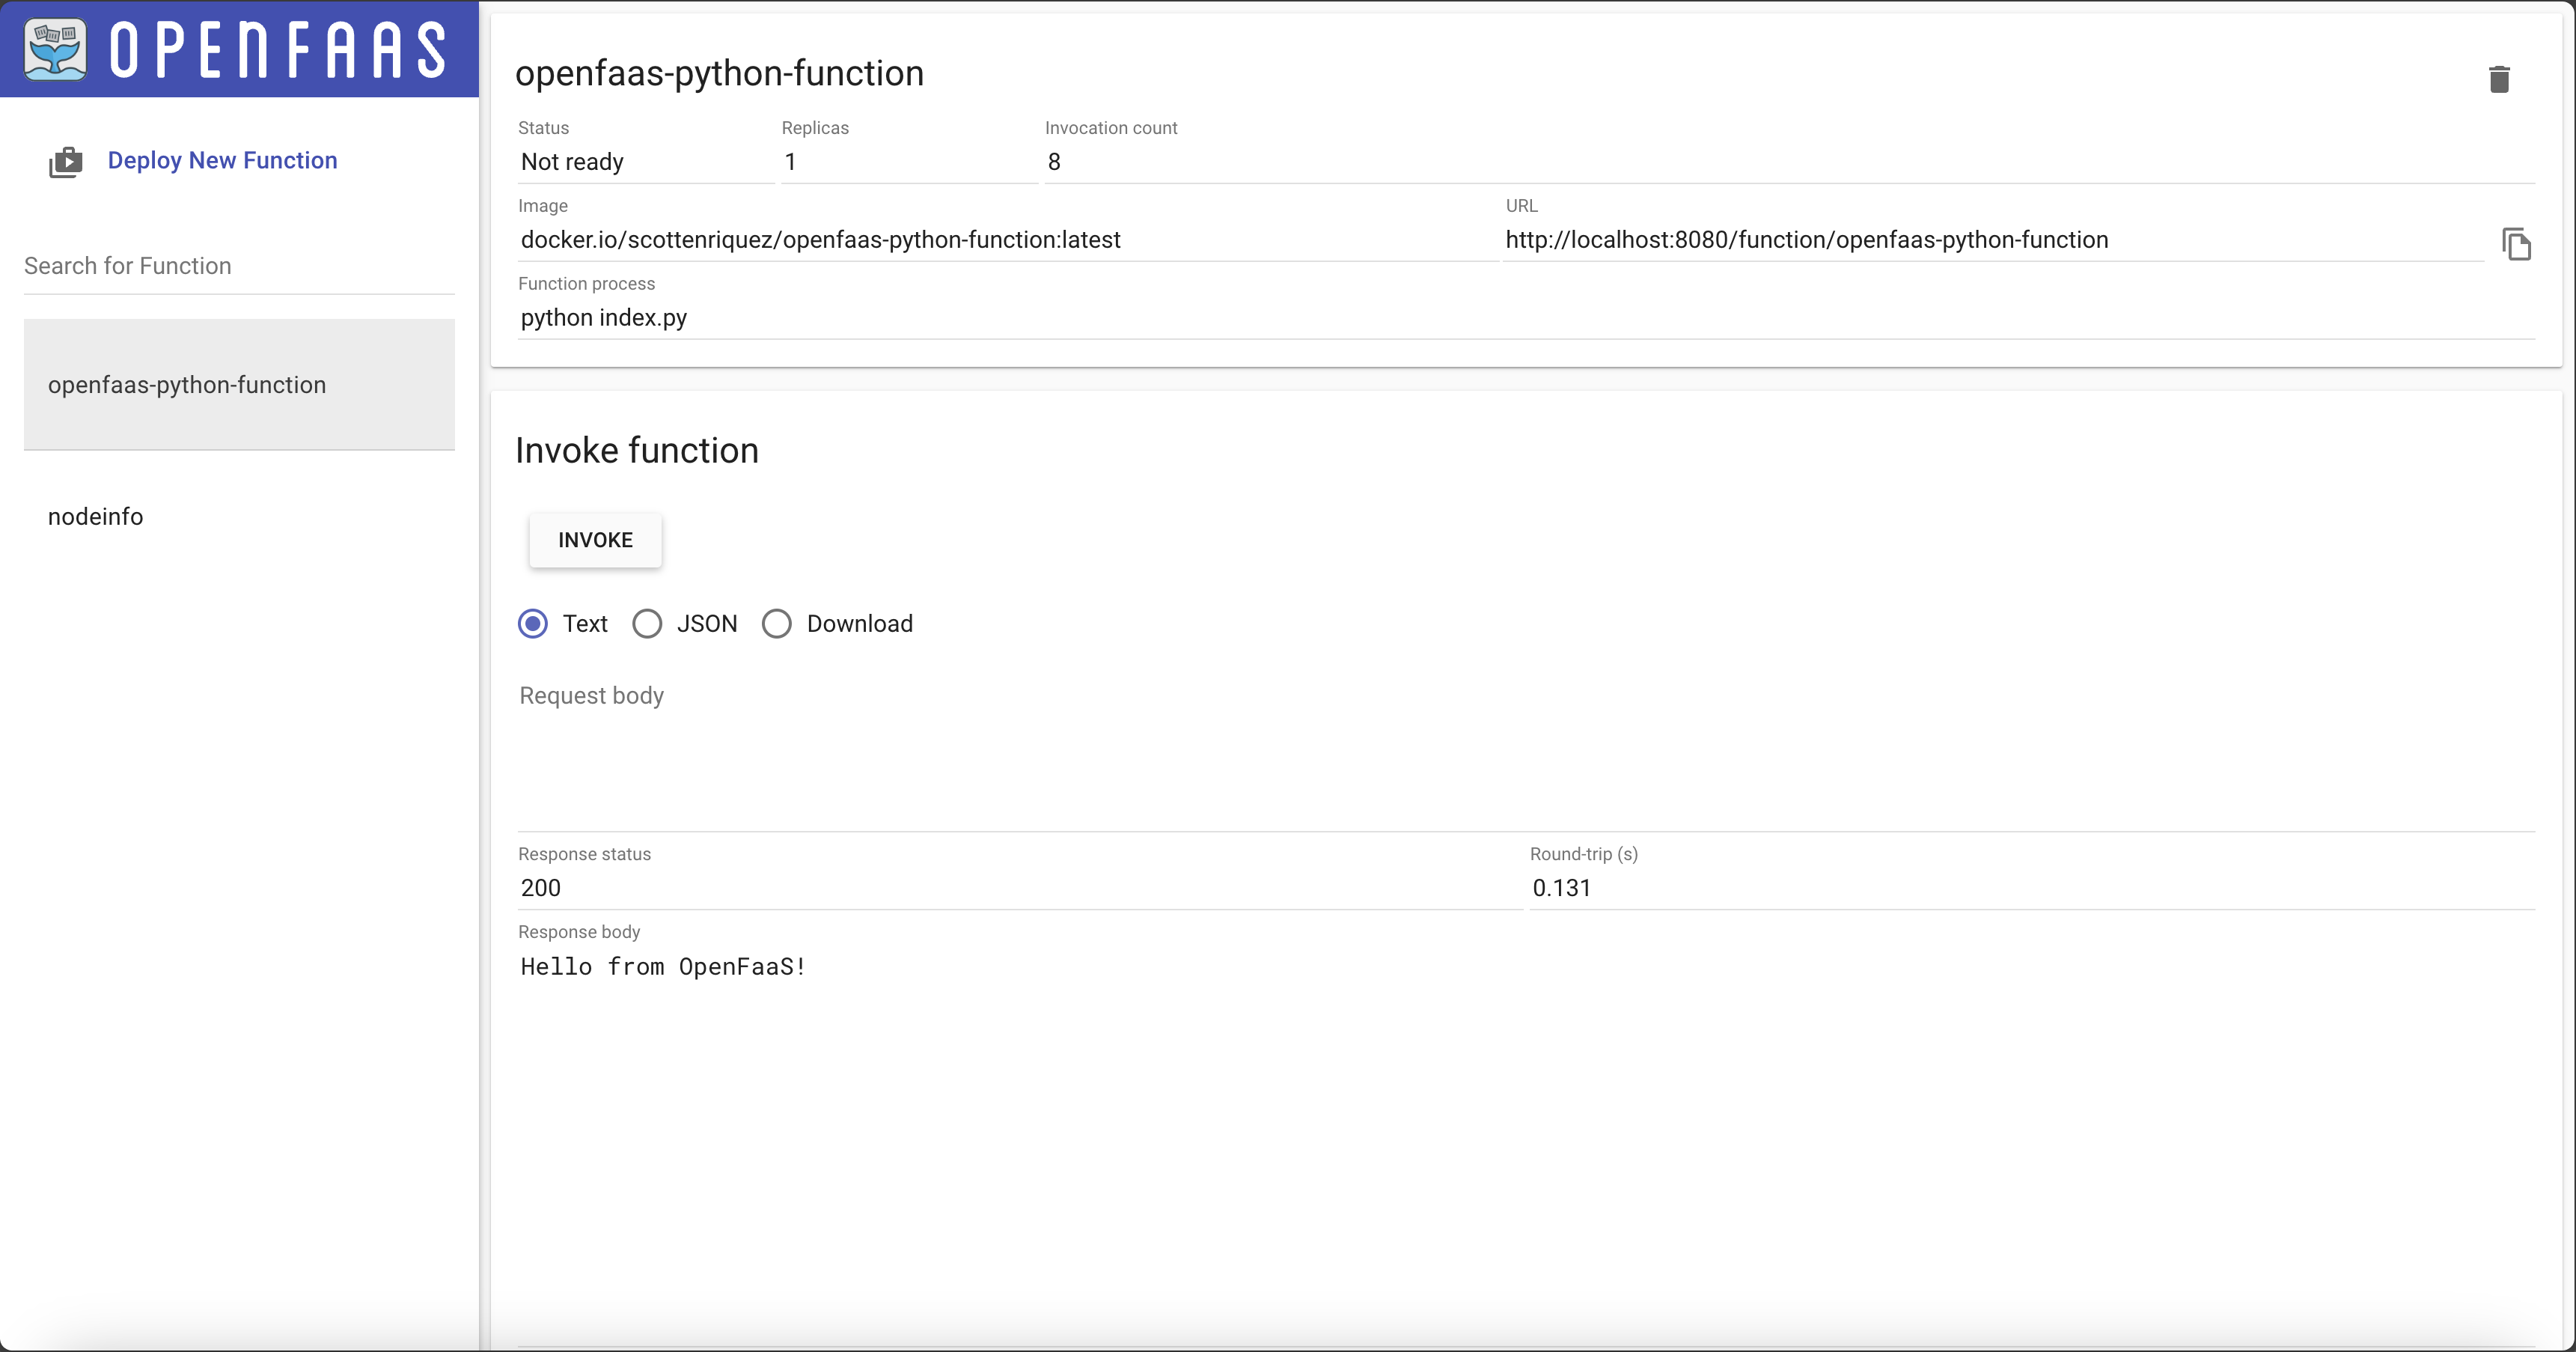
OpenFaaS

Disclaimer

At the time of writing this blog post, I currently work for Amazon Web Services. The opinions and views expressed here are my own and not the views of my employer.

The Nature of Code Companion Series: Chapter One

· 8 min read
Scottie Enriquez
Senior Solutions Developer at Amazon Web Services

About the Book

Recently, I started reading a fantastic book called The Nature of Code by Daniel Shiffman. From the description:

How can we capture the unpredictable evolutionary and emergent properties of nature in software? How can understanding the mathematical principles behind our physical world help us to create digital worlds? This book focuses on a range of programming strategies and techniques behind computer simulations of natural systems, from elementary concepts in mathematics and physics to more advanced algorithms that enable sophisticated visual results. Readers will progress from building a basic physics engine to creating intelligent moving objects and complex systems, setting the foundation for further experiments in generative design.

Daniel implements numerous examples using a programming language called Processing. Instead, I decided to write my own versions using JavaScript, React, Three.js, and D3. For this blog series, I intend to implement my learnings from each chapter.

Previous Entries in the Blog Series

Source Code

The source code for this post is located on GitHub.

Introduction to Euclidean Vectors

The book references example code in the Processing programming language that simulates a bouncing ball in two-dimensional space. Below is the core logic:

Bounce.pde
void draw()
{
xpos = xpos + (xspeed * xdirection);
ypos = ypos + (yspeed * ydirection);
// width-rad and rad refer to the boundaries of the screen
if (xpos > width-rad || xpos < rad) {
// invert direction if an edge has been hit
xdirection *= -1;
}
if (ypos > height-rad || ypos < rad) {
// invert direction if an edge has been hit
ydirection *= -1;
}
ellipseMode(RADIUS);
fill(random(256));
ellipse(xpos, ypos, rad, rad);
}

This image from the Processing code output shows the ball's movement through vector space. The circle's path is tracked by selecting a random color for the ball on each iteration:

Bouncing Ball Processing

From Wikipedia:

In mathematics, physics, and engineering, a Euclidean vector or simply a vector (sometimes called a geometric vector or spatial vector) is a geometric object that has magnitude (or length) and direction. Euclidean vectors can be added and scaled to form a vector space. A Euclidean vector is frequently represented by a directed line segment, or graphically as an arrow connecting an initial point AA with a terminal point BB.

To expand this example to the third dimension, additional variables called zpos and zspeed are required. Obviously, this approach does not scale well to nn dimensions since each needs new speed and position variables. While vectors alone don't expand the physics functionality (e.g., the circle's motion), they streamline and minimize the amount of code required to include new dimensions. In JavaScript, we can write a simple class to organize the components and implement vector operations such as addition.

src/components/NatureOfCode/One/NVector/nVector.js
class NVector {
constructor(...components) {
this.components = components;
}

get dimensions() {
return this.components.length;
}

// assumes that the second vector has the same dimensions as the first
add(otherVector) {
return new NVector(
...this.components.map((component, index) => component + otherVector.components[index])
);
}
}

After instantiating two NVector objects, a third vector can be created to capture the sum. This vector addition is the basis for simulating motion:

let circleLocation = new NVector(1, 2, 3);
const circleVelocity = new NVector(4, 5, 6);
circleLocation = circleLocation.add(circleVelocity);
// { components: [5, 7, 9] }
console.log(circleLocation);

In other words (with location as ll and velocity as vv):

l=l+v\overrightarrow{l} = \overrightarrow{l} + \overrightarrow{v}

Or:

lx=lx+vxl_{x} = l_{x} + v_{x} ly=ly+vyl_{y} = l_{y} + v_{y} lz=lz+vzl_{z} = l_{z} + v_{z}

Vector subtraction behaves the same way as addition:

src/components/NatureOfCode/One/NVector/nVector.js
// assumes that the second vector has the same dimensions as the first
subtract(otherVector) {
return new NVector(
...this.components.map((component, index) => component - otherVector.components[index])
);
}

For multiplication, there are both scalar and vector products:

src/components/NatureOfCode/One/NVector/nVector.js
scale(scalar) {
return new NVector(...this.components.map(component => component * scalar));
}

// assumes that the second vector has the same dimensions as the first
dot(otherVector) {
return this.components.reduce((sum, component, index) => sum + component * otherVector.components[index], 0);
}

Scalar multiplication can be written as (where nn is a single number):

w=un\overrightarrow{w} = \overrightarrow{u} * n

Or:

wx=uxnw_{x} = u_{x} * n wy=uynw_{y} = u_{y} * n wz=uznw_{z} = u_{z} * n
const u = new NVector(1, 3, 5);
const n = 3
const w = u.scale(n);
// { components: [3, 9, 15] }
console.log(w);

For dot products (where nn is the dimension of vector space):

uv=i=1nuivi=u1v1++unvn{\displaystyle \mathbf {u} \cdot \mathbf {v} =\sum _{i=1}^{n}u_{i}v_{i}=u_{1}v_{1}+\cdots +u_{n}v_{n}}
const u = new NVector(1, 3, -5);
const v = new NVector(4, -2, -1);
const w = u.dot(v);
// 3
console.log(w);

Finally, a vector's magnitude (or length) can be calculated like so:

u=u12++un2.{\displaystyle \|\mathbf {u} \|={\sqrt {u_{1}^{2}+\cdots +u_{n}^{2}}}.}

This is useful for normalizing a vector (which we do in the bouncing sphere example later in the post):

u^=uu{\displaystyle \mathbf {\hat {u}} ={\frac {\mathbf {u}}{\|\mathbf {u} \|}}}

With this code in hand (plus a graphics library called Three.js), we can begin to model vectors in three-dimensional space:

// additionally, a line is drawn between the two vectors
const vectors = [
// use the graphics library's implementation of a vector instead of NVector
new THREE.Vector3(-10, -10, -10),
new THREE.Vector3(10, 10, 10)
];

Bouncing Sphere

Using our knowledge of vectors and a Vector class (THREE.Vector3, which is our graphics library's implementation of our NVector class above), we can expand the bouncing ball Processing example into the third dimension. First, we create a sphere with a random starting position vector within the bounds of our space (i.e., -50 to 50).

src/components/NatureOfCode/One/BouncingSphere/boucingSphere.js
const generateSphere = () => {
const x = Math.random() * 100 - 50;
const y = Math.random() * 100 - 50;
const z = Math.random() * 100 - 50;
const sphereLocationVector = new THREE.Vector3(x, y, z);
const sphereGeometry = new THREE.SphereGeometry(5, 32, 32);
const sphereMaterial = new THREE.MeshStandardMaterial({color: 0x50fa7b, roughness: 0});
const sphere = new THREE.Mesh(sphereGeometry, sphereMaterial);
sphere.position.set(sphereLocationVector.x, sphereLocationVector.y, sphereLocationVector.z);
return sphere;
};

Similarly to the draw function in the two-dimensional example above, the animate function uses the screen's boundaries as a signal to invert the direction of the sphere's motion by negating the corresponding component in the velocity vector:

src/components/NatureOfCode/One/BouncingSphere/sceneInit.js
generateVelocityVector() {
const x = (this.isXPositiveDirection ? 1 : -1) * 15;
const y = (this.isYPositiveDirection ? 1 : -1) * 15;
const z = (this.isZPositiveDirection ? 1 : -1) * 15;
return new THREE.Vector3(x, y, z);
}

animate() {
const sphere = this.scene.getObjectByName('sphere');
window.requestAnimationFrame(this.animate.bind(this));
if (sphere.position.x > this.topXPosition || sphere.position.x < this.bottomXPosition) {
this.isXPositiveDirection = !this.isXPositiveDirection;
}
if (sphere.position.y > this.topYPosition || sphere.position.y < this.bottomYPosition) {
this.isYPositiveDirection = !this.isYPositiveDirection;
}
if (sphere.position.z > this.topZPosition || sphere.position.z < this.bottomZPosition) {
this.isZPositiveDirection = !this.isZPositiveDirection;
}
const timeDelta = this.clock.getDelta();
const sphereVelocityVector = this.generateVelocityVector();
sphereVelocityVector.multiplyScalar(timeDelta);
sphereVelocityVector.normalize();
sphere.position.add(sphereVelocityVector);
this.render();
this.controls.update();
}

After leveraging the clock's time delta (i.e., the time elapsed since the last frame) for scalar multiplication and normalizing the sphere velocity vector, we see the sphere move through our three-dimensional environment.

Bouncing Sphere with Random Acceleration

In the first bouncing sphere model, the initial position is random. However, the path that the sphere takes is a deterministic loop. Next, we add random acceleration to the velocity. In other words, the final algorithm is (with u\overrightarrow{u} as the initial velocity, a\overrightarrow{a} as acceleration, and tt as time):

v=u+at\overrightarrow{v} = \overrightarrow{u} + \overrightarrow{a} * t

With the final velocity as v{\mathbf {v}}:

v^=vv{\displaystyle \mathbf {\hat {v}} ={\frac {\mathbf {v}}{\|\mathbf {v} \|}}}

With the normalized vector as v^{\mathbf {\hat {v}}} and location as ll:

l=l+v^{\overrightarrow{l} = \overrightarrow{l} + \displaystyle \mathbf {\hat {v}}}

Implemented in JavaScript, this is:

src/components/NatureOfCode/One/BouncingSphereWithAcceleration/sceneInit.js
generateVelocityVector() {
const x = (this.isXPositiveDirection ? 1 : -1) * 15;
const y = (this.isYPositiveDirection ? 1 : -1) * 15;
const z = (this.isZPositiveDirection ? 1 : -1) * 15;
return new THREE.Vector3(x, y, z);
}

generateRandomAccelerationVector() {
const x = Math.random() * 30 - 15;
const y = Math.random() * 30 - 15;
const z = Math.random() * 30 - 15;
return new THREE.Vector3(x, y, z);
}

animate() {
const sphere = this.scene.getObjectByName('sphere-acceleration');
window.requestAnimationFrame(this.animate.bind(this));
if (sphere.position.x > this.topXPosition || sphere.position.x < this.bottomXPosition) {
this.isXPositiveDirection = !this.isXPositiveDirection;
}
if (sphere.position.y > this.topYPosition || sphere.position.y < this.bottomYPosition) {
this.isYPositiveDirection = !this.isYPositiveDirection;
}
if (sphere.position.z > this.topZPosition || sphere.position.z < this.bottomZPosition) {
this.isZPositiveDirection = !this.isZPositiveDirection;
}
const timeDelta = this.clock.getDelta();
const sphereVelocityVector = this.generateVelocityVector();
const sphereAccelerationVector = this.generateRandomAccelerationVector();
sphereVelocityVector.multiplyScalar(timeDelta);
sphereVelocityVector.add(sphereAccelerationVector);
sphereVelocityVector.normalize();
sphere.position.add(sphereVelocityVector);
this.render();
this.controls.update();
}

Next Section

Chapter two examines forces and laws of motion.

AWS Billing Conductor SP/RI Benefit Utility

· 10 min read
Scottie Enriquez
Senior Solutions Developer at Amazon Web Services

About

This is a tool that I developed and open sourced at AWS. Find the latest in the GitHub repository here. It's released under MIT-0.

AWS Billing Conductor (ABC) Overview

AWS Billing Conductor is a priced service in the AWS billing suite designed to support showback and chargeback workflows for any AWS customer who needs to enforce visibility boundaries within their Organization or add custom rates unique to their business. This alternative version of the monthly bill is called a pro forma bill.

How Billing Conductor Handles Savings Plans (SPs) and Reserved Instances (RIs)

It’s important to note that AWS Billing Conductor does not change the application of SPs or RIs in the account’s billing family. It only affects how the application is visible in the pro forma views. To conceptualize the difference between the two, consider the intention behind each of the two products. When applying SPs and RIs, the AWS billing system prioritizes maximizing the discount benefit of each product to save customers the most money possible. When calculating pro forma costs, AWS Billing Conductor prioritizes creating the prescribed view for each billing group by enforcing strict visibility boundaries within the Organization.

By default, AWS Billing Conductor shares the benefits of Savings Plans and Reserved Instances that were purchased in a linked account belonging to a billing group with all accounts placed in the same billing group. However, benefits from any Savings Plans or Reserved Instances owned outside a billing group are not included in that billing group’s pro forma cost. A few examples of how SP and RI benefits will or will not appear in pro forma data:

  • A Savings Plan was purchased in the payer account, which is not in any billing group. Billing groups will not see any SP benefit in their pro forma view. Sharing purchases made outside of billing groups (e.g., in the payer account) is the primary use case for this tool.
  • Linked account 1 is in billing group A, and linked account 1 has received benefit from a Savings Plan or Reserved Instance that was purchased outside the billing group A in the consolidated bill (i.e., what the customer pays to AWS). Linked account 1 will not see any benefit in their pro forma view.
  • Linked account 2 owns an RI and is in billing group A. Linked account 2 consumed its own RI during the month. It will see the benefit of that RI in its pro forma view as well.
  • Linked account 2 owns an RI and is in billing group A. Linked account 2 did not have any usage that the RI could apply to and neither did any account in billing group A. In the consolidated bill (i.e., what the customer pays to AWS), the RI benefit was applied to linked account 3, which is not in billing group A. Linked account 2’s pro forma view will show the RI as unused.
  • Linked account 2 owns an RI and is in billing group A. Linked account 2 does not have usage that the RI could apply to. However, linked account 3 (also in billing group A) does have usage that the RI could apply to. In the consolidated bill (i.e., what the customer pays to AWS), the RI applied to linked account 4, which does not belong to billing group A. In the pro forma view, the RI was applied to linked account 3 because ABC constrains application to the billing group where it was purchased regardless of whether sharing is enabled.

Utility Logic Overview

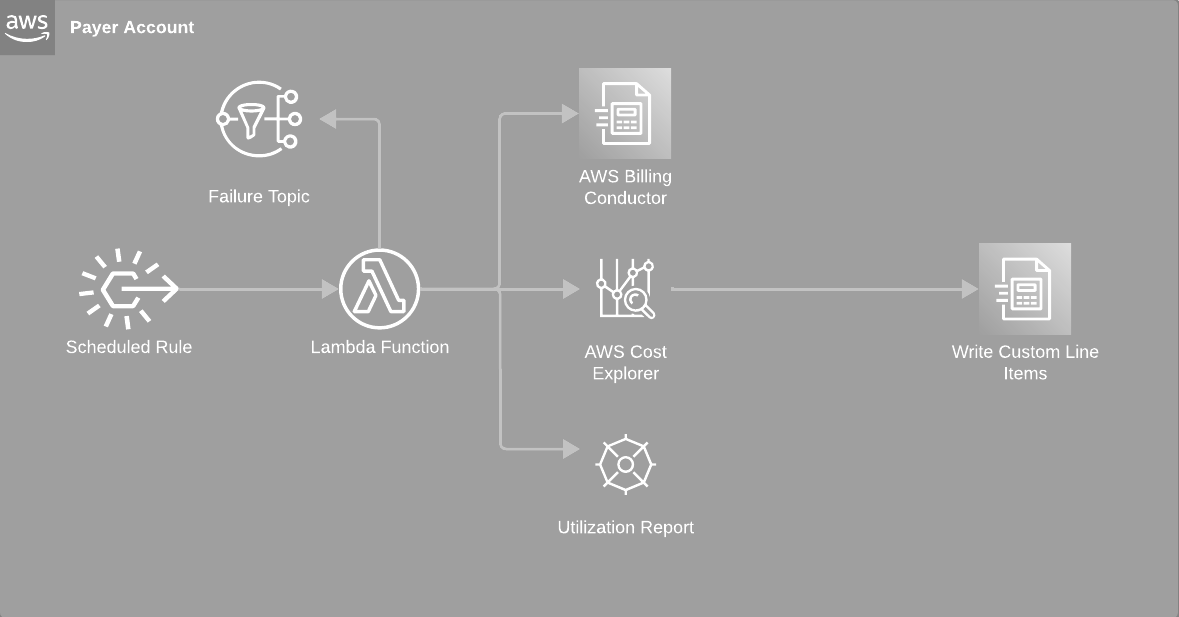
This utility shows how ABC custom line items can be used to distribute the benefits of SPs and RIs purchased outside of billing groups (e.g., in a payer account) to linked accounts belonging to billing groups. The solution's logic is as follows:

  • Trigger on the fifth of every month using EventBridge
  • Determine the date range of the previous billing period (i.e., the first and last day of the previous full month)
    • For example, if the current date is January 5th, the previous billing period would be December 1st to 31st
  • Get the account associations from Billing Conductor for the previous billing period (i.e., which accounts belonged to which billing group during the last full month)
  • Pull the number of EC2 running hours by instance type via the Cost Explorer API and calculate normalized hours based on normalization factor
    • Include normalized Fargate usage if the INCLUDE_FARGATE_FOR_SAVINGS_PLANS feature flag is enabled (disabled by default)
    • Include normalized Lambda usage if the INCLUDE_LAMBDA_FOR_SAVINGS_PLANS feature flag is enabled (disabled by default)
  • Pull the number of RDS running hours by instance type via the Cost Explorer API and calculate normalized hours based on normalization factor
  • Pull the net savings for the previous billing period per Savings Plan and Reserved Instance
  • Divide the net savings for each commitment proportionally across the linked accounts that belong to a billing group
    • Each linked account's percentage is its normalized usage divided by the total normalized usage for all accounts belonging to a billing group
  • Create a custom line per commitment per account
  • Write the custom line items to Billing Conductor if the DRY_RUN flag is disabled (enabled by default for testing purposes), otherwise only return the output (viewable in the Lambda Console)
  • If an error occurs, an SNS topic is notified
  • In regard to managed services, the initial solution only covers RDS, but includes code comments about how to expand to other services such as ElastiCache and OpenSearch

Architecture

abc-sp-ri-utility-architecture-diagram.png

The core functionality resides in a Lambda function built using AWS Serverless Application Model (SAM). The infrastructure is defined using a CloudFormation template with the following resources intended to be deployed in the payer account:

  • Lambda function using Python 3.12
  • EventBridge rule using a cron expression to trigger on the fifth day of every month (i.e., so that the bill for the previous month is finalized)
  • An SNS topic to subscribe to on errors
  • An IAM policy and execution role with the minimum required permissions

Minimum IAM Permissions Required

From the CloudFormation file:

template.yaml
Policies:
- Statement:
- Sid: BillingConductorAndCostExplorer
Effect: Allow
Action:
- billingconductor:ListAccountAssociations
- billingconductor:CreateCustomLineItem
- ce:GetCostAndUsage
- ce:GetReservationUtilization
- ce:GetSavingsPlansUtilizationDetails
- organizations:ListAccounts
Resource:
- '*'
- Statement:
- Sid: SNSPublishToFailureTopic
Effect: Allow
Action:
- sns:Publish
Resource:
- !Ref rLambdaFailureTopic

Local Setup

Creating a Virtual Environment

git clone git@github.com:aws-samples/aws-billing-conductor-sp-ri-benefit-utility.git
cd aws-billing-conductor-sp-ri-benefit-utility
python3.12 -m venv '.venv'
. .venv/bin/activate
pip install -r sam_sp_ri_utility/requirements.txt

Running Unit Tests

pytest

Deployment

Building Using AWS SAM

sam build

Deploying Using AWS SAM

First, ensure that local AWS credentials are configured correctly.

sam deploy --guided

Leveraging the Sample

By default, the Lambda function does not write the custom line items to Billing Conductor. To disable dry run mode, change the Lambda environment variable called DRY_RUN to Disabled either via the Console or CloudFormation template. Before doing so, we strongly recommend that you review what would have been written to ensure that the benefit distribution meets your business requirements. For feature ideas and/or questions that could apply to all ABC users, please open an issue in this repository. Contact your account team or open an AWS support case for 1:1 discussions that require specifics that cannot be shared publicly.

Edge Cases and Additional Considerations

  • This utility assumes that ABC has been configured and some linked accounts are associated with billing groups. The payer (or account where purchases are centrally made) must not belong to a billing group. It also assumes that there is at least one month of ABC data for each billing group given that it looks back to the previous month.
  • If some or all of the linked accounts that belong to billing groups have commitment purchases, be aware that these accounts would receive benefits in the pro forma data both from the purchases made at the linked account level and outside the billing group (e.g., in the payer) as well. However, this utility does not allocate any benefits for purchases made within a linked account belonging to a billing group since ABC does this already.
  • Spot usage is ignored by the EC2 and Fargate normalized usage calculation functions. This is intended to mirror the way that Savings Plans and Reserved Instances are applied by AWS billing systems. Unused ODCRs (i.e., usage types containing UnusedBox and UnusedDed) are also excluded from the total eligible usage and every linked accounts' eligible usage.
  • Not all sizes (e.g., m6i.metal) are contained in the normalization map. If an instance size is not found, the normalization factor defaults to 1.0. In addition, only size is currently considered. Users may also want to customize the weights based on instance family as well (e.g., for GPU usage).
  • It is possible that a commitment can have negative net savings due to low utilization. If this occurs, the negative value will be distributed to the eligible linked accounts as a fee.
  • The distribution logic does not match benefits to usage (e.g., only applying the benefits for an RDS RI to accounts with the region, instance type, etc. specified by the commitment). This aims to support centralized purchasing strategies.
  • In regard to non-US currency payers, since the sample utility distributes benefits based on normalized usage hours, it is not reliant on any one currency for its calculation logic (other than net savings). However, we recommend that every customer using the utility, regardless of the currency they use, validates that the custom line items produce the expected results.
  • Fargate and Lambda usage are ignored by default because Compute Savings Plans cover EC2 usage first due to higher savings percentage over On-Demand. To enable these features, change the INCLUDE_FARGATE_FOR_SAVINGS_PLANS and/or INCLUDE_LAMBDA_FOR_SAVINGS_PLANS Lambda environment variable(s) to Enabled.
  • Lambda has a 15-minute maximum timeout. If the function cannot complete within that time period, the code may need to leverage a different offering like Fargate that can support longer run times.

Cost

For a complete list of resources deployed by this utility, see the template.yaml file. The Lambda function leverages ARM and runs once per month by default. The number of seconds will vary based on the environment. See the Lambda pricing for details. The core logic leverages the Cost Explorer API for the following:

  • Pulling Savings Plans and Reserved Instances utilization
  • Fetching cost and usage for EC2, RDS, Lambda, and Fargate

Each Cost Explorer API request costs 0.01 USD. Monitor these costs via Cost Explorer by filtering to the Cost Explorer service and/or by API operation (i.e., GetCostAndUsage, GetReservationUtilization, GetSavingsPlansUtilDetails, and GetSavingsPlansUtilization). The unit tests located in the sam_sp_ri_utility/test directory mock API calls by patching SDK methods. To test locally without incurring costs, modify these Python objects to emulate API calls.

Writing Optimized Functions Using AWS Lambda Power Tuning

· 8 min read
Scottie Enriquez
Senior Solutions Developer at Amazon Web Services

Solution Overview

As I wrote about previously, AWS users are shifting left on costs using DevOps and automation. While tools like Infracost are powerful for estimating costs for Lambda and other services, they alone do not provide optimization or tuning feedback during the development lifecycle. This is where a tool like AWS Lambda Power Tuning assists:

AWS Lambda Power Tuning is an open-source tool that can help you visualize and fine-tune the memory and power configuration of Lambda functions. It runs in your own AWS account, powered by AWS Step Functions, and it supports three optimization strategies: cost, speed, and balanced.

Lambda pricing is determined by the number of invocations and the execution duration. There are several strategies for decreasing duration costs including using Graviton for 20% savings (which this solution does for both Lambda and CodeBuild), leveraging the latest runtime versions, taking advantage of execution reuse, etc. In addition to these, optimizing memory allocation is a key mechanism for efficiency. From the documentation:

The [duration] price depends on the amount of memory you allocate to your function. In the AWS Lambda resource model, you choose the amount of memory you want for your function and are allocated proportional CPU power and other resources. An increase in memory size triggers an equivalent increase in CPU available to your function.

Without running the Lambda function using different configurations, it is unclear what is the most optimal memory amount for cost and/or performance. This solution demonstrates AWS Lambda Tuning Tools integration with a CodeSuite CI/CD pipeline to bring Lambda tuning information to the pull request process and code review discussion. The source code is hosted on GitHub.

Solution Architecture

Diagram

This solution deploys several resources:

  • The AWS Lambda Power Tuning application
  • A CodeCommit repository preloaded with Terraform code for a Lambda function to tune
  • A CodeBuild project triggered by pull request state changes that invoke the AWS Lambda Power Tuning state machine
  • A CodePipeline with manual approvals to deploy the Terraform for changes pushed to the main branch
  • An S3 bucket to store Terraform state remotely
  • An S3 bucket to store CodePipeline artifacts

Preparing Your Development Environment

While this solution is for writing and deploying Terraform HCL syntax, I wrote the infrastructure code for the deployment pipeline and dependent resources using AWS CDK, which is my daily driver for infrastructure as code. I intentionally used Terraform for the target Lambda function to clearly differentiate between the code for resources managed by the pipeline and the pipeline itself.

The following dependencies are required to deploy the pipeline infrastructure:

Rather than installing Node.js, CDK, Terraform, and all other dependencies on your local machine, you can alternatively create a Cloud9 IDE with these pre-installed via the Console or with a CloudFormation template:

Resources:
rCloud9Environment:
Type: AWS::Cloud9::EnvironmentEC2
Properties:
AutomaticStopTimeMinutes: 30
ConnectionType: CONNECT_SSH
Description: Environment for writing and deploying CDK
# AWS Free Tier eligible
InstanceType: t2.micro
Name: PowerTuningCDKPipelineCloud9Environment
# https://docs.aws.amazon.com/cloud9/latest/user-guide/vpc-settings.html#vpc-settings-create-subnet
SubnetId: subnet-EXAMPLE

Installation and Deployment

To install and deploy the pipeline, use the following commands:

git clone https://github.com/scottenriquez/lambda-power-tuned.git
cd lambda-power-tuned
python3 -m venv .venv
. .venv/bin/activate
cd lambda_power_tuned
pip install -r requirements.txt
# https://docs.aws.amazon.com/cdk/v2/guide/bootstrapping.html
cdk bootstrap
cdk deploy

Using the Deployment Pipeline

The CodePipeline pipeline is triggered at creation, but there are manual approval stages to prevent any infrastructure from being created without intervention. Feel free to deploy the Terraform, but it is not required for generating tuning information via a pull request. The CodePipeline is triggered by changes to main.

Pipeline

Next, make some code changes to see the performance impact. To modify the Lambda code, either use the CodeCommit GUI in the Console or clone the repository to your development environment. First, create a branch called feature off of main. Then make some kind of code change, commit to feature, and open a pull request. This automatically triggers the build, which does the following:

  • Add a comment to the pull request with a hyperlink back to the CodeBuild run
  • Initialize Terraform against the deployment state to detail resources changed relative to main
  • Add a comment to the pull request with the resource_changes property from the Terraform plan
  • Reinitialize the environment to create a transient deployment of the feature branch infrastructure to leverage for tuning purposes
  • Generate an input file for AWS Lambda Power Tuning
  • Run the execute-power-tuning.sh Bash code to invoke the state machine and capture results
  • Add a comment to the pull request with a hyperlink to the tuning results for easy consumption

PR

The results are encoded into the query string of the hyperlink, so the tuning results can easily be shared. As shown by the results of the example function included in the repository, 128MB is the cheapest configuration.

Diving Into the Pull Request Build Logic

The Python code for describing the deployment pipeline lives in power_tuned_lambda_stack.py. The build logic is spread across the pull request project's buildspec and a Bash script residing in the CodeCommit repository. The CodeBuild logic is responsible for creating and destroying the transient testing environment, while the execute-power-tuning.sh contains the specific logic needed to tune the target Lambda function(s). The following code snippets (with comments explaining the build phase) contain the core logic for integrating AWS Lambda Power Tuning into the pull request:

lambda_power_tuned/lambda_power_tuned/lambda_power_tuned_stack.py
pull_request_codebuild_project = aws_codebuild.Project(self, 'PullRequestCodeBuildProject',
build_spec=aws_codebuild.BuildSpec.from_object({
'version': '0.2',
'phases': {
'install': {
'commands': [
'git checkout $CODEBUILD_SOURCE_VERSION',
'yum -y install unzip util-linux jq',
f'wget https://releases.hashicorp.com/terraform/{terraform_version}/terraform_{terraform_version}_linux_arm64.zip',
f'unzip terraform_{terraform_version}_linux_arm64.zip',
'mv terraform /usr/local/bin/',
'export BUILD_UUID=$(uuidgen)'
]
},
'build': {
'commands': [
'aws codecommit post-comment-for-pull-request --repository-name $REPOSITORY_NAME --pull-request-id $PULL_REQUEST_ID --content \"The pull request CodeBuild project has been triggered. See the [logs for more details]($CODEBUILD_BUILD_URL).\" --before-commit-id $SOURCE_COMMIT --after-commit-id $DESTINATION_COMMIT',
# create plan against the production function (i.e., what is currently in main)
f'terraform init -backend-config="bucket={terraform_state_s3_bucket.bucket_name}"',
'terraform plan -out tfplan-pr-$BUILD_UUID.out',
# format plan output into Markdown
'terraform show -json tfplan-pr-$BUILD_UUID.out > plan-$BUILD_UUID.json',
'echo "\`\`\`json\n$(cat plan-$BUILD_UUID.json | jq \'.resource_changes\')\n\`\`\`" > plan-formatted-$BUILD_UUID.json',
# write plan to the pull request comments
# limit to 10,000 bytes to due the CodeCommit limit pull request content
'aws codecommit post-comment-for-pull-request --repository-name $REPOSITORY_NAME --pull-request-id $PULL_REQUEST_ID --content \"Terraform resource changes:\n$(cat plan-formatted-$BUILD_UUID.json | head -c 10000)\" --before-commit-id $SOURCE_COMMIT --after-commit-id $DESTINATION_COMMIT',
# reinitialize and create a new state file to manage the transient environment for performance tuning
f'terraform init -reconfigure -backend-config="bucket={terraform_state_s3_bucket.bucket_name}" -backend-config="key=pr-$BUILD_UUID.tfstate"',
'terraform apply -auto-approve',
# execute the state machine and get tuning results
# defer tuning logic and configuration to the repository for developer customization
'sh execute-power-tuning.sh',
# destroy transient environment
'terraform destroy -auto-approve'
]
}
}
}),
source=aws_codebuild.Source.code_commit(
repository=lambda_repository),
badge=True,
environment=aws_codebuild.BuildEnvironment(
build_image=aws_codebuild.LinuxBuildImage.AMAZON_LINUX_2_ARM_3,
environment_variables={
'REPOSITORY_NAME': aws_codebuild.BuildEnvironmentVariable(
value=lambda_repository.repository_name),
'STATE_MACHINE_ARN': aws_codebuild.BuildEnvironmentVariable(
value=power_tuning_tools_application.get_att('Outputs.StateMachineARN').to_string())
},
compute_type=aws_codebuild.ComputeType.SMALL,
privileged=True
),
role=terraform_apply_codebuild_iam_role)

Since the CodeBuild project does not have contextual awareness of what the Terraform HCL in the CodeCommit repository is describing (e.g., how many Lambda functions exist), the developer can implement the tuning logic in execute-power-tuning.sh. For this example, this is simply grabbing the Lambda ARN, formatting the AWS Lambda Power Tuning input file, and executing the state machine. However, this logic could be expanded for multiple Lambda functions and other use cases.

lambda_power_tuned/lambda_power_tuned/terraform/execute-power-tuning.sh
#!/bin/bash
# obtain ARN from Terraform and build input file
TARGET_LAMBDA_ARN=$(terraform output -raw arn)
echo $(jq --arg arn $TARGET_LAMBDA_ARN '. += {"lambdaARN" : $arn}' power-tuning-input.json) > power-tuning-input-$BUILD_UUID.json
POWER_TUNING_INPUT_JSON=$(cat power-tuning-input-$BUILD_UUID.json)
# start execution
EXECUTION_ARN=$(aws stepfunctions start-execution --state-machine-arn $STATE_MACHINE_ARN --input "$POWER_TUNING_INPUT_JSON" --query 'executionArn' --output text)
echo -n "Execution started..."
# poll execution status until completed
while true;
do
# retrieve execution status
STATUS=$(aws stepfunctions describe-execution --execution-arn $EXECUTION_ARN --query 'status' --output text)
if test "$STATUS" == "RUNNING"; then
# keep looping and wait if still running
echo -n "."
sleep 1
elif test "$STATUS" == "FAILED"; then
# exit if failed
echo -e "\nThe execution failed, you can check the execution logs with the following script:\naws stepfunctions get-execution-history --execution-arn $EXECUTION_ARN"
break
else
# print execution output if succeeded
echo $STATUS
echo "Execution output: "
# retrieve output
aws stepfunctions describe-execution --execution-arn $EXECUTION_ARN --query 'output' --output text > power-tuning-output-$BUILD_UUID.json
break
fi
done
# get output URL and comment on pull request
POWER_TUNING_OUTPUT_URL=$(cat power-tuning-output-$BUILD_UUID.json | jq -r '.stateMachine .visualization')
aws codecommit post-comment-for-pull-request --repository-name $REPOSITORY_NAME --pull-request-id $PULL_REQUEST_ID --content "Lambda tuning is complete. See the [results for full details]($POWER_TUNING_OUTPUT_URL)." --before-commit-id $SOURCE_COMMIT --after-commit-id $DESTINATION_COMMIT

Lastly, note that there is an AWS Lambda Power Tuning input file included in the CodeCommit repository that can be modified as well. The "lambdaARN" property is excluded because it will be dynamically added by the build for the transient environment. For more details on the input and output configurations, see the documentation on GitHub.

lambda_power_tuned/lambda_power_tuned/terraform/power-tuning-input.json
{
"powerValues": [
128,
256,
512,
1024
],
"num": 50,
"payload": {},
"parallelInvocation": true,
"strategy": "cost"
}

Cleanup

If you deployed resources via the deployment pipeline, be sure to either use the DestroyTerraform CodeBuild project or run:

# set the bucket name variable or replace with a value
# the bucket name nomenclature is 'terraform-state-' followed by a UUID
# this can also be found via the Console
terraform init -backend-config="bucket=$TERRAFORM_STATE_S3_BUCKET_NAME"
terraform destroy

To destroy the pipeline itself run:

cdk destroy

If you spun up a Cloud9 environment, be sure to delete that as well.

Disclaimer

At the time of writing this blog post, I currently work for Amazon Web Services. The opinions and views expressed here are my own and not the views of my employer.
AWS re:Invent 2022

· 10 min read
Scottie Enriquez
Senior Solutions Developer at Amazon Web Services

Overview

I learn best by doing, so with every release cycle, I take the time to build fully functional examples and digest the blog posts and video content. Below are some of my favorite releases from re:Invent 2022. You can find all source code in this GitHub repository.

Compute Optimizer Third-Party Metrics

Compute Optimizer is a powerful and free offering from AWS that analyzes resource usage and provides recommendations. Most commonly, it produces rightsizing and termination opportunities for EC2 instances. However, in my experience, the most significant limitation for customers is that Compute Optimizer does not factor memory or disk utilization into findings by default. As a result, AWS customers that use CloudWatch metrics have their findings enhanced, but other customers who use third-party alternatives to capture memory and disk utilization did not. AWS announced third-party metric support for Compute Optimizer, including Datadog.

To test this new feature, we need a few things:

  • Compute Optimizer enabled for the proper AWS account(s)
  • Datadog AWS integration enabled
  • An EC2 instance (i.e., candidate for rightsizing) with the Datadog agent installed

First, opt in to Compute Optimizer in your AWS account. Next, enable AWS integration in your Datadog account. This can be done in an automated fashion via a CloudFormation stack. It's also worth noting that Datadog offers a 14-day free trial.

datadog-aws-integration.png

Back in the AWS Console for Compute Optimizer, select Datadog as an external metrics ingestion source.

compute-optimizer-third-party.png

Lastly, we need to deploy an EC2 instance. The following CDK stack creates a VPC, EC2 instance (t3.medium; be aware of charges) with the Datadog agent installed, security group, and an IAM role. Before deploying the stack, be sure to set DD_API_KEY and DD_SITE environment variables. The EC2 instance, role, and security group are also configured for Instance Connect.

ec2-instance-with-datadog/lib/ec2-instance-with-datadog-stack.ts
export class Ec2InstanceWithDatadogStack extends cdk.Stack {
constructor(scope: Construct, id: string, props?: cdk.StackProps) {
super(scope, id, props);

// networking
const vpc = new ec2.Vpc(this, 'VPC', {
ipAddresses: ec2.IpAddresses.cidr('10.0.0.0/16'),
natGateways: 0
});
const selection = vpc.selectSubnets({
// using public subnets as to not incur NAT Gateway charges
subnetType: ec2.SubnetType.PUBLIC
});
const datadogInstanceSecurityGroup = new ec2.SecurityGroup(this, 'datadog-instance-sg', {
vpc: vpc,
allowAllOutbound: true,
});
// IP range for EC2 Instance Connect
datadogInstanceSecurityGroup.addIngressRule(ec2.Peer.ipv4('18.206.107.24/29'), ec2.Port.tcp(22), 'allow SSH access for EC2 Instance Connect');

// IAM
const datadogInstanceRole = new iam.Role(this, 'datadog-instance-role', {
assumedBy: new iam.ServicePrincipal('ec2.amazonaws.com'),
managedPolicies: [
iam.ManagedPolicy.fromAwsManagedPolicyName('EC2InstanceConnect'),
],
});

// EC2 instance
const userData = ec2.UserData.forLinux();
userData.addCommands(
'sudo yum install ec2-instance-connect',
// set these environment variables with your Datadog API key and site
`DD_API_KEY=${process.env.DD_API_KEY} DD_SITE="${process.env.DD_SITE}" bash -c "$(curl -L https://s3.amazonaws.com/dd-agent/scripts/install_script_agent7.sh)"`,
);
const ec2Instance = new ec2.Instance(this, 'ec2-instance', {
vpc: vpc,
vpcSubnets: {
subnetType: ec2.SubnetType.PUBLIC,
},
role: datadogInstanceRole,
securityGroup: datadogInstanceSecurityGroup,
// note: this will incur a charge
instanceType: ec2.InstanceType.of(
ec2.InstanceClass.T3,
ec2.InstanceSize.MEDIUM,
),
machineImage: new ec2.AmazonLinuxImage({
generation: ec2.AmazonLinuxGeneration.AMAZON_LINUX_2,
}),
userData: userData
});
}
}

Once successfully deployed, metrics for the EC2 instance will appear in your Datadog account.

datadog-ec2-metrics.png

Finally, wait up to 30 hours for a finding to appear in Compute Optimizer with the proper third-party APM metrics.

AWS Lambda SnapStart

Cold starts are one of the most common drawbacks of serverless adoption. Specific runtimes, such as Java, are more affected by this, especially in conjunction with frameworks like Spring Boot. SnapStart aims to address this:

After you enable Lambda SnapStart for a particular Lambda function, publishing a new version of the function will trigger an optimization process. The process launches your function and runs it through the entire Init phase. Then it takes an immutable, encrypted snapshot of the memory and disk state, and caches it for reuse. When the function is subsequently invoked, the state is retrieved from the cache in chunks on an as-needed basis and used to populate the execution environment. This optimization makes invocation time faster and more predictable, since creating a fresh execution environment no longer requires a dedicated Init phase.

For now, SnapStart only supports the Java runtime.

With the release came support via CloudFormation and CDK. However, at the time of writing, CDK only supports SnapStart via the L1 construct: CfnFunction. The L2 Function class does not yet have support, so this may be a temporary blocker for CDK projects. Using CDK, I wrote a simple stack to test a trivial function:

java11-snapstart-lambda/lib/java11-snapstart-lambda-stack.ts
export class Java11SnapstartLambdaStack extends cdk.Stack {
constructor(scope: Construct, id: string, props?: cdk.StackProps) {
super(scope, id, props);
// artifact bucket and ZIP deployment
const artifactBucket = new s3.Bucket(this, 'ArtifactBucket');
const artifactDeployment = new s3Deployment.BucketDeployment(this, 'DeployFiles', {
sources: [s3Deployment.Source.asset('./artifact')],
destinationBucket: artifactBucket,
});

// IAM role
const lambdaExecutionRole = new iam.Role(this, 'LambdaExecutionRole', {
assumedBy: new iam.ServicePrincipal('lambda.amazonaws.com'),
});
lambdaExecutionRole.addManagedPolicy(iam.ManagedPolicy.fromAwsManagedPolicyName('service-role/AWSLambdaBasicExecutionRole'));

// Lambda functions
const withSnapStart = new lambda.CfnFunction(this, 'WithSnapStart', {
code: {
s3Bucket: artifactDeployment.deployedBucket.bucketName,
s3Key: 'corretto-test.zip'
},
functionName: 'withSnapStart',
handler: 'example.Hello::handleRequest',
role: lambdaExecutionRole.roleArn,
runtime: 'java11',
snapStart: { applyOn: 'PublishedVersions' }
});
const withoutSnapStart = new lambda.CfnFunction(this, 'WithoutSnapStart', {
code: {
s3Bucket: artifactDeployment.deployedBucket.bucketName,
s3Key: 'corretto-test.zip'
},
functionName: 'withoutSnapStart',
handler: 'example.Hello::handleRequest',
role: lambdaExecutionRole.roleArn,
runtime: 'java11'
});
}
}

In Jeff Barr's post, he used a Spring Boot function and achieved significant performance benefits. Next, I wanted to see if there were any benefits to a barebones Java 11 function, given that there is no additional charge for SnapStart. With a few tests, I reproduced a slight decrease in total duration.

Cold start without SnapStart (577.84 milliseconds): without-snapstart.png

Cold start with SnapStart (537.94 milliseconds): with-snapstart.png

A few cold start tests are hardly conclusive, but I'm excited to see how AWS customers' performance and costs fare at scale. One thing to note is that in both my testing and the Jeff Barr example, the billed duration increased with SnapStart while the total duration decreased (i.e., this may be faster but come with an indirect cost).

AWS CodeCatalyst

I started my career as a .NET developer writing C#. My first experience with professional software development involved using Team Foundation Server. Even as a consultant focused on AWS about a year ago, many customers I worked for primarily used Azure DevOps to manage code, CI/CD pipelines, etc. While it may seem strange to use a Microsoft tool for AWS, the developer experience felt more unified than AWS CodeSuite in my opinion. CodeCommit, CodeBuild, and CodePipeline feel like entirely separate services within the AWS Console. While they are easily integrated via automation like CloudFormation or CDK, navigating between the services in the UI often takes several clicks.

Enter CodeCatalyst. In addition to the release blog post, there is an excellent AWS Developers podcast episode outlining the vision for the product. I'm paraphrasing, but these are the four high-level problems that CodeCatalsyt aims to solve in addition to the feedback above:

  • Setting up the project itself
  • Setting up CI/CD
  • Setting up infrastructure and environments
  • Onboarding new developers

CodeCatalyst does not live in the AWS Console. It's a separate offering that integrates via Builder ID authentication. While CodeCatalyst can be used to create resources that reside in an account (i.e., via infrastructure as code), the underlying repositories, pipelines, etc. that power the developer experience are not exposed to the user. In addition to this, the team recognized that many customers have at least some of the tooling in place that CodeCatalyst provides. As such, it supports third-party integration for various components (e.g., Jira for issues, GitHub for a repository, GitHub Actions for CI/CD, etc.).

One of the most compelling features of CodeCatalyst is blueprints. Blueprints aim to provide fully functional starter kits encapsulating useful defaults and best practices. For example, I chose the .NET serverless blueprint that provisioned a Lambda function's source code and IaC in a Git repository with a CI/CD pipeline.

codecatalyst.png

AWS Application Composer Preview

Application Composer is a new service from AWS that allows developers to map out select resources using a GUI with the feel of an architecture diagram. These resources can be connected to one another (e.g., an EventBridge Schedule to trigger Lambda). A subset of attributes can also be modified, such as the Lambda runtime.

aws-application-composer.png

While the creation process is UI-driven, the output is a SAM template (i.e., a CloudFormation template with a Transform statement). For example, the diagram above creates the following:

Transform: AWS::Serverless-2016-10-31
Resources:
Bucket:
Type: AWS::S3::Bucket
Properties:
BucketName: !Sub ${AWS::StackName}-bucket-${AWS::AccountId}
BucketEncryption:
ServerSideEncryptionConfiguration:
- ServerSideEncryptionByDefault:
SSEAlgorithm: aws:kms
KMSMasterKeyID: alias/aws/s3
PublicAccessBlockConfiguration:
IgnorePublicAcls: true
RestrictPublicBuckets: true
BucketBucketPolicy:
Type: AWS::S3::BucketPolicy
Properties:
Bucket: !Ref Bucket
PolicyDocument:
Id: RequireEncryptionInTransit
Version: '2012-10-17'
Statement:
- Principal: '*'
Action: '*'
Effect: Deny
Resource:
- !GetAtt Bucket.Arn
- !Sub ${Bucket.Arn}/*
Condition:
Bool:
aws:SecureTransport: 'false'
S3Function:
Type: AWS::Serverless::Function
Properties:
Description: !Sub
- Stack ${AWS::StackName} Function ${ResourceName}
- ResourceName: S3Function
CodeUri: src/Function
Handler: index.handler
Runtime: nodejs18.x
MemorySize: 3008
Timeout: 30
Tracing: Active
Events:
Bucket:
Type: S3
Properties:
Bucket: !Ref Bucket
Events:
- s3:ObjectCreated:*
- s3:ObjectRemoved:*
S3FunctionLogGroup:
Type: AWS::Logs::LogGroup
DeletionPolicy: Retain
Properties:
LogGroupName: !Sub /aws/lambda/${S3Function}

This service has the potential to offer the best of both worlds: an easy-to-use GUI and a deployable artifact. There's a clear focus on serverless design for now, but I'd like to see if this expands to other areas (e.g., VPC design). It's also worth noting that Application Composer utilizes the browser's file API for Google Chrome and Microsoft Edge to save the latest template changes locally. I'd love to see CDK L2 construct support here in addition to CloudFormation also.

Amazon RDS Managed Blue/Green Deployments

When updating databases, using a blue/green deployment technique is an appealing option for users to minimize risk and downtime. This method of making database updates requires two database environments: your current production environment, or blue environment, and a staging environment, or green environment.

I find this release particularly valuable, given that many AWS customers are trying to maximize their use of Graviton for managed services, including RDS. Graviton processors are designed by AWS and achieve significant price-performance improvements. They also offer savings versus Intel chips. Typically, the adoption of Graviton for EC2 is a high-lift engineering activity since code and dependencies must support ARM. However, with managed services, AWS handles software dependency management. This makes RDS an excellent candidate for Graviton savings. Due to the stateful nature of databases, changes introduce additional risks. Blue/Green Deployments mitigate much of this risk by having two fully functional environments coexisting.

To test this feature, I provisioned a MySQL RDS instance with an older version on an Intel instance with a previous-generation general-purpose SSD. A Blue/Green Deployment can then be created via the Console and CLI, which spawns a second instance. I then modified the Green instance to use gp3 storage, a Graviton instance type (db.t4g.medium), and the latest version of MySQL.

rds-blue-green-deployment.png

Once the Green instance modifications were finished, I then switched over the instances.

rds-blue-green-switch-over.png

Amazon CodeWhisperer Support for C# and TypeScript

CodeWhisperer, Amazon's response to GitHub Copilot, is described as an ML-powered coding companion. I had yet to test the preview, but this release is relevant to me, given I write mostly TypeScript and C# these days. Moreover, TypeScript is particularly interesting to the cloud community, given that it is the de facto standard for CDK as the first language supported. CodeWhisperer is available as part of the AWS Toolkit for Visual Studio Code and the JetBrains suite, but I opted to give it a test run in Cloud9, AWS's cloud-based IDE.

amazon-codewhisperer.png

CodeWhisperer is proficient at generating code against the AWS SDK, such as functions to stop an EC2 instance or fetch objects from an S3 bucket. With regards to CDK, it generated simple constructs sufficiently for me. However, CodeWhisperer tended to generate recommendations line-by-line instead of in large blocks for larger and more complex constructs. In addition, the recommendations seemed to be context-aware (i.e., recommending valid properties and methods based on class definitions). These two use cases alone provide a great deal of opportunity since most of the time I spend writing code with AWS SDK and CDK tends to be spent reading documentation.

The Nature of Code Companion Series: Introduction Chapter

· 4 min read
Scottie Enriquez
Senior Solutions Developer at Amazon Web Services

About the Book

Recently, I started reading a fantastic book called The Nature of Code by Daniel Shiffman. From the description:

How can we capture the unpredictable evolutionary and emergent properties of nature in software? How can understanding the mathematical principles behind our physical world help us to create digital worlds? This book focuses on a range of programming strategies and techniques behind computer simulations of natural systems, from elementary concepts in mathematics and physics to more advanced algorithms that enable sophisticated visual results. Readers will progress from building a basic physics engine to creating intelligent moving objects and complex systems, setting the foundation for further experiments in generative design.

Daniel implements numerous examples using a programming language called Processing. Instead, I decided to write my own versions using JavaScript, React, Three.js, and D3. For this blog series, I intend to implement my learnings from each chapter. This first post covers the introduction section of the book.

Random Walk

A random walk traces a path through a Cartesian plane going in a random direction with each step (i.e., one pixel). The walks are built by plotting individual pixels as rectangles in Scalable Vector Graphics (SVGs). The program starts at (200, 400) for each walk to represent the center of the Cartesian plane. The walk function chooses a random direction and updates the internal state to indicate that a step has been taken.

walk(pixels) {
const step = Math.floor(Math.random() * 4);
switch (step) {
case 0:
this.coordinates.x++;
break;
case 1:
this.coordinates.x--;
break;
case 2:
this.coordinates.y++;
break;
default:
this.coordinates.y--;
break;
}
pixels.push({
x: this.coordinates.x,
y: this.coordinates.y
});
}

The walkWeightedRight function illustrates the same functionality but with a non-uniform distribution. In this code, there's a 70% chance of moving to the right.

walkWeightedRight(pixels) {
const step = Math.floor(Math.random() * 10);
if (step <= 6) {
this.coordinates.x++;
}
else if (step === 7) {
this.coordinates.x--;
}
else if (step === 8) {
this.coordinates.y++;
}
else {
this.coordinates.y--;
}
pixels.push({
x: this.coordinates.x,
y: this.coordinates.y
});
}

The randomWalk function calls the walk or walkWeightedRight function until an edge is hit. The SVG is then rendered based on the pixels stored in memory representing the path.

randomWalk(weightedRight) {
const pixels = [];
this.steps.current = 0;
while (this.steps.current <= this.steps.max &&
this.coordinates.x < width - 1 && this.coordinates.x > 0
&& this.coordinates.y < height - 1
&& this.coordinates.y > 0)
{
if (weightedRight) {
this.walkWeightedRight(pixels);
}
else {
this.walk(pixels);
}
this.steps.current++;
}
return pixels;
}

The random walks are capped at 10,000 pixels for performance reasons.


Random Numbers with Normal Distribution

This example plots random numbers generated with a normal distribution (i.e., no specific weights).

generateRandomData() {
const datasetSize = 100;
const maxValue = 100;
const data = [];
for(let index = 0; index < datasetSize; index++) {
data[index] = {
index: index,
value: Math.floor(Math.random() * maxValue)
}
}
return data;
}

Bell Curve (Frequency Distribution)

This example shows how to create a bell curve for one thousand monkeys ranging in height from 200 to 300 pixels with a normal distribution. First, the code generates the data.

generateHeightData() {
const data = [];
const datasetSize = 1000;
const baseHeight = 200;
const maxRandomValue = 100;
for(let index = 0; index < datasetSize; index++) {
data[index] = {
index: index,
// generate a height between 200 and 300
value: baseHeight + (Math.floor(Math.random() * maxRandomValue))
}
}
return data.sort((current, next) => { return current.value - next.value });
}

Next, the code computes the standard deviation.

computeMean(array) {
let sum = 0;
for(let index = 0; index < array.length; index++) {
sum += array[index].value;
}
return sum / array.length;
}

computeStandardDeviation(data, mean) {
let sumSquareDeviation = 0;
for(let index = 0; index < data.length; index++) {
sumSquareDeviation += Math.pow(data[index].value - mean, 2);
}
return Math.sqrt(sumSquareDeviation / data.length);
}

Lastly, the code groups each monkey by standard deviations for the x-axis and plots the frequency counts for the y-axis.

generateHeightBellCurve() {
const data = this.generateHeightData();
const meanHeight = this.computeMean(data);
const standardDeviationHeight = this.computeStandardDeviation(data, meanHeight);
const bellCurveData = {};
for(let index = 0; index < data.length; index++) {
data[index].standardDeviations = Math.round((data[index].value - meanHeight) / standardDeviationHeight);
if(!bellCurveData[data[index].standardDeviations]) {
bellCurveData[data[index].standardDeviations] = {
standardDeviations: data[index].standardDeviations,
count: 1
}
}
else {
bellCurveData[data[index].standardDeviations].count++;
}
}
return Object.keys(bellCurveData).map(key => bellCurveData[key]).sort((one, other) => { return one.standardDeviations - other.standardDeviations });
}

Next Section

Chapter one explores Euclidean vectors and the basics of motion.

Writing Cost-Conscious Terraform Using Infracost and AWS Developer Tools

· 7 min read
Scottie Enriquez
Senior Solutions Developer at Amazon Web Services

Solution Overview

My current role focuses on every facet of AWS cost optimization. Much of this entails helping to remediate existing infrastructure and usage. Many customers ask how they can shift left on cloud costs, like they do with security. Ultimately, cost consciousness needs to be injected into every aspect of the engineering lifecycle: from the initial architecture design to implementation and upkeep.

One such aspect is providing developers visibility into the impact of their code changes. Infrastructure as code has made it easy to deploy cloud resources faster and at larger scale than ever before, but this means that cloud bills can also scale up quickly in parallel. This solution demonstrates how to integrate Infracost into a deployment pipeline to bring cost impact to the pull request process and code review discussion. The source code is hosted on GitHub.

Solution Architecture

Diagram

This solution deploys several resources:

  • A CodeCommit repository pre-loaded with Terraform code for a VPC, EC2 instance, S3 bucket, and Lambda function to serve as some example infrastructure costs to monitor
  • A CodeBuild project triggered by pull request state changes that analyzes cost changes relative to the main branch
  • A CodePipeline with manual approvals to deploy the Terraform for changes pushed to the main branch
  • An SNS topic to notify developers of cost changes
  • An S3 bucket to store Terraform state remotely
  • An S3 bucket to store CodePipeline artifacts

Preparing Your Development Environment

While this solution is for writing, deploying, and analyzing Terraform HCL syntax, I wrote the infrastructure code for the deployment pipeline and dependent resources using AWS CDK, which is my daily driver for infrastructure as code. Of course, the source code could be rewritten using Terraform or CDK for Terraform, but I used CDK for the sake of a quick prototype that only creates AWS resources (i.e., no need for additional providers). In addition, Infracost currently only supports Terraform, but there are plans for CloudFormation and CDK in the future.

The following dependencies are required to deploy the pipeline infrastructure:

Rather than installing Node.js, CDK, Terraform, and all other dependencies on your local machine, you can alternatively create a Cloud9 IDE with these pre-installed via the Console or with a CloudFormation template:

Resources:
rCloud9Environment:
Type: AWS::Cloud9::EnvironmentEC2
Properties:
AutomaticStopTimeMinutes: 30
ConnectionType: CONNECT_SSH
Description: Environment for writing and deploying CDK
# AWS Free Tier eligible
InstanceType: t2.micro
Name: InfracostCDKPipelineCloud9Environment
# https://docs.aws.amazon.com/cloud9/latest/user-guide/vpc-settings.html#vpc-settings-create-subnet
SubnetId: subnet-EXAMPLE

Installation, Deployment, and Configuration

Before deploying the CDK application, store the Infracost API key in an SSM parameter SecureString called /terraform/infracost/api_key.

To install and deploy the pipeline, use the following commands:

git clone https://github.com/scottenriquez/infracost-cdk-pipeline.git
cd infracost-cdk-pipeline/infracost-cdk-pipeline/
npm install
# https://docs.aws.amazon.com/cdk/v2/guide/bootstrapping.html
cdk bootstrap
cdk deploy

Before testing the pipeline, subscribe to the SNS topic via the Console. For testing purposes, use email to get the cost change data delivered.

Using the Deployment Pipeline

The CodePipeline resource is triggered at creation, but there are manual approval stages to prevent any infrastructure from being created without intervention. Feel free to deploy the Terraform, but it is not required for generating cost differences via a pull request. The CodePipeline is triggered by changes to main.

Approval

Make some code changes to see the cost impact. To modify the Terraform code, either use the CodeCommit GUI in the Console or clone the repository to your development environment. First, create a branch called feature off of main. Then modify ec2.tf to use a different instance type:

infracost-cdk-pipeline/lib/terraform/ec2.tf
resource "aws_instance" "server" {
# Amazon Linux 2 Kernel 5.10 AMI 2.0.20220606.1 x86_64 HVM in us-east-1
# if deploying outside of us-east-1, you must use the corresponding AL2 AMI for your region
ami = "ami-0cff7528ff583bf9a"
# changed from t3.micro
instance_type = "m5.large"
subnet_id = module.vpc.private_subnets[0]

root_block_device {
volume_type = "gp3"
volume_size = 50
}
}

Infracost also supports usage estimates in addition to resource costs. For example, changing the storage GBs for the S3 bucket in infracost-usage.yml will also update the cost comparison and estimate. These values are hardcoded and version-controlled here, but Infracost is also experimenting with fetching actual usage data via CloudWatch.

infracost-cdk-pipeline/lib/terraform/infracost-usage.yml
version: 0.1
resource_usage:
aws_lambda_function.function:
monthly_requests: 10000
request_duration_ms: 250
aws_s3_bucket.bucket:
standard:
# changed from 10000
storage_gb: 15000
monthly_tier_1_requests: 1000

Commit these changes to the feature branch and open a pull request. Doing so will trigger the CodeBuild project that computes the cost delta and publishes the payload to the SNS topic if the amount increases. Assuming you subscribed to the SNS topic via email, some JSON should be in your inbox. Here's an abridged example output:

{
"version": "0.2",
"currency": "USD",
"projects": [{
"name": "codecommit::us-east-1://TerraformRepository/.",
"metadata": {
"path": "/tmp/main",
"infracostCommand": "breakdown",
"type": "terraform_dir",
"branch": "main",
"commit": "2e6eafd94811a0c9ac814a8c31132dc3badc0b9f",
"commitAuthorName": "AWS CodeCommit",
"commitAuthorEmail": "noreply-awscodecommit@amazon.com",
"commitTimestamp": "2022-07-16T05:47:50Z",
"commitMessage": "Initial commit by AWS CodeCommit",
"vcsRepoUrl": "codecommit::us-east-1://TerraformRepository",
"vcsSubPath": "."
}
}],
"totalHourlyCost": "0.41661461198630137000733251",
"totalMonthlyCost": "304.12866675",
"pastTotalHourlyCost": "0.33101461198630137000733251",
"pastTotalMonthlyCost": "241.64066675",
"diffTotalHourlyCost": "0.0856",
"diffTotalMonthlyCost": "62.488",
"timeGenerated": "2022-07-16T06:21:02.155239211Z",
"summary": {
"totalDetectedResources": 3,
"totalSupportedResources": 3,
"totalUnsupportedResources": 0,
"totalUsageBasedResources": 3,
"totalNoPriceResources": 0,
"unsupportedResourceCounts": {},
"noPriceResourceCounts": {}
}
}

Diving Into the Pull Request Build Logic

The TypeScript for describing the deployment pipeline lives in infracost-cdk-pipeline-stack.ts. The following code snippet (with comments explaining the install and build phases) contains the core logic for integrating Infracost into the pull request:

infracost-cdk-pipeline/lib/infracost-cdk-pipeline-stack.ts
const pullRequestCodeBuildProject = new codebuild.Project(this, 'TerraformPullRequestCodeBuildProject', {
buildSpec: codebuild.BuildSpec.fromObject({
version: '0.2',
phases: {
install: {
commands: [
// checkout the feature branch
'git checkout $CODEBUILD_SOURCE_VERSION',
'sudo yum -y install unzip python3-pip jq',
'sudo pip3 install git-remote-codecommit',
`wget https://releases.hashicorp.com/terraform/${terraformVersion}/terraform_${terraformVersion}_linux_amd64.zip`,
`unzip terraform_${terraformVersion}_linux_amd64.zip`,
'sudo mv terraform /usr/local/bin/',
'curl -fsSL https://raw.githubusercontent.com/infracost/infracost/master/scripts/install.sh | sh',
// clone the main branch
`git clone ${terraformRepository.repositoryCloneUrlGrc} --branch=${mainBranchName} --single-branch /tmp/main`,
// generate Infracost baseline file for main
'infracost breakdown --path /tmp/main --usage-file infracost-usage.yml --format json --out-file infracost-main.json'
]
},
build: {
commands: [
// initialize Terraform with remote state
`terraform init -backend-config="bucket=${terraformStateBucket.bucketName}"`,
'terraform plan',
// compute diff based on baseline created from main
'infracost diff --path . --compare-to infracost-main.json --usage-file infracost-usage.yml --format json --out-file infracost-pull-request.json',
// parse JSON to get total monthly difference
`DIFF_TOTAL_MONTHLY_COST=$(jq '.diffTotalMonthlyCost | tonumber | floor' infracost-pull-request.json)`,
// if there's a cost increase, publish the diff to the SNS topic
`if [[ $DIFF_TOTAL_MONTHLY_COST -gt 0 ]]; then aws sns publish --topic-arn ${terraformCostTopic.topicArn} --message file://infracost-pull-request.json; fi`
]
}
}
})
});

More advanced notification logic, such as using the percentage increase for an alert threshold, could be implemented to minimize noise for developers. Additionally, offloading the logic to a Lambda function and invoking it via the CLI or SNS would allow for more robust and testable logic than a simple shell script. Alternatively, the cost delta could be added as a comment on the source pull request. Choose the option that makes the most sense for your code review process.

Conclusion

Technology alone will not resolve all cost optimization challenges. However, integrating cost analysis into code reviews is integral to shaping a cost-conscious culture. It is much better to find and address cost spikes before infrastructure is deployed. Seeing a large cost increase from infracost diff is scary, but seeing it in Cost Explorer later is far scarier.

Cleanup

If you deployed resources via the deployment pipeline, be sure to either use the DestroyTerraform CodeBuild project or run:

# set the bucket name variable or replace with a value
# the bucket name nomenclature is 'terraform-state-' followed by a UUID
# this can also be found via the Console
terraform init -backend-config="bucket=$TERRAFORM_STATE_S3_BUCKET_NAME"
terraform destroy

To destroy the pipeline itself run:

cdk destroy

If you spun up a Cloud9 environment, be sure to delete that as well.

Disclaimer

At the time of writing this blog post, I currently work for Amazon Web Services. The opinions and views expressed here are my own and not the views of my employer.

A CDK Companion for Rahul Nath's .NET Lambda Course

· 6 min read
Scottie Enriquez
Senior Solutions Developer at Amazon Web Services

The Course and Companion

Rahul Nath recently released a course called AWS Lambda for the .NET Developer on Udemy and Gumroad. I had a ton of fun going through the exercises and highly recommend purchasing a copy. While working through the material, I implemented the solutions with infrastructure as code using AWS CDK in C# and .NET 6. I also containerized most of the Lambda functions and wrote unit tests for both the functions and infrastructure. You can find all my source code on GitHub.

Technology Decisions and Benefits

While infrastructure as code (IaC) has existed within the AWS ecosystem for over a decade, adoption has exploded in recent years due to the ability to manage large amounts of infrastructure at scale and standardize design across an organization. There are many options including CloudFormation (CFN), CDK, and Terraform for IaC and Serverless Application Model (SAM) and Serverless Framework for development. This article from A Cloud Guru quickly sums up the pros and cons of each IaC option. I choose this particular stack for some key reasons:

  • Docker ensures that the Lambda functions run consistently across local development, builds, and production environments and simplifies dependency management
  • CDK allows the infrastructure to be described as C# instead of YAML, JSON, or HCL
  • CDK provides the ability to inject more robust logic than intrinsic functions in CloudFormation and more modularity as well while still being an AWS-supported offering
  • CDK supports unit testing

Elaborating on the final point, here is an example unit test for ensuring that a DynamoDB table is destroyed when the stack is. The default behavior is for the table to be retained, leading to clutter and cost since this is a non-production project. This is an example how of IaC can be meaningfully tested:

[Fact]
public void Stack_DynamoDb_ShouldHaveDeletionPolicyDelete()
{
// arrange
App app = new App();
LambdaWithApiGatewayStack stack = new LambdaWithApiGatewayStack(app, "LambdaWithApiGatewayStack");

// act
Template template = Template.FromStack(stack);

// assert
template.HasResource("AWS::DynamoDB::Table", new Dictionary<string, object>()
{
{"DeletionPolicy", "Delete"}
});
}

Dependencies

To build and run this codebase, the following dependencies must be installed:

  • .NET 6
  • Node.js
  • Docker
  • AWS CDK
  • Credentials configured in ~/.aws/credentials(easily done with the AWS CLI)

My Development Environment and CPU Architecture Considerations

I developed all the code on my M1 MacBook Pro using JetBrains Rider. Because of my machine's ARM processor, it's key to note that all of my Dockerfiles use ARM images (e.g., public.ecr.aws/lambda/dotnet:6-arm64) and are deployed to Graviton2 Lambda environments. I suspect that most folks reading this are using x86 Windows machines, so here is a modified Dockerfile illustrating the requisite changes:

LambdaWithAPIGateway/src/LambdaWithApiGateway.DockerFunction/src/LambdaWithApiGateway.DockerFunction/Dockerfile
# ARM
# FROM public.ecr.aws/lambda/dotnet:6-arm64 AS base
# x86
FROM public.ecr.aws/lambda/dotnet:6 AS base

# ARM
# FROM mcr.microsoft.com/dotnet/sdk:6.0-bullseye-slim-amd64 as build
# x86
FROM mcr.microsoft.com/dotnet/sdk:6.0-bullseye-slim as build
WORKDIR /src
COPY ["LambdaWithApiGateway.DockerFunction.csproj", "LambdaWithApiGateway.DockerFunction/"]
RUN dotnet restore "LambdaWithApiGateway.DockerFunction/LambdaWithApiGateway.DockerFunction.csproj"

WORKDIR "/src/LambdaWithApiGateway.DockerFunction"
COPY . .
RUN dotnet build "LambdaWithApiGateway.DockerFunction.csproj" --configuration Release --output /app/build

FROM build AS publish
RUN dotnet publish "LambdaWithApiGateway.DockerFunction.csproj" \
--configuration Release \
# ARM
# --runtime linux-arm64
# x86
--runtime linux-x64 \
--self-contained false \
--output /app/publish \
-p:PublishReadyToRun=true

FROM base AS final
WORKDIR /var/task
COPY --from=publish /app/publish .
CMD ["LambdaWithApiGateway.DockerFunction::LambdaWithApiGateway.DockerFunction.Function::FunctionHandler"]

The CDK code for the Lambda function also requires a slight change:

LambdaWithAPIGateway/src/LambdaWithApiGateway/LambdaWithApiGatewayStack.cs
DockerImageFunction sqsDockerImageFunction = new DockerImageFunction(this, "LambdaFunction",
new DockerImageFunctionProps()
{
// ARM
// Architecture = Architecture.ARM_64,
// x86
Architecture = Architecture.X86_64,
Code = sqsDockerImageCode,
Description = ".NET 6 Docker Lambda function for polling SQS",
Role = sqsDockerFunctionExecutionRole,
Timeout = Duration.Seconds(30)
}
);

Using Cloud9

AWS offers a browser-based IDE called Cloud9 that has nearly all required dependencies installed. The IDE can be provisioned from the AWS Console or via infrastructure as code. Unfortunately, Cloud9 does not support Graviton-based instances yet. Below is a CloudFormation template for provisioning an environment with the source code pre-loaded:

Resources:
rCloud9Environment:
Type: AWS::Cloud9::EnvironmentEC2
Properties:
AutomaticStopTimeMinutes: 30
ConnectionType: CONNECT_SSM
Description: Web-based cloud development environment
InstanceType: m5.large
Name: Cloud9Environment
Repositories:
- PathComponent: /repos/rahul-nath-dotnet-lambda-course-cdk-companion
RepositoryUrl: https://github.com/scottenriquez/rahul-nath-dotnet-lambda-course-cdk-companion.git

Note that the instance must be deployed to a public subnet. The Cloud9 AMI does not have .NET 6 pre-installed. To do so, run the following commands:

sudo rpm -Uvh https://packages.microsoft.com/config/centos/7/packages-microsoft-prod.rpm
sudo yum install dotnet-sdk-6.0

Code Structure

Each section of the course has a separate solution in the repository:

  • FirstLambda is a simple ZIP Lambda function that returns the uppercase version of a string
  • LambdaWithDynamoDb is a simple Lambda function that queries a DynamoDB table
  • LambdaWithApiGateway is a full CRUD app using DynamoDB for storage
  • LambdaTriggers are event-driven Lambda functions triggered by SNS and SQS

Each solution is structured in the same way. I generated the CDK app using the CLI and used the Lambda templates to create my functions like so:

# create the CDK application
# the name is derived from the directory
# this snippet assumes the directory is called Lambda
cdk init app --language csharp
# install the latest version of the .NET Lambda templates
dotnet new -i Amazon.Lambda.Templates
cd src/
# create the function
dotnet new lambda.image.EmptyFunction --name Lambda.DockerFunction
# add the projects to the solution file
dotnet sln add Lambda.DockerFunction/src/Lambda.DockerFunction/Lambda.DockerFunction.csproj
dotnet sln add Lambda.DockerFunction/test/Lambda.DockerFunction.Tests/Lambda.DockerFunction.Tests.csproj
# build the solution and run the sample unit test to verify that everything is wired up correctly
dotnet test Lambda.sln

Each Lambda function has projects for the handler code and unit tests. All CDK code for infrastructure resides in the corresponding *Stack.cs file. Here is some example IaC for a Lambda function triggered by SQS:

LambdaTriggers/src/LambdaTriggers/LambdaTriggersStack.cs
public class LambdaTriggersStack : Stack
{
public LambdaTriggersStack(Construct scope, string id, IStackProps props = null) : base(scope, id, props)
{
Queue queue = new Queue(this, "Queue");
Role sqsDockerFunctionExecutionRole = new Role(this, "SqsDockerFunctionExecutionRole", new RoleProps {
AssumedBy = new ServicePrincipal("lambda.amazonaws.com"),
ManagedPolicies = new IManagedPolicy[]
{
new ManagedPolicy(this, "ManagedPolicy", new ManagedPolicyProps()
{
Document = new PolicyDocument(new PolicyDocumentProps()
{
Statements = new []
{
new PolicyStatement(new PolicyStatementProps()
{
Actions = new [] { "sqs:*" },
Resources = new [] { queue.QueueArn }
}),
new PolicyStatement(new PolicyStatementProps
{
Actions = new []
{
"logs:CreateLogGroup",
"logs:CreateLogStream",
"logs:PutLogEvents"
},
Effect = Effect.ALLOW,
Resources = new [] { "*" }
})
}
})
})
}
});
DockerImageCode sqsDockerImageCode = DockerImageCode.FromImageAsset("src/LambdaTriggers.SqsDockerFunction/src/LambdaTriggers.SqsDockerFunction");
DockerImageFunction sqsDockerImageFunction = new DockerImageFunction(this, "LambdaFunction",
new DockerImageFunctionProps()
{
Architecture = Architecture.ARM_64,
Code = sqsDockerImageCode,
Description = ".NET 6 Docker Lambda function for polling SQS",
Role = sqsDockerFunctionExecutionRole,
Timeout = Duration.Seconds(30)
}
);
SqsEventSource sqsEventSource = new SqsEventSource(queue);
sqsDockerImageFunction.AddEventSource(sqsEventSource);
}
}

Resource Deployment

To deploy the infrastructure, navigate to the corresponding section folder and use the CDK CLI like so:

cd LambdaTriggers
cdk deploy

Resource Cleanup

To destroy resources, run this command in the same directory:

cdk destroy

Using the New Terraform for CDK Convert Feature

· 5 min read
Scottie Enriquez
Senior Solutions Developer at Amazon Web Services

I previously wrote a blog post about getting started with Terraform for CDK and the benefits. At that time, the latest version was 0.3. Last week, version 0.5 was released. In this version, some new experimental features could make adopting CDK for Terraform exponentially easier.

The Convert Command

The CLI command takes in a Terraform file and converts it to the language specified.

cat terraform.tf | cdktf convert --language csharp

I started with a single terraform.tf file that creates an Azure App Service.

terraform {
required_providers {
azurerm = {
source = "hashicorp/azurerm"
version = "=2.46.0"
}
}
}

provider "azurerm" {
features {}
}

resource "azurerm_resource_group" "cdktf_convert_rg" {
name = "cdktf-convert-resource-group"
location = "Central US"
}

resource "azurerm_app_service_plan" "cdktf_convert_app_service_plan" {
name = "cdktf-convert-appserviceplan"
location = azurerm_resource_group.cdktf_convert_rg.location
resource_group_name = azurerm_resource_group.cdktf_convert_rg.name
sku {
tier = "Free"
size = "F1"
}
}

resource "azurerm_app_service" "cdktf_convert_app_service" {
name = "cdktf-convert-app-service"
location = azurerm_resource_group.cdktf_convert_rg.location
resource_group_name = azurerm_resource_group.cdktf_convert_rg.name
app_service_plan_id = azurerm_app_service_plan.cdktf_convert_app_service_plan.id
}

The command creates a C# snippet.

using Gen.Providers.Azurerm;

new AzurermProvider(this, "azurerm", new Struct {
Features = new [] { new Struct { } }
});

var azurermResourceGroupCdktfConvertRg = new ResourceGroup(this, "cdktf_convert_rg", new Struct {
Location = "Central US",
Name = "cdktf-convert-resource-group"
});

var azurermAppServicePlanCdktfConvertAppServicePlan =
new AppServicePlan(this, "cdktf_convert_app_service_plan", new Struct {
Location = azurermResourceGroupCdktfConvertRg.Location,
Name = "cdktf-convert-appserviceplan",
ResourceGroupName = azurermResourceGroupCdktfConvertRg.Name,
Sku = new [] { new Struct {
Size = "F1",
Tier = "Free"
} }
});

new AppService(this, "cdktf_convert_app_service", new Struct {
AppServicePlanId = azurermAppServicePlanCdktfConvertAppServicePlan.Id,
Location = azurermResourceGroupCdktfConvertRg.Location,
Name = "cdktf-convert-app-service",
ResourceGroupName = azurermResourceGroupCdktfConvertRg.Name
});

While this alone is extremely powerful, the C# code cannot be executed until the provider objects (i.e., Gen.Providers.Azurerm from the using statement) are generated with cdktf get. I see the use case for this command being translation of individual files for migration into an existing CDK for Terraform project. The --language flag currently supports all languages that CDK does. Instead, the option to generate an entire project from a folder seems much more helpful for converting entire solutions.

Initializing from an Existing Terraform Project

Rather than converting a single file, the init command has been updated to support creating from an existing project. At the time of writing, only TypeScript is supported.

cdktf init --from-terraform-project terraform-project-folder --template typescript

I tested against a Terraform example on GitHub from Futurice that creates a scheduled Lambda function. I forked and updated the template to work with Terraform version 1.0.3. The HCL is split across multiple files (i.e., main, variables, outputs, and permissions). I also created a Lambda function via the SAM CLI and built a ZIP artifact. The updated init command was smart enough to merge all of the .tf files into a single stack. However, the command does not migrate folders and assets outside of Terraform (i.e., my Lambda code, SAM folders, etc.). For now, these will need to be copied manually. Find the full output project here.

Notes About Conversion

Interacting with the Provider

I did not specify the region in the source HCL provider like so:

provider "aws" {
region = "us-east-1"
}

To modify the provider settings, instantiate a provider object. The convert method will translate this, but it was not apparent to me how to code this manually.

new AwsProvider(this, 'aws', {
region: 'us-east-1'
});

Counts

At the time of writing, the count meta-argument does not work consistently yet. I've opened up an issue on GitHub accordingly. The following HCL throws an error when converting:

resource "aws_instance" "multiple_server" {
count = 4
ami = "ami-0c2b8ca1dad447f8a"
instance_type = "t2.micro"
tags = {
Name = "Server ${count.index}"
}
}

I'm not sure if the intent is that this will be translated into a for loop or if the count meta-argument will just be modified. In any case, this can easily be rewritten using the general-purpose language in a much cleaner way (i.e., a loop).

I've seen a common pattern in Terraform templates that uses the count attribute to create resources conditionally. In the snippet below, a Lambda function resource is created based on whether or not an S3 bucket name is specified.

resource "aws_lambda_function" "local_zipfile" {
count = var.function_s3_bucket == "" ? 1 : 0
filename = var.function_zipfile
}

This pattern does not convert directly because in CDK for Terraform, count is set via an escape hatch using the addOverride method. The underlying Terraform configuration will be modified, but there is not a way to access individual constructs in the list of constructs in the code. However, this is another opportunity to leverage the benefits of using a general-purpose language by using conditionals, lists, for loops, etc.

Built-In Functions

Terraform built-in functions are converted and supported by CDK for Terraform. Below is a simple example using the max() function in the instance's tag:

resource "aws_instance" "ec2_instance" {
ami = "ami-0c2b8ca1dad447f8a"
instance_type = "t2.micro"
tags = {
Name = "Server ${max(1, 2, 12)}"
}
}

This converts to the following TypeScript:

new aws.Instance(this, "ec2_instance", {
ami: "ami-0c2b8ca1dad447f8a",
instanceType: "t2.micro",
tags: {
name: "Server ${max(1, 2, 12)}",
},
});

The string containing the built-in function is preserved in the cdk.tf.json build artifact file and evaluated accordingly. As best practices form, I'm curious how often built-in functions will be used versus their corresponding equivalents in the general-purpose language. While this is useful for easily converting templates with built-in functions, I would argue that there are many benefits to rewriting this logic in TypeScript (i.e., unit testing, readability, etc.).

Configuring AWS SAM Pipelines for GitHub Actions

· 3 min read
Scottie Enriquez
Senior Solutions Developer at Amazon Web Services

About AWS SAM Pipelines

Last week, AWS announced the public preview for SAM Pipelines. This feature expands the SAM CLI allowing users to create multi-account CI/CD pipelines for serverless applications quickly across several providers such as GitHub Actions, GitLab CI/CD, and Jenkins. Along with CDK Pipelines, the AWS tooling keeps making it easier to standardize with best practices.

Preparing Your Machine

I opted to create a container image for my Lambda function for my testing, so the core dependencies are the AWS CLI, SAM CLI, and Docker.

# aws-cli/2.2.23 Python/3.9.6 Darwin/20.6.0 source/x86_64 prompt/off
aws --version
# SAM CLI, version 1.27.2
sam --version
# Docker version 20.10.7, build f0df350
docker --version

Creating the SAM Application and Pipeline

First, create a starter application. I chose amazon/nodejs14.x-base for a base image. Then, run the pipeline command with the --bootstrap flag to configure the CI/CD provider and requisite AWS resources like IAM policies.

sam init
sam pipeline init --bootstrap

The pipeline command walks you through a series of configuration steps. For the CI/CD provider, choose GitHub Actions which is a two-stage pipeline. For each stage, provide the following information:

  • Name (i.e., pre-production, production)
  • Account details (i.e., access keys provided for AWS CLI)
  • Reference application build resources (i.e., pipeline execution role, CloudFormation execution role, S3 bucket for build artifacts, ECR repository for container images)

The pipeline user's access key and secret key will display in the terminal, which will be required for configuring the GitHub Actions. Repeat the steps for the second stage. The CLI creates .aws-sam/pipeline/pipelineconfig.toml to store the configuration.

.aws-sam/pipeline/pipelineconfig.toml
version = 0.1
[default]
[default.pipeline_bootstrap]
[default.pipeline_bootstrap.parameters]
pipeline_user = "arn:aws:iam::123456789199:user/aws-sam-cli-managed-Pre-production-pi-PipelineUser-CGSL85Y74RRL"

[Pre-production]
[Pre-production.pipeline_bootstrap]
[Pre-production.pipeline_bootstrap.parameters]
pipeline_execution_role = "arn:aws:iam::123456789199:role/aws-sam-cli-managed-Pre-prod-PipelineExecutionRole-HKCRZ2IX8SOY"
cloudformation_execution_role = "arn:aws:iam::123456789199:role/aws-sam-cli-managed-Pre-p-CloudFormationExecutionR-1XKKSR1ZGOTH3"
artifacts_bucket = "aws-sam-cli-managed-pre-productio-artifactsbucket-g2pauw42amc"
image_repository = "123456789199.dkr.ecr.us-east-1.amazonaws.com/aws-sam-cli-managed-pre-production-pipeline-resources-imagerepository-qjnaif21ukb0"
region = "us-east-1"

[Production]
[Production.pipeline_bootstrap]
[Production.pipeline_bootstrap.parameters]
pipeline_execution_role = "arn:aws:iam::123456789199:role/aws-sam-cli-managed-Producti-PipelineExecutionRole-1ANR2SNKQD638"
cloudformation_execution_role = "arn:aws:iam::123456789199:role/aws-sam-cli-managed-Produ-CloudFormationExecutionR-17RL86055A01I"
artifacts_bucket = "aws-sam-cli-managed-production-pi-artifactsbucket-177nd7ab4h4bz"
image_repository = "123456789199.dkr.ecr.us-east-1.amazonaws.com/aws-sam-cli-managed-production-pipeline-resources-imagerepository-nhdrmzfnssnr"
region = "us-east-1"

The CLI will prompt you for the secret name to use for the IAM pipeline user in GitHub Actions (i.e., ${{ secrets.AWS_ACCESS_KEY_ID }} instead of a hardcoded value). These credentials should never be exposed in the source code. pipeline.yaml is created in the .github/workflows folder.

.github/workflows/pipeline.yaml
name: Pipeline

on:
push:
branches:
- 'main'
- 'feature**'

env:
PIPELINE_USER_ACCESS_KEY_ID: ${{ secrets.AWS_ACCESS_KEY_ID }}
PIPELINE_USER_SECRET_ACCESS_KEY: ${{ secrets.AWS_SECRET_ACCESS_KEY }}
SAM_TEMPLATE: sam-pipelines-app/template.yaml
TESTING_STACK_NAME: sam-pipelines-app
TESTING_PIPELINE_EXECUTION_ROLE: arn:aws:iam::123456789199:role/aws-sam-cli-managed-Pre-prod-PipelineExecutionRole-HKCRZ2IX8SOY
TESTING_CLOUDFORMATION_EXECUTION_ROLE: arn:aws:iam::123456789199:role/aws-sam-cli-managed-Pre-p-CloudFormationExecutionR-1XKKSR1ZGOTH3
TESTING_ARTIFACTS_BUCKET: aws-sam-cli-managed-pre-productio-artifactsbucket-g2pauw42amc
TESTING_IMAGE_REPOSITORY: 123456789199.dkr.ecr.us-east-1.amazonaws.com/aws-sam-cli-managed-pre-production-pipeline-resources-imagerepository-qjnaif21ukb0
TESTING_REGION: us-east-1
PROD_STACK_NAME: sam-pipelines-app
PROD_PIPELINE_EXECUTION_ROLE: arn:aws:iam::123456789199:role/aws-sam-cli-managed-Producti-PipelineExecutionRole-1ANR2SNKQD638
PROD_CLOUDFORMATION_EXECUTION_ROLE: arn:aws:iam::123456789199:role/aws-sam-cli-managed-Produ-CloudFormationExecutionR-17RL86055A01I
PROD_ARTIFACTS_BUCKET: aws-sam-cli-managed-production-pi-artifactsbucket-177nd7ab4h4bz
PROD_IMAGE_REPOSITORY: 123456789199.dkr.ecr.us-east-1.amazonaws.com/aws-sam-cli-managed-production-pipeline-resources-imagerepository-nhdrmzfnssnr
PROD_REGION: us-east-1

jobs:
test:
runs-on: ubuntu-latest
steps:
- uses: actions/checkout@v2
- run: |
# trigger the tests here

build-and-deploy-feature:
...

build-and-package:
...

deploy-testing:
...

integration-test:
...

deploy-prod:
...

Before pushing the changes to the remote origin, add the IAM pipeline user credentials as secrets in GitHub.

github-actions-secret.png

Adding Approvers

The default pipeline does not have any approval mechanisms in place, so when pushing to main, the application goes directly to production. To add approvers, create an environment in GitHub and add approvers. Then, reference the environment in the pipeline YAML.

.github/workflows/pipeline.yaml
deploy-prod:
if: github.ref == 'refs/heads/main'
needs: [integration-test]
runs-on: ubuntu-latest
environment: production

Feature Branch Environments

For feature branches (i.e., named feature*), the pipeline will create a new CloudFormation stack and deploy the branch automatically. This is powerful for quickly testing in a live environment outside of the two stages created by the pipeline.

feature-branches-action.png

Note that there is no functionality in the default pipeline to delete the CloudFormation stack when the feature branch is deleted.